You’ve just harvested a deer, the freezer is packed, and you’re looking for something to do with those round cuts in those vacuum-sealed bags.
One of the best solutions for that is making venison jerky in the oven!
Making venison jerky requires very little extra cost, and it utilizes cuts of meat that most people would never consider. And even better, you’ll have something to munch on and share that is downright delicious.
Why Make Venison Jerky At Home?
There are several good reasons to make venison jerky at home, instead of purchasing it from a store. Cost is certainly one of them, but at the end of the day, having a say over how your wild game is processed can’t be overstated.
You get to decide how thick the slices are going to be. You get to decide how salty your jerky will be. You get to decide what spices and flavors will be used. Plus, you get the satisfaction of knowing that no artificial preservatives or fillers were used in processing the animal you harvested.
What Cuts Work Best for Venison Jerky
The best cuts for oven jerky are typically those from the hindquarter. Eye of round, top round and bottom round are the best choices, as they are lean, firm and slice easily with minimal waste. Backstraps can be used too, but most hunters prefer using them for other meals.
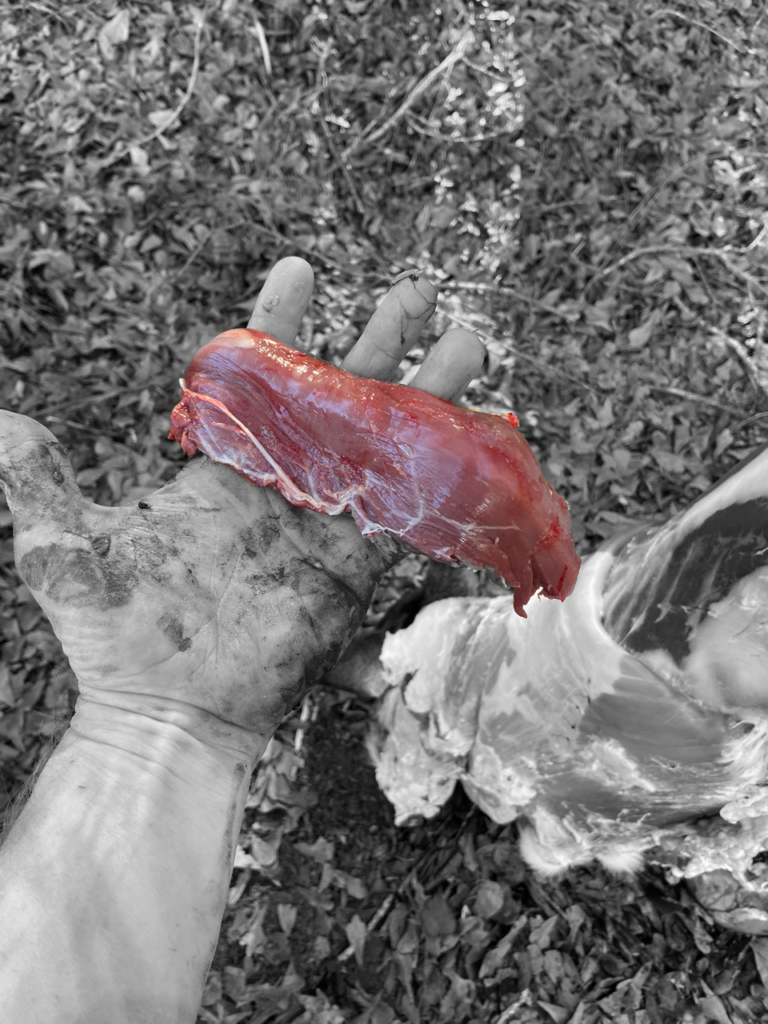
While tenderloin like this is a prize venison cut, it’s actually the hindquarters of the deer that are the best choice for jerky.
Preparing the Venison
When making venison jerky, the quality of your preparation will determine the quality of your product. So, before the marinade, before the oven, before anything, you should spend time preparing at the beginning of the process.
To help ensure the best flavor, be sure to trim up the meat well and discard all silver skin, connective tissue and fatty areas. Fat will not dehydrate like lean muscle will. It remains sticky, reduces the shelf life, and can cause unwanted flavors in the final product.
Slice for Consistency
You can partially freeze trimmed venison before slicing. This strengthens the fibers and makes cutting thin and even cuts much easier.
Cut the meat in 1/8- to 1/4-inch thick slices. Cutting across the grain of the meat will produce jerky that is more tender and easy to chew. Cutting the meat against the grain will produce chewier jerky, which may be preferred by some. Both approaches work.
The Marinade
When making venison jerky, the marinade serves two purposes: It flavors the meat and also helps to keep it from getting dried out. And even better, you don’t have to have an extensive list of ingredients to achieve excellent results.
A Reliable Base Recipe
Here’s a tried and true marinade recipe for 2 pounds of venison:
2/3 cup soy sauce
1/2 cup brown sugar
2 tablespoons Worcestershire sauce
2 teaspoons black pepper
2 teaspoons garlic powder
2 teaspoons onion powder
1 tsp red pepper flakes (optional)
Mix in all ingredients, evenly coating your venison strips. The soy sauce contains salt and is a mild and subtle curer. The brown sugar helps to even out the color and provides a very slight glaze to each strip during drying. For a smokier finish, you can also add smoked paprika.
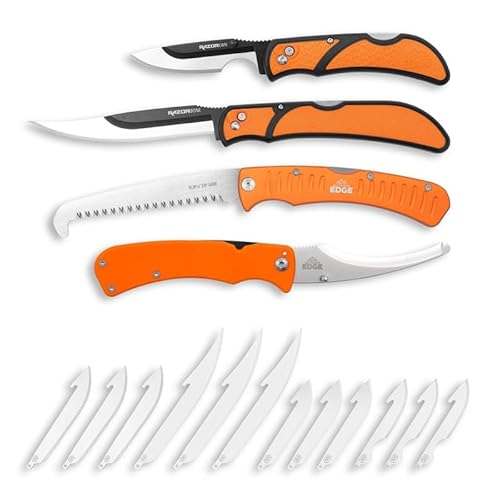
We earn a commission if you make a purchase, at no additional cost to you.
08/16/2026 10:04 pm GMT
Marinating Time
Pour marinade over the strips and refrigerate in a zip-top bag for a minimum of 6 hours. Letting the meat marinate for 12 to 24 hours will produce a deep flavor. Meat can be left to marinate for up to 48 hours but will begin to lose texture beyond that.
During the marination process, be sure to turn the bag over a few times to be sure that the marinade covers every piece of meat in the bag.
Step-by-Step Oven Method
Once the venison has been marinated, follow these steps:
Preheat the oven to its lowest setting, which is typically around 160-170 degrees F. The goal is not to bake the meat, but rather to dehydrate it.
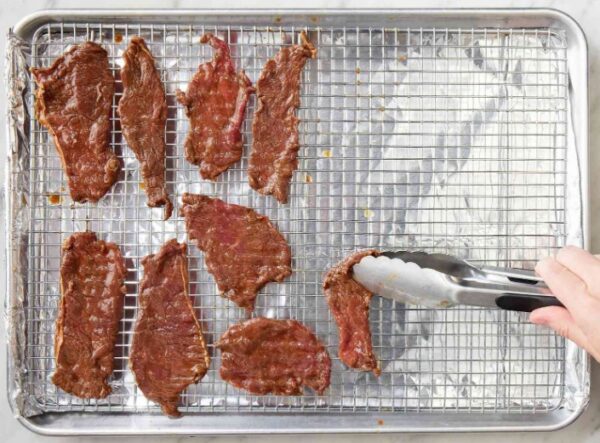
Line a baking sheet with foil and top with a wire cooling rack. The rack raises meat off surface, allowing air flow under each strip of meat.
Dry the meat strips with paper towels. Drying surface moisture in marinades helps the dehydration process to occur faster and helps the final texture of the meat.
Place the strips in the rack, single layer, taking care not to overlap them. Any contact between strips will slow the drying process, causing the consistency of the drying to be uneven.
Keep the door of the oven open a little. Any rolled ball of foil or wooden spoon will work. This is what allows the moisture to escape the oven.
Bake for 3-4 hours. Begin to check at the 3-hour mark (be sure to flip over the strips half way through, to dehydrate them on both sides).
To test, bend a piece. It should bend and break, but not easily split open. If it bends, but doesn’t crack, it will need more cooking time. If it splits, then it’s too dry.
Once strips are past the bend test, bake in oven at 275 degrees F for 10 minutes. This step allows the meat to achieve a safe internal temperature, killing off any bacteria (all homemade jerky should be cooked to 160°F, throughout).
Some Mistakes To Avoid When Making Deer Jerky
There are some common mistakes to avoid when making deer jerky in the oven:
Leaving the meat with the silver skin intact. This dries out into a rubbery, tough mess and cannot be improved with additional oven time.
Forgetting to use paper towels. Wet meat strips will dry much slower, causing the texture to be less desirable.
Racking with strips that overlap. Overlapping meat strips on the rack is the most common reason for batches that dry unevenly.
Having the oven closed completely. If there is no air movement, you are baking instead of dehydrating the meat.
Storing before it is fully cooled. Sealing up warm jerky traps steam inside the bag and will soften it.
Wait until the strips are completely cool before transferring to another container.
Deer jerky may be kept at room temperature for one week in an air-tight container. It can keep in the refrigerator for 2-3 weeks. That can be extended to three to six months using a vacuum sealer and/or a freezer.
The longer the strips, the drier they will be. So, if storing at room temperature is important to you, choose the thinner and drier pieces.
Enjoy Your Harvest All Year With Deer Jerky
When it comes to venison jerky, fancy equipment and complicated recipes just aren’t necessary. You can easily make extra deer meat into something really delicious with a simple marinade, a wire rack, a sharp knife and a low-heat oven.
So, while hunting season is only for a short time, venison jerky can be enjoyed year-round! By following the above simple steps, the marinade balance and the drying process will make for a dependable recipe that can be repeated and enjoyed over and over!
Frequently Asked Questions
Is it necessary to have a dehydrator to dehydrate venison?
No. The kitchen oven on the lowest setting is satisfactory. A propped door and a low heat setting will do the trick.
Is ground venison an option?
Yes. Marinate or shape slices with ground venison instead, using a jerky gun to make even strips and adding the seasonings to the meat.
What if I want to try premium flavors without making my own?
There are a large number of flavors that are already prepared and marvelous in both classic and bold regional flavors. Jerky Brands is one of our favorites.
Why is my jerky chewy in the middle but dry on the outside?
The strips may have been too thick or may have been in contact with the rack. This is almost always fixed by keeping slices 1/4″ thick or thinner and spaced apart with no overlapping.
Hunters spend a large chunk of the year waiting for deer season to begin. And, once it does, early mornings and late afternoons become part of life. This time of year is often marked by that first cup of coffee, the hike-in to the perfect hunting spot, the wait for a whitetail to step into just the right position, so you can settle the crosshairs and enjoy the thrill of a successful hunt.
Seasoned hunters know that simply purchasing top-of-the-line equipment and hauling it into the woods doesn’t necessarily equal success. They also know that the windows of opportunity often occur near dawn and dusk, when deer and other animals are most active.
In this guide, you’ll learn how to maximize low-light hours, choose the right optics, and set up your rifle.
Why the Golden Hours are Prime-Time for Hunting
Crepuscular animals, like deer, are highly active at dawn and dusk. In the early morning hours, they return to their bedding areas after spending the night feeding. Then, after resting under cover for most of the day, they get up and look for food again once the light starts to fade.
Dawn
Deer spend most of the first light heading back to their rest areas after eating vegetation during the night. They feel safer moving in the morning shadows, as cooler temperatures make them even more comfortable. During the rut, they are even more active, as bucks are searching for does to breed.
Dusk
Dusk is quite similar to dawn in that deer, and other animals, feel safer moving when the light is low, and will seek food sources to feed on throughout the night. Deer will often move in groups at dusk to graze and return to their bedding areas at dawn. This is another good time to observe or hunt deer, as they are most active and visible (always be sure to check your local game laws for legal shooting hours).
How to Overcome the Low-Light Hunting Challenge
While dawn and dusk may be some of the best times to put eyes on deer, they can also be difficult times to identify targets and judge distance, due to the low-light condition. But, there are ways for hunters to overcome this challenge.
1. Use Objective Lens Diameter
The objective lens diameter, measured in millimeters, is the size of the lens of your optic that is farthest from your eye and faces the object you are observing. The objective lens gathers incoming light and focuses it, to provide a bright and clear image. So, when you see specs of a set of binoculars that say 10×28, the objective lens diameter would be denoted by the 28. This measurement dictates the optic’s light-gathering power, resolution, and overall physical bulk. When it comes to purchasing an optic for low-light hunting, larger lenses may be heavier and more expensive, but they also let in more light for brighter vision and a clearer view of your target. They also deliver better use of higher magnifications and improve scope alignment time for faster target acquisition.
When looking for a lens to purchase, go for an objective lens diameter of around 50mm to 56mm to guarantee a larger exit pupil at bigger magnifications. Keep in mind that these lenses can be bulkier than most, so plan accordingly.
2. Exit Pupil Diameter
Exit pupil is the diameter of the light beam that passes through the optic and into your eye. It determines the target image’s brightness.
Ideally, the exit pupil of your optic should be the same size or bigger than the pupil size of your eyefor maximum brightness and visibility. Our pupils tend to enlarge, or dilate, in low-light situations to a maximum diameter of about 4-8mm. This means that the ideal exit pupil diameter for low-light hunting is 5mm to 7mm. This delivers the maximum amount of light for your vision.
3. Use Lens Coatings
A lens coating is a thin film applied to an optic’s surface to reduce reflections, maximize light transmission, and provide specialized outer layers that protect the glass from scuffing or scraping.
While there is a vast range of coating types and levels available, the best option for low-light hunting is a fully multi-coated optic with anti-reflective coatings to reduce reflection and increase light transmission. For context, fully multi-coated means that all the optics’ air-to-glass surfaces have several layers of anti-reflective coatings. This delivers the maximum light needed for low-light hunting success.
Along with your lens coatings, look for high-quality glass, which maximizes light transmission and quality, helping you to distinguish animal outlines from their surroundings.
Types of Magnification Ranges for Low Light
When hunting in low light, it is typical for hunters to use lower magnification ranges. These magnification ranges can be fixed or variable.
1. Fixed Magnification:
Fixed magnification means the scope has only one magnification, which cannot be changed. They are lighter, due to the lower amount of internal glass lenses, and more portable, but not as versatile. Popular fixed magnification configurations are 8×56 and 7×50.
2. Variable Magnification:
Variable magnification allows hunters to adjust magnification based on target distance. For low-light settings, look for magnification ranges of 2.5-10x or 3-9x. These ranges allow for lower magnification, which increases the exit pupil diameter for a brighter image, plus the right amount of zoom for medium distances.
How to Set Up Your Rifle Up for Low-Light Excellence
Optimizing your rifle for the best possible low-light hunting outcome involves careful attention to the interface between the hunter and the optic. For a successful hunt, a hunter needs to be able to fully see their target without being hampered by their equipment.
1. Use Optics for Low Light Hunting
The two most relevant choices for low-light hunting are red dot sights and low-power variable optics.
Red Dot Sights
Red dot sights are extremely popular with modern hunters. Light is projected from an LED, which is then reflected toward your eye by the front lens. Red dot sights make aiming easier and allow you to keep both eyes open for increased focus and reduce human error, as long as the dot is on the target. This is ideal for low-light hunting, as a red dot is simpler to see than standard sights in these conditions.
LPVO
An LPVO, or Low Power Variable Optic, is a type of riflescope that usually offers a magnification range of 1x to 6x but can be adjusted higher. They are versatile in that they deliver high precision for both close and long-range shots. With a simple turn of a dial, these riflescopes allow quick magnification adjustments and feature an etched reticle.
An etched reticle is an aiming line directly engraved onto the lens glass, providing shock resistance and durability, and can be used to aim if the battery fails. Many LPVOs also come with illuminated reticles to improve visibility considerably in low-light conditions.
If you are looking for close-range accuracy in low-light settings, a red dot sight delivers faster target acquisition and ease of use. However, if you’re looking to be more accurate in fading light at longer ranges, an LPVO with enhanced magnification is the wiser choice.
2. Consider the Mounting Height
After you have selected your optics, the next thing to consider is the mounting height.
In low light, it is common for hunters to use a larger objective lens diameter, meaning your riflescope should be mounted higher to avoid the objective bell coming into contact with the barrel. Getting this right ensures proper eye relief, which affects how quickly and comfortably you can spot a target in fading light.
Generally, mounting heights range from 0.75 to 2.33 inches. To stay comfortable while shooting, use medium-to-high mounting rings. For bolt-action rifles, 1 to 1.2 inches are more effective, while for flat-top rifles, look for mounting rings in the 1.4 to 1.6-inch range.
3. Eye-Relief Considerations
Eye relief refers to the space between your eye and the eyepiece of a rifle scope in which you can maintain a clear view. It affects your comfort, target acquisition speed, and accuracy. Modern rifle scopes offer eye relief of between approximately 3 and 4 inches, meaning if your eye is too far forward or back from this “sweet spot,” the image you see will begin to distort or develop dark shadows around the edges.
You can ensure perfect eye relief by following these steps. For practical reasons, try to do this with a friend or expert nearby:
Unload your rifle, keep your finger off the trigger, and point it in a safe direction. Set your scope to its highest magnification.
Then, move the rifle up to your shoulder, settle into a comfortable cheek weld on the stock, close your eyes, and then draw your rifle to aim. Closing your eyes prevents you from subconsciously adjusting your position.
While keeping your head absolutely still, open your aiming eye. You should see a full, clear image. If you do not, you need to adjust your scope.
To adjust, stay in this position and have a friend or expert adjust the scope. Loosen the scope rings and slide them back and forth until a full, clear view comes into your frame. Once you find this, tighten the mount.
Tip: Do this test as if you were out in the backcountry. Wear your full gear to simulate real hunting conditions. This will help you identify issues before hunting day, and more importantly, allow you to fine tune your setup to what works.
Low-Light Hunting Field Setup Tips
In most areas of life, preparation is everything. This is no different in hunting. For success during the “golden hours” of dawn and dusk, you need to do your homework before heading out.
Here are some tips to increase your chances of success:
1. Scout Your Location
This may not always be possible, depending on how far you live from where you plan on hunting. But if it is in the vicinity, it is useful to spend some time out in the field for a few days or weeks before the hunt.
Take note of the trails and terrain, the vegetation, spoor (animal droppings), tracks, and anything else you think is important. Also, keep an eye on how the target animals move, where they bed, and where they feed. This will maximize your readiness when it comes time to hunt.
2. Practice Makes Perfect
If you plan to shoot in low-light conditions, you need to practice in them. This builds your experience, improves your accuracy, and refines your instincts in darker conditions. This leads to faster target acquisition while out in the field, increasing the chance of an ethical shot.
Tip: Place your practice targets at different distances and use targets of various sizes, shapes, and colors to better simulate the conditions you will face at dawn or dusk.
3. Position Yourself Strategically
While hunting at dawn or dusk, you can use the sun’s position to your advantage. Shadows created by the rising or setting sun can obscure a crafty hunter’s position from observant prey. This allows you to get closer to your target undetected.
In addition, try to keep the sun at your back wherever possible, as this keeps you concealed in the shadows while illuminating your target. It also decreases strain on your eyes and prevents you from staring into the sun.
The time of day you plan to shoot determines how you set up:
Dawn
This is the time of day when deer are returning to their bedding areas after spending the night feeding and foraging. Try to arrive at your spot (as quietly as possible) half an hour to an hour before sunrise to allow yourself time to set up and get settled. Set your stand or blind up near a food or water source, or about 100-200 yards from where the animals bed down.
When approaching your spot, take note of the wind to make sure your scent isn’t blowing toward where you believe the target is. Also, when setting up, ensure you use as much natural cover as possible and have a clear shot path.
Dusk
For hunting at dusk, it is pivotal that you research local hunting laws first. Some locations require specific permits or restrict the usage of specialized optics.
And while hunting, prioritize ethical shots to ensure the target is harvested as humanely as possible (this applies to dawn hunting as well). Use optics with light-gathering capabilities and position yourself strategically between where the target animals bed and where they eat.
In addition, be as quiet as possible and use natural cover to conceal yourself from the target.
As mentioned previously, pay close attention to the wind, and, more importantly, be patient. Most crepuscular animals only emerge from the thick brush minutes before the end of legal shooting time, when it is far darker.
4. Consider your Clothing
When hunting in low-light conditions, wear clothing that can help conceal you from animals. Also, try not to wear clothing that gives off a “shine” or “glare”. Go for high-contrast camouflaged clothing made of fleece or lightweight synthetic blends for concealment and flexibility.
If you expect a change in weather, wear highly weather-resistant fabrics so you are dry, warm, and comfortable in the rain or snow. Keep in mind that wool is an excellent choice for sound control while moving or in pursuit. For thebest “invisible and comfortable” feel, go for merino wool as it stays warm even when wet and is naturally scent-resistant.
5. Choose the Right Gear
The right optics are equally important for gathering the light needed to make a clean, ethical shot. You can use:
Large objective lens diameters in the 50mm to 56mm range to allow more ambient light in.
Illuminated reticles or red dot sights to allow you to find your aim more quickly and provide increased contrast against dark targets.
A fully multi-coated lens makes sure that as much available light as possible reaches your eye.
Depending on how much you can carry and the length of your hunt, it’s advisable to bring other necessary items such as:
A GPS tracker to keep track of where you are, or a reflective tape
A powerful flashlight (1,000+ lumens) for visibility and any potential tracking after a shot.
Extra batteries and a power bank for longer hunts
A first-aid kit for emergencies.
Recommended Low-Light Hunting Optics
The best low-light hunting optics prioritize large objective lenses and illuminated reticles because they deliver peak performance in dim conditions.
If you’re looking for a comprehensive range of premium hunting optics and accessories, one place to check out is freedomgorilla.com. They offer some of the best prices, as well as personalized advice on which optics to choose for hunting.
Here are some of the best low-light hunting optics that you might find there or other sites:
1. Leupold VX-5HD 3-15×56
The Leupold VX-5HD offers a 3-15x magnification range and delivers exceptional reliability and performance in any hunting situation. Its FireDot illuminated reticle has multiple brightness settings, so you never lose it in low-light conditions.
This riflescope also delivers exceptional clarity and glare reduction for sharp images in harsh, direct light, as well as high accuracy for any type of shot.
2. Vortex Viper PST Gen II 1-6×24
If you’re looking for a budget-friendly option that delivers brilliant low-light performance, the Vortex Viper PST Gen II is a good bet. This optic has an illuminated reticle, fast-focus eyepiece, and premium anti-reflective lens coatings. It’s designed to withstand a range of weather conditions and deliver clear, high-contrast images.
The Vortex Viper PST GenII also offers 1-6x magnification, which is perfect for low- to medium-range targets.
3. Trijicon AccuPoint 2.5-10×56
The Trijicon AccuPoint 2.5 is known for its extreme light-gathering ability and 56mm objective lens. It features multiple lens coatings and high-quality glass for a clear, high-contrast image in low-light settings.
Also, it has a large exit pupil of 5.6mm for precise and comfortable viewing even in challenging lighting conditions. This scope comes with fiber optics and tritium for an always-on, vivid aiming point.
4. Sig Sauer Tango SPR 4-16×44
Another budget-friendly option is the Sig Sauer Tango SPR. It comes with a factory-installed SPR mount to attach to your rifle right out of the box.
Also, it features high-quality glass and advanced lens coatings that preserve clarity and brightness throughout the entire magnification range.
Taking Full Advantage of Low-Light Hunting
Low-light hunting is demanding. So, get the optics you are comfortable with and that accommodate your preferred shooting range and time. Also, make time to practice with them at least 3 – 4 times before heading out into the field. And with the tips above, you’re definitely on the path to success when hunting at dawn, dusk, or both!
Adventure trips into the great outdoors often begin long before sunrise. Hunters may be driving to a private land or public land hunting spot. Anglers may be towing a boat toward a quiet launch, and campers may be heading down unfamiliar roads with gear packed tight. In cities and towns where rail traffic is part of daily movement, those same travel habits can bring outdoor enthusiasts close to busy crossings before they ever reach the woods, water, or trail.
Why Railroad Crossing Safety Matters for Outdoor Travelers
Railroad crossings deserve the same attention to detail as weather, road conditions, and gear checks. A missed signal, a rushed turn, or a moment of distraction near the tracks can lead to life-changing consequences. This is especially true for travelers moving between urban rail corridors and rural outdoor destinations, where crossings may look very different from one road to the next.
Some crossings have gates, flashing lights, and clear markings. Others may have only signs, limited lighting, or poor visibility because of trees, curves, hills, or bad weather. The safest approach is simple: treat every railroad crossing as active, slow down before reaching the tracks, and assume a train could arrive at any time.
Why Hunters, Anglers, Campers, and Hikers Face Higher Risks Near Railroad Crossings
Many outdoor enthusiasts leave home in the early morning, when visibility is low and fatigue can affect reaction time. These conditions can make crossings more dangerous, especially on unfamiliar rural roads.
Additionally, hunters and anglers frequently tow boats, utility trailers, campers, or ATVs. Extra weight changes braking distance and limits how quickly a vehicle can move across tracks. A driver who misjudges the distance or speed of an approaching train may not have enough time to react safely.
Backroads leading to fishing areas, hunting property, and campsites can also include passive crossings. These may not have flashing lights or gates. Instead, drivers may only see a crossbuck sign or pavement marking before reaching the tracks. In wooded areas or farmland, visibility may be limited by trees, curves, tall grass, or uneven terrain.
Navigation apps can create another hazard. Looking down for even a few seconds near a railroad crossing can prevent a driver from noticing warning lights, train horns, or approaching rail traffic. Fog, rain, snow, and ice can further reduce visibility and increase stopping distance.
Rushing to arrive before sunrise can also lead to risky decisions. Some travelers try to beat crossing gates or move too quickly through unfamiliar intersections because they are focused on reaching a trailhead, boat launch, or hunting spot before daylight. The reality is that railroad crossings require patience and full attention regardless of how empty the road may appear.
Warning Signs Every Outdoor Traveler Should Understand
Many railroad crossing accidents happen because drivers fail to recognize or properly respond to warning signs. Outdoor travelers who spend time on rural roads should understand what these signals mean before heading out on a trip.
The most common railroad crossing sign is the crossbuck. This white X-shaped sign marks the location where railroad tracks cross the road. Drivers should treat it as a warning to slow down, look both ways, and prepare to stop if necessary.
Some crossings include flashing red lights and crossing gates. When lights begin flashing, it means a train is approaching. Drivers should stop immediately and remain behind the marked line until the train has passed and the signals stop. Trying to drive around lowered gates is extremely dangerous and illegal in many states.
Outdoor travelers may also encounter multiple-track crossings. After one train clears the crossing, another may still be approaching on a separate track. Drivers should wait until all tracks are fully clear before moving forward.
Pavement markings, stop lines, bells, and electronic warning systems can also help drivers recognize a crossing in advance. During rain, snow, or low-light conditions, these warnings may be harder to see or hear, which makes reducing speed even more important.
Tracks that appear unused may still carry active rail traffic. Freight trains can operate at any hour, and some trains move more quietly than people expect.
Safe Driving Habits When Approaching Railroad Tracks
Drivers heading toward outdoor destinations should approach every railroad crossing with caution, even when the area appears quiet or isolated. Trains move faster than many people realize, and their stopping distance is far longer than that of passenger vehicles.
Reducing speed before reaching the tracks gives drivers more time to react to warning lights, gates, or an approaching train. This becomes especially important when towing campers, boats, or utility trailers because heavier loads require greater stopping distance.
At crossings without gates or flashing lights, it is important to stop if visibility is limited. Rolling down the windows can help drivers hear train horns or track vibrations that may not be noticeable inside the vehicle.
Distractions should also be kept to a minimum near railroad tracks. Adjusting GPS directions, checking phones, eating, or searching for gear can take attention away from warning signs during critical moments.
Travelers driving through rail-heavy regions should remain especially alert because of the higher volume of train activity compared to many smaller towns and rural communities. Serious collisions in these areas can lead to catastrophic injuries, long-term medical complications, and difficult legal questions involving rail operators, crossing equipment, and roadway conditions. If you were heading to a rural part of Illinois through a big city like Chicago, you would simply want to see Chicago in your rearview, not dialing 911 and a Chicago train accident lawyer due to a railway accident.
We earn a commission if you make a purchase, at no additional cost to you.
08/17/2026 12:03 am GMT
What To Do Immediately After a Railroad Crossing Accident
In the extremely unfortunate event of a railroad crossing accident, the first priority is getting away from immediate danger. If the vehicle is on or near the tracks and it is possible to move safely, everyone should exit and get clear of the crossing. Tracks can remain dangerous after the first impact because another train may be approaching.
Call 911 as soon as possible. Emergency responders can secure the scene, provide medical care, and contact the proper rail authorities. Even if injuries seem minor, medical evaluation is important because pain, head injuries, back injuries, and internal trauma may not be obvious right away.
Anyone involved should document the scene when it is safe to do so. Photos and videos can help show the position of the vehicle, damage, crossing gates, signal lights, weather conditions, road markings, blocked views, and nearby signs. These details may become important later if questions arise about how the accident happened.
Parents should always keep children and pets away from railroad crossings and rail-adjacent trails. Curiosity, headphones, distractions, and uneven terrain can reduce awareness near active tracks. Maintaining a safe distance is one of the simplest ways to prevent serious injuries.
Witness information can also be valuable. Names, phone numbers, and brief statements from people who saw the collision may help clarify whether signals were working, whether gates lowered properly, or whether visibility was limited.
Extra Railroad Safety Tips for Hikers and Campers
Railroad safety applies to more than drivers. Hikers, campers, anglers, and outdoor photographers can also place themselves at risk when traveling near tracks, bridges, or rail corridors.
Always avoid walking directly on railroad tracks. Tracks, ties, and surrounding gravel can become slippery or unstable, especially after rain or during cold weather. Trains may also approach more quietly than expected, particularly in open outdoor areas where sound carries differently.
Outdoor adventurers should never use railroad bridges or tunnels as shortcuts. These structures are designed for trains, not pedestrians, and many leave little room to escape if a train approaches unexpectedly. Even bridges that appear abandoned may still carry active rail traffic.
Fishing areas near tracks can also create additional danger. Some rivers, creeks, and waterfront access points are located close to rail corridors, particularly near industrial areas and older transportation routes around larger cities. Campers and anglers should stay alert to warning signs and avoid setting up equipment too close to active tracks.
Anyone walking near roads or crossings during low-light conditions should wear reflective or brightly colored clothing whenever possible. Flashlights and headlamps can help improve visibility for both pedestrians and drivers.
Planning Safer Outdoor Routes Before You Travel
A safer outdoor trip begins before the vehicle leaves the driveway. Reviewing the route in advance can help travelers identify railroad crossings, rural intersections, gravel roads, and areas where visibility may be limited.
Outdoor travelers should look for major crossings near trailheads, boat launches, campsites, hunting leases, and public land access points. When a route includes several crossings, it may be worth choosing a slightly longer path with better lighting, clearer signs, or active gates.
Attention to the weather should also be part of the travel plan. Fog, heavy rain, snow, and ice can make railroad crossings harder to see and can increase stopping distance. Drivers towing boats, campers, or gear trailers should allow extra room to slow down before tracks.
Sharing travel plans with someone at home is also a smart habit, especially when heading into remote areas. A simple route, destination, and expected return time can help others respond faster if something goes wrong.
Emergency supplies should be easy to reach rather than buried under gear. A flashlight, reflective vest, first-aid kit, phone charger, water, and basic tools can make a difference after a roadside emergency. Packing reliable survival essentials can also help outdoor travelers stay prepared when delays, breakdowns, or accidents happen far from help.
Railroad crossings should be treated as part of the overall travel plan. Again, the same care that goes into checking weather, gear, maps, and licenses should also apply to every road and crossing along the way.
Railroad Crossing Safety and Awareness Should Be Part of Every Outdoor Trip
According to published crossing accident statistics, railroad collisions continue to cause serious injuries and fatalities across both urban and rural areas every year. Outdoor lovers who regularly drive unfamiliar roads should understand that even remote crossings can present substantial danger when visibility, weather, or distractions become factors.
Railroad crossings should be part of every outdoor traveler’s safety plan. Whether the trip leads to a hunting lease, fishing spot, campsite, hiking trail, or remote cabin, the roads along the way can carry risks that deserve full attention.
Slowing down near tracks, watching for warning signs, avoiding distractions, and planning safer routes can reduce the chance of a serious accident. These habits matter even more when traveling in the dark, towing equipment, or driving through unfamiliar areas.
Outdoor safety begins long before reaching the destination. By treating railroad crossings with caution and respecting the power of trains, travelers can help protect themselves, their passengers, and everyone sharing the road.