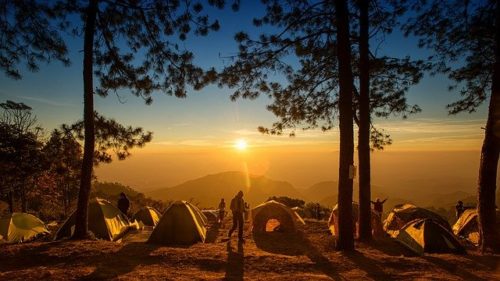
One of the best ways to get closer to nature and spend valuable time with the family is camping.
Camping brings you to unique places and gives you access to the beauty that can often be ignored in the midst of a busy life.
When preparing to go camping, there is so much gear and so many factors to keep in mind. With food, water, clothes, and so much else on the docket, it does not take much for something to escape your mind.
Which tent will you choose for your camping adventure? We’ll cover some of the best options… keep reading!
One item that absolutely cannot go unnoticed is your tent. When tent camping, your shelter is the biggest thing that protects you from the outside elements. Without it, the trip can become miserable and even dangerous.
Now, good tents are not very cheap, so it is truly an investment. In order to get the most out of that investment, you should know what you’re looking for and what the market can offer.
So, here are the best tents for camping in every scenario… Let’s get started!
You can jump straight to the type of tent you are looking for by clicking the links below:
- Best Budget Tent
- Best Tents For Family Camping
- Best Backpacking Tents
- Best Tent For Travel
- Best Weather-Ready Tent
- Best Luxury Tent
- Best Tents For Camping With Dogs
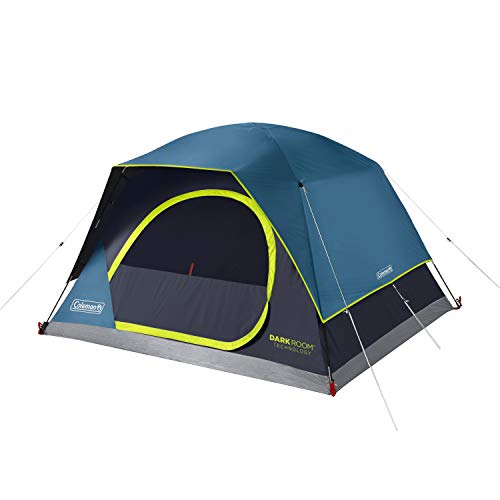
Coleman Skydome | Best Tent On A Budget
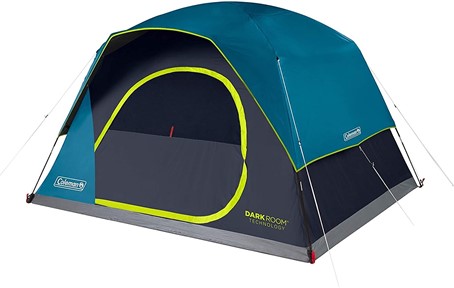
The Coleman Skydome tent scores high in affordability and comes in 2, 4, 6, and 8-person versions.
The first tent on our list is also the best budget tent we will look at. The Coleman Skydome tent is very affordable and comes in sizes for two, four, six, and eight people. Just specify your tent to the group size that you usually go out with.
This is also a great beginner tent as it is super easy to set up and store. So, if you are looking for something steady that will not break the bank, the Skydome is a great option. And, because it comes in models that have a higher capacity, it’s a great option for tent camping with a family.
Pros of the Coleman Skydome:
- Very affordable
- Can be spacious with the larger capacity models
- Very easy to set up
Cons of the Coleman Skydome:
- Not the most durable tent
- Poles are quite cheap
- There is only one door, so ease of use can be tricky
-
Product on sale
 N1 Outdoors® “Sunset Mountain” Tee$15.00
 -
Product on sale
 N1 Outdoors® “Lumber Mountain” Tee (Various Colors)$9.00
 -
 N1 Outdoors® Mountain Colors Tee (Various Colors)Price range: $24.99 through $28.99
Best Tents For Family Camping
Camping with family is a great time to experience the great outdoors with loved ones. Let’s take a peek at some of the best tent options for family camping…
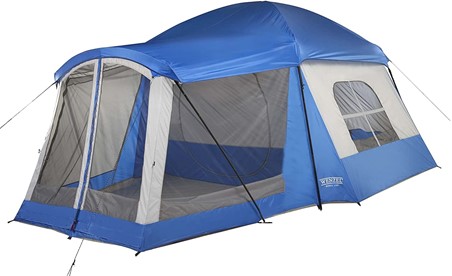
leman Weathermaster
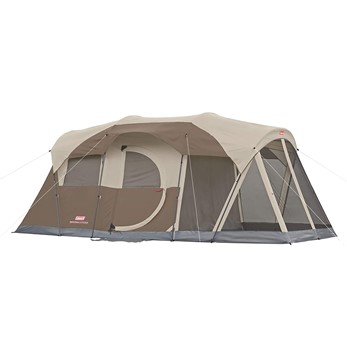
The Coleman Weathermaster tent will not only comfortably hold 6 people, but is tall enough for all of them to stand up.
Coleman is a brand that will be mentioned more than once on this list as it can keep costs low and inside space high. After all, these are two really solid attributes you need for a good family tent.
The Weathermaster is a 6-person tent that has a complete screen room for added convenience. When it can hold six people and is tall enough for many to stand in with no issues, you have a really good family tent. You can even fit two queen-sized air mattresses in the main room.
Pros:
- Incredibly spacious and tall tent big enough to fit the whole family
- Strong frame
- Fully screened-in porch
- Comfortably fits six people
Cons:
- Quite heavy, so good with car camping and not so much for camping on a weight limit
- Good rainfly, but there are cases of areas being compromised in heavy rain
#ad

Core 9-Person Extended Dome Tent
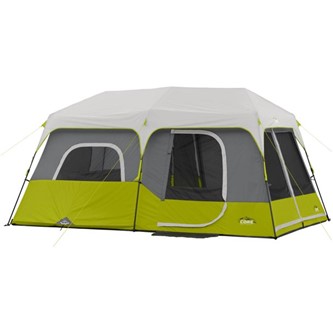
The Core 9-person Extended Dome tent is a super spacious option with great ventilation.
If you need to really take it up a notch in terms of capacity, the Core 9-Person Extended Dome Tent is made for you. Not only can it fit a larger number of people, but the tent is very roomy and also affordable.
The Core brand is very affordable while still providing really good quality tents. Nine people is a lot to pack into a tent, so a good way to get the most out of the experience is by camping with 5-6 people instead of nine. This ensures everyone is comfortable and safe.
Pros:
- Very spacious
- Extended dome allows for even more space
- Really good ventilation
- Very affordable
Cons:
- Very heavy due to the size
- Cases of water leaking in the corners known in some situations
#ad

REI Co-op Kingdom
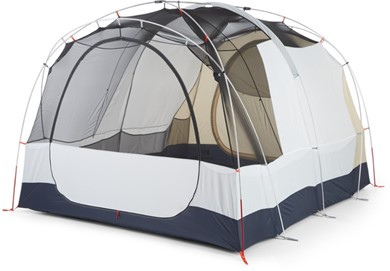
The REI Co-op Kingdom tent is a high-end option built to last.
REI is one of the world’s leading outdoor retailers, and their lines of products are of super high quality. The REI Co-op tents are incredible options that range from large, family-style tents to ultralight backpacking ones. So, if you like one in this line, you can cater to all avenues of camping right there.
The Kingdom line has sizes ranging from 4-8 people, so you can get one that best fits your needs on the trail. This is a fairly high-end tent that will cost a good amount, but can last a long time.
Pros:
- Very tall and spacious
- Big enough for the whole family
- Comes in a few variations that can be specified for size
- Very strong build
Cons:
- Quite pricey
- Can be heavy for the six and eight-person models
Caddis Rapid 6
The Caddis Rapid 6 tent has some of the best weatherproofing available.
If you love your tent to have a substantial height, the Caddis Rapid 6 is the way to go. This is a tall, wide tent that offers room for up to six people at once. Now, it may be a bit tight with six people packed into it, but if you have only four or five, you will be really living the life.
Although this is a pretty heavy tent, it is perfect for car camping with the whole family. It is also super easy to set up and enjoy fully.
Pros:
- Very family-friendly
- Comes from a reliable brand
- Reinforced corners and seems to provide the best weatherproofing possible
Cons:
- Somewhat pricey
- Very heavy and bulky
- There is no vestibule
-
 N1 Outdoors® USA Flag Leather Patch Hat$29.99
 -
Product on sale
 N1 Logo Leather Patch Hat (Mossy Oak Bottomland)Original price was: $26.99.$19.99Current price is: $19.99.
The North Face Wawona 4
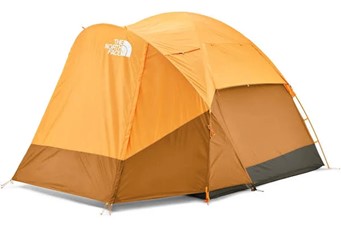
At 11 pounds, the Wawona 4 from The North Face is a light option for a family of four.
Although The North Face is best known for its outdoor apparel, the tent department can also bring the goods. When you can invest in a tent brand of this quality, you know the customer experience and service both will be up to par.
The Wawona 4 specifically is great for smaller families that still want to be conscious about the size and weight of the setup. With it weighing about 11 pounds, it is nowhere near backcountry light, but to fit four people, it is quite light.
Pros:
- Fairly light considering the size
- Fits four people
- Has a good amount of in-tent storage
Cons:
- Four people will be a bit crammed
- Not the tallest option out there

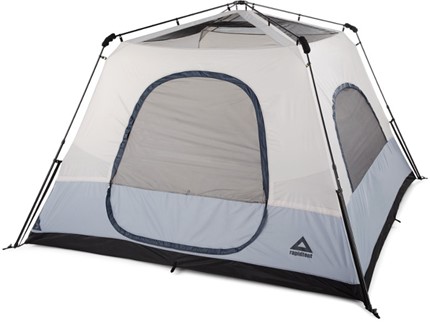
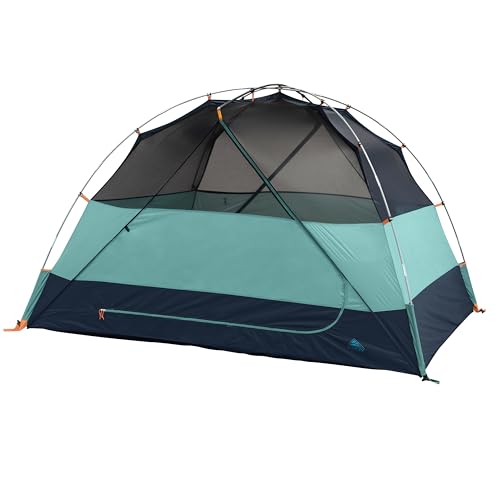
Eureka Copper Canyon LX

The Eureka Copper Canyon LX will hold 6 people and made of high-quality, weatherproof materials.
One way to really up the ante is by getting a 6-person tent with plenty of room. The Eureka Copper Canyon LX is a fantastic family tent as it is spacious, strong, and built for real camping. That being considered, it is quite heavy, so camping out of your car would be best.
Unfortunately, there is only one door and no vestibule, so you are missing out on a couple of key options. Overall, Eureka is a great brand, but the Copper Canyon does lack a couple of key aspects.
Pros:
- Comes in four and six person variables
- Comes from a reputable brand.
- High quality materials that are waterproof
Cons:
- Does not have a vestibule
- There is only one door, so getting out can be a pain
- The rainfly does not have great coverage
#ad

REI Co-op Grand Hut
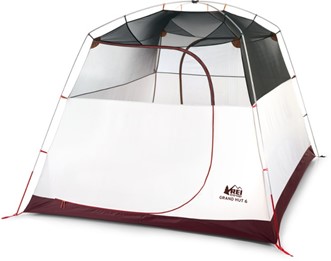
The REI Co-op Grand Hut holds six and sports a large rain fly for great weatherproof protection.
We round out our list with the REI Co-op Grand Hut. This is a great family tent as it can hold six people in total but four people is the number for really good comfort.
The Grand Hut has four standard walls and a pretty high ceiling. One of the shining stars is the rain fly. It is large and thick to provide the best protection possible. Plus, it is long enough to create a nice vestibule.
Pros:
- Of great quality and a reputable brand
- Fairly affordable for the quality
- High quality rainfly
Cons:
- Not very light, but is very good for car camping
Best Backpacking Tents
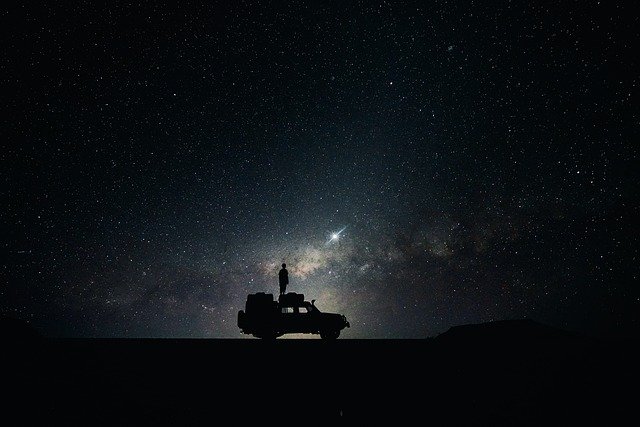
One of the best ways to experience nature in a unique way backpacking. Packing up your gear and hitting the backcountry will put you in places that you could only imagine and that pictures just won’t do justice!
So, let’s cover the best backpacking tents in the game right now. Investing in a quality backpacking tent will transform your experience and put you in the best possible position for backpacking success.
Here are the best backpacking tents for various scenarios…
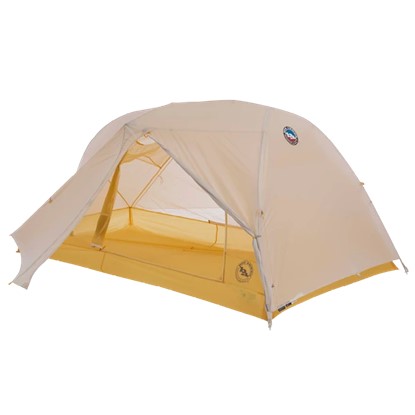
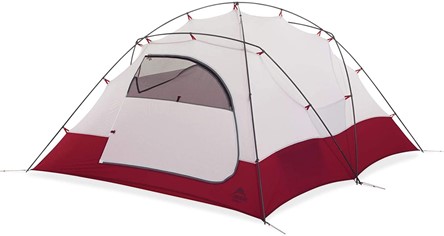
Big Agnes Copper Spur HV UL2 – Best 2-person Backpacking Tent
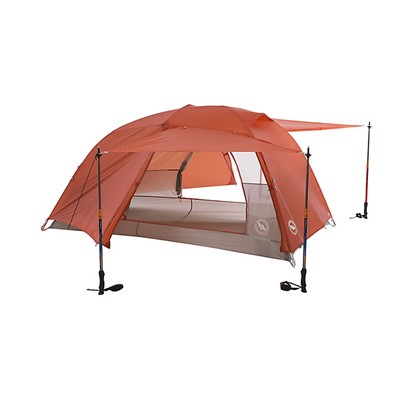
The Big Agnes Copper Spur HV UL2 weighs just over 1 lb and can sleep two people comfortably.
No list of the best backpacking tents is complete without the Big Agnes Copper Spur HV UL2 making an appearance.
It’s acclaim and reputation is why it landed in the top spot on our list. Weighing just over a pound and being able to fit two people comfortably, it is hard to go wrong with this one. It’s light weight makes it perfect for backpack hunting trips and other adventures where travelling as light as possible is a must.
This tent compacts down super well and is one of the best backpacking tents for two people. It covers pretty much any situation in which you would need to bear the conditions and hold up for a night.
There are doors on both sides with vestibules created by the rain fly to provide ease of use for everyone.
Pros of the Big Agnes Copper Spur HV UL2:
- Plenty of space for two people
- Lots of built-in storage
- Lightweight despite the size
Cons of the Big Agnes Copper Spur HV UL2:
- Small foot taper
- Can be considered pricey to more budget-conscious backpackers

REI Co-op Passage 2- Best Backpacking Tent on a Budget
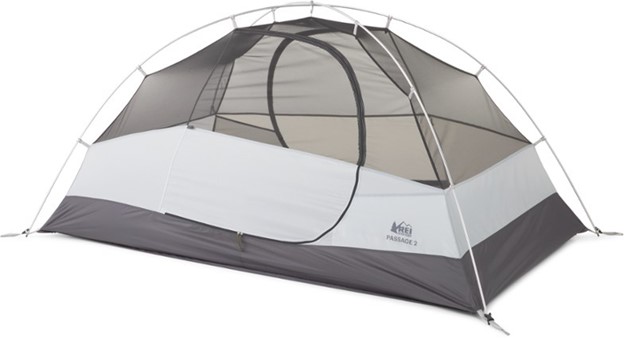
The REI Co-Op Passage 2 is great for the budget-conscious backpacker and is very user-friendly.
REI is one of the leading outdoor retailers in the game, and over time, they have developed a great deal of their own equipment. The REI Co-op Passage 2 is one of the best backpacking tents on a budget.
Coming in at 5 pounds 7 ounces, this is a steady option for those who cannot spend a ton of money on a tent that is lighter and pricier. If you fall into the middle of the road in terms of wants, needs, and budget, this is an excellent option.
There are just two poles and two doors that open all the way up. Overall, the user experience with the Passage 2 is incredibly consistent and user friendly.
Pros of REI Co-Op Passage 2:
- Very affordable
- Roomy enough for two people, with doors on both sides
- Super functional
Cons of REI Co-Op Passage 2
- Does have cheaper, more mass-released materials
- Has a heavier weight than some backpacking options
Big Agnes Tiger Wall UL2
The Big Agnes Tiger Wall UL2 is perfect for the backpackers who are looking to shave every ounce possible off the weight, yet have a high ceiling.
As one of the best lightweight backpacking tents, the Big Agnes Tiger Wall UL2 is an awesome option for those who really want to trim the fat on the pack’s weight.
Once again, Big Agnes makes its appearance on the list as the product is of extremely good quality.
Coming in at just 2 pounds, 9 ounces, this is the best lightweight backpacking tent listed today. Outfitted with a tall ceiling and a very compact size when packed down, this tent is a great option for the hardcore backpackers who fret over every ounce.
Pros of the Big Agnes Tiger Wall UL2:
- Super lightweight and compact to allow weight ot be dispersed in other ways
- Fairly durable despite the weight
- High ceilings to provide for easier movement
Cons of the Big Agnes Tiger Wall UL2:
- Can be a bit tricky to set up
- Build causes water to sometimes breach the walls

NEMO Dragonfly 2
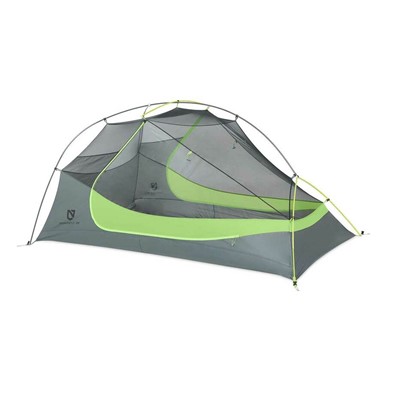
The Nemo Dragonfly 2 is lightweight, comfortable and durable.
One of the most balanced and well-rounded options is the NEMO Dragonfly 2. With a light weight, high comfort and great durability, you really have it all. Now, this will come at a higher price, so keep that in mind.
This is the tent that probably has the best vestibule setup. When you get the rain fly affixed correctly, you will have a good amount of covered room to get ready before hitting the elements outside. The pole design also is there to provide a ton of durability in high wind.
Pros of the NEMO Dragonfly 2:
- Very well-rounded and covers all the bases
- Super durable to withstand many situations
- Build creates for the maximum water and weather resistance
Cons of the NEMO Dragonfly 2:
- Pricey
- Can be difficult to find in stock in some places

MSR Hubba Hubba NX1 – Best 1-Person Backpacking Tent

The MSR Hubba Hubba NX 1 weighs just under 4 lbs and is spacious and durable.
The best 1-person backpacking tent today is the MSR Hubba Hubba NX 1. Coming in at just under 4 pounds, you are getting a very durable tent that is for those who know they don’t need to waste effort on extra space.
The design is unique in the sense that it is made to maximize the space given. 1-person tents are known to be very tight, but the Hubba Hubba is known to be quite spacious. Plus, there are doors and vestibules on both sides for ultimate ease of use.
Pros of the NSR Hubba Hubba NX1:
- Lightweight and spacious
- Very durable and outfitted with dual vestibules to escape the elements
Cons of the NSR Hubba Hubba NX1:
- Slightly heavy for just 1-person usage
- Quite expensive

Sea to Summit Telos TR3 – Best 3-person Backpacking Tent
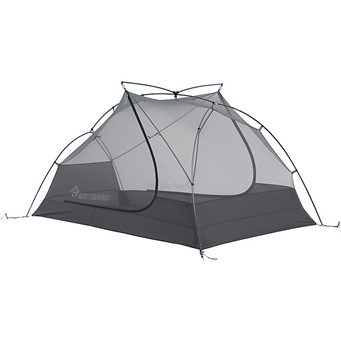
The Sea To Summit Telos TR2 has extra headroom and high quality craftsmanship.
Sea to Summit has been a steady brand in the outdoor space for a long time. So, it is only fitting that it makes today’s list of the best backpacking tents.
The Telos TR3 is a fantastic tent that is one of the best backpacking tents for three people. With the extra room and relatively low weight, you really get a good value with this one.
One aspect that makes it a great 3-person backpacking tent is the high ceiling. The pole structure allows for some extra head room, which is a really nice perk. Although the price is high, the space and quality are of a really high caliber
Pros of the Telos TR3:
- Big enough for two or three people tent camping at once
- Very easy to construct
- Double doors and vestibules
Cons of the Telos TR3:
- Can be considered pricey
- A little heavy

REI Co-Op Half Dome | Lightweight And Strong Backpacking Tent

The REI Co-Op Half Dome offers good weatherproofing and is lightweight and strong.
Although a retailer, REI has developed some of the best camping items on the market. So, going with their products is a great investment. The REI Co-op Half Dome is one of the many Co-op models that is a great option.
The Half Dome has options for two or three people and is all about staying lightweight while also being strong.
If you want a crossover tent that could be used for short backpacking trips if you would like. If you need something beefier to leave in your car, this is still a good option, but being lightweight is an important part of the build.
Pros of the REI Co-Op Half Dome:
- Aluminum poles for strength and saving weight
- Good for two or three people at once
- Offers good weatherproofing
- Lightweight and compacts well
Cons of the REI Co-Op Half Dome:
- Pricey
- Not incredibly reinforced
- Not overly spacious for non-backpacking endeavors
Kelty Wireless | Best Tent For Travel
The Kelty Wireless tent is spacious and is good for travel and easy to set up.
Kelty is an outdoor brand best known for making really good quality backpacks, but their tents are great too. The Wireless is a solid overall tent for those who want a larger design that has more inside space. This is a great tent for camping out of your car as weight and space can become an issue.
This is a steady tent that is made to fit six people. There are double doors with their own vestibules, so getting in and out could not be easier. If you want to really take advantage of the space, only use it for a couple of people.
Pros of the Kelty Wireless:
- Very affordable for the size
- Spacious and comfortable for moving around
- Very easy to set up and travel with
Cons of the Kelty Wireless:
- Poles are cheaply made, so you may want to upgrade them down the line
- Does not have the best ventilation
- Some aspects of the fabric are cheap
The North Face Wawona | Best Weather-Ready Tent

The North Face Wawona has great durability for tough weather conditions.
If you are camping with family or just need a good amount of room, The North Face Wawona is the way to go. Being made for six people, it does not shy away from being a big tent for many people.
One thing that The North Face tents are known for is durability. These things can withstand the high winds and wild elements, which is a really big aspect to consider. It is simply a steady tent that can handle what you give it.
Pros of The North Face Wawona:
- Very durable in many weather conditions
- High quality rainfly
- Very spacious and can fit the whole family
Cons of The North Face Wawona:
- Fairly expensive
- Only one door
- Can be a bit difficult to set up

Coleman Octagon | Best Luxury Tent
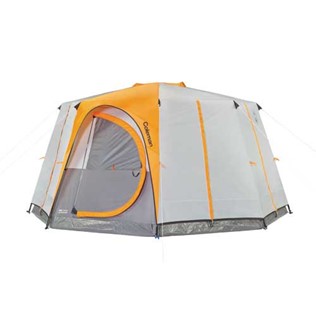
If a luxury tent is what you’re looking for, the Coleman Octagon might be what you need.
If you are looking for more of a luxurious camping experience, you may need a luxury tent. Luxury tents are large and spacious enough to fit cots, air mattresses, or anything else you need to elevate that experience.
The best budget luxury tent is the Coleman Octagon. This can fit up to eight people, but 4-6 people allows for the most spacious use of the tent.
Pros of the Coleman Octagon:
- Very spacious and will fit the whole family
- Incredibly affordable
Cons of the Coleman Octagon:
- Very bulky and heavy
- Difficult setup due to the size

Best Tents For Camping With Dogs
Taking your furry friend into the wilderness with you can be such a unique and fun experience. And while some areas will not allow pets on the trails or in the campsites, where it is permitted can be super fun and enjoyable.
When bringing a dog camping, there are a few aspects you need to keep in mind. Having dog food, a water bowl, and a few other items will ensure that your dog is safe and happy. You must also have a tent that caters to both you and your best friend.
So, let’s cover the best tents for camping with dogs!
MSR Expedition Remote 4
The MSR Expedition Remote 4 has extra padding and insulation to keep you and your dog comfy and warm!
MSR is a fantastic backcountry brand that makes excellent tents. When it comes to camping with your dog, You will need that extra room to be comfortable. Although this option is fairly expensive, it provides incredible quality.
One aspect unique to MSR is the winterizing factor. The extra material and padding allows for much better insulation and heat trapping during those cold months.
That durability also translates to ensuring that your dog’s nails won’t completely tear up the fabric. When it is strong enough to handle it, you won’t have to worry about this aspect.
Pros:
- Very durable and dog-friendly
- Great for winter camping
- Plenty of room for you and your dog
- High reputation in the outdoor space
Cons:
- High price point
- Can be warm in the summer

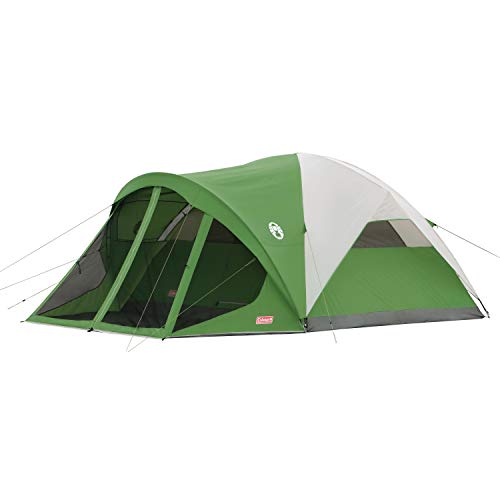
Coleman 6-Person Dome Tent
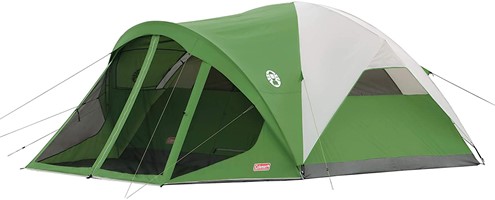
The Coleman 6-person Dome Tent provides not only ample space, but provides a large screened area where you can feed your dog.
You definitely need to make sure that there is plenty of space between you, your dog, and anyone else who is going with you. If you are crammed with an antsy dog, it can make for a long night.
So, the Coleman 6-person dome tent will have more than enough room for everyone. This tent has a ton of space and keeps things simple and affordable. It is easy to set up and is still very weatherproof.
One of the big selling points alongside the size, is the vestibule. There is a large screened area in front of the tent that makes camping with a dog very convenient. This area can be used to clean up or feed the dog before jumping into the tent.
Pros:
- Extremely affordable for the size
- Plenty of room for you and your dog
- Reinforced corners to keep rain out and heat in
- Super easy to set up
- Clovered vestibule area
Cons:
- Not the most durable tent
- The screened portion can be susceptible to to the elements
Coleman Steel Creek Dome Tent
The Coleman Steel Creek Dome Tent is an affordable option providing space and functionality.
As we stick with Coleman, you can see that this brand focuses on functionality, space, and affordability. Those three functions are top priorities when camping with dogs. So, the Coleman Steel Creek dome tent follows those points to a tee.
A big part of this tent’s identity is the fast pitch design. You can set it up fully in a matter of minutes and dedicate the rest of the time to enjoying nature.
This is also a 6-person tent, so there is plenty of room inside. They also do a good job of weatherproofing the fly and corners, so there will not be water seeping in during the night.
Pros:
- Very spacious design
- Has fast-pitch technology for ultimate ease of use
- Good weatherproofing and solid materials.
- Very affordable
Cons:
- Quite heavy due to the materials used

PetEgo U Pet Portable Tent
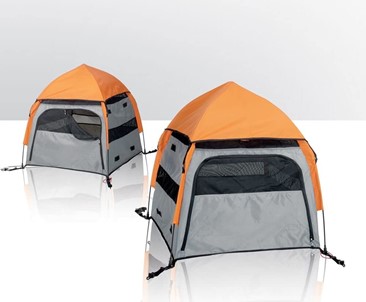
The PetEgo Portable Tent is made specifically for pets, including claw proof floors and mesh windows.
One brand that is specific to dog camping is the PetEgo Portable Tent. Because the brand specifically caters to pets, you know you have something that can work with you and your dog on the trail. This is a super easy tent to pop up and get you and the dog out of the elements.
It is also outfitted with claw-proof floors, so there is no worry about ripping up the materials. There are mesh windows on the sides that can provide air flow if you so wish. Overall, this is a decent tent that is made to withstand your pet and their needs.
Pros:
- Pet-friendly due to the company and branding
- Rip-proof floor materials
- Spacious enough for a dog of basically any size
- Comes in three sizes
- Very light and compact
Cons:
- Not very much extra room
- Only designed to cover the dog, not the owner

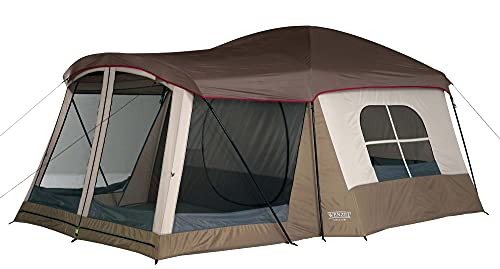
Wenzel 8-Person Klondike
The Wenzel 8-Person Klondike provides maximum space for you, your family and your dog to move around comfortably.
The best tent on our list for many people camping at once is the Wenzel 8-Person Klondike tent. With a large inside and very spacious vestibule, this is an excellent option for dog owners. With that space, you will not feel cramped, and your dog can feel as comfortable as possible.
It is 6’6” tall, so the normal person and dog can both stand and move around comfortably. So, you can pack yourself, your dog, and some other people all in the same tent!
Pros:
- Incredibly spacious
- Very affordable for the size
- Has a large vestibule for added convenience
- Great for car camping
Cons:
- Quite heavy despite the size.
- Can be overkill if you will camp with smaller numbers of people.
Moon Lence Camping Tent
The Moon Lence Camping Tent is our pick for the best lightweight and compact tent for camping with your dog.
As our pick for the best lightweight, compact tent for camping with a dog, the Moon Lence tent is an awesome option. Now, this is designed specifically for people who are camping solo with their dog. It is a 2-person tent by design, but your dog will take up one of those spots.
It weighs just over five pounds while still having room for you and your furry friend. If you are doing some backcountry camping or you really need to save weight, this is the option for you. It is a dome tent with a small vestibule on the side. It has good ventilation and is roomy enough to get by when saving weight.
Pros:
- Very lightweight and compact
- Weatherproof and has proper ventilation
- Good for backpacking with a dog
Cons:
- Not very spacious
- Very small vestibule

Best Tents For Camping Final Thoughts
Hopefully, this recap has given you some key information to help you make a decision on the best tents for your specific type of camping adventure… and there are so many adventures out there!
Be safe, and get out and enjoy God’s creation!