hand holding antlers

Scent control in deer hunting | How to hunt the wind so you can see and harvest more deer

So, what’s the big deal with deer hunting and all this “upwind” and “downwind” talk?

Every year hunters make mistakes by not paying attention to wind direction. You can have all the deer in the world on your property. You can have all the “best” and most expensive hunting gear.

whitetail buck standing in field

When it comes to harvesting mature whitetails, you had better be on your A-game when it comes to scent control and wind direction.

But, if you don’t pay attention to wind direction, you will be severely limiting your chances of harvesting a whitetail.

So, let’s learn how to hunt the wind, so that you can give yourself the best chance for hunting success while in the field.

Wind direction doesn’t really matter when hunting whitetail deer… does it?

You’ve probably heard stories of the hunter who rolls out of bed, goes through the local breakfast joint drive-through and gets a greasy sausage biscuit and drives to the hunting land.

Then, gets out of the truck, rides his/her 4-wheeler straight to the bottom of the tree they plan to hunt, ascend, light up a cigarette and shoot the biggest buck of their life.

6-point buck

Don’t just think about where the wind is right for you to hunt… think about where the wind is right for a buck, and then figure out how you can get in and out of that area to hunt him without him knowing.

Then, when the subject of scent control and wind direction in deer hunting comes up, they point to the wall hanger in the den and say something like, “pffffft, I never pay attention to the wind and you can see I’m doing just fine.”

Sure these stories are out there, but don’t be fooled. A mature whitetail didn’t become mature by “throwing caution to the wind.” A whitetail’s nose is its best defense and you are one of the most offensive smells around.

So, if you hope to have sustained success in the deer woods, you need to be serious about scent control. For bowhunters, who typically need to get a close shot to get the kill, it’s even more critical.


#ad


What is “upwind” and “downwind” in hunting?

So, if you’re still reading, you must want to learn about how to hunt the wind in a way that keeps your scent away from a buck’s nose.

When it comes to wind direction, the key is to stay “downwind” of the deer you are hunting. But, what does “downwind” and “upwind” really mean?

How to “hunt the wind”

Being “downwind” of a deer means that if you were looking straight at the deer you hope to shoot, the wind would be blowing in your face. Thus, the wind would be blowing your scent away from the deer.

Conversely, if you were “upwind” of the deer, the wind would carry your scent “downwind” toward the deer (not what you want).

So, you want the deer to be upwind of you, and you want to be downwind of them. Got it?

Let’s take a look at the diagram below, which might help clear things up.

hunting wind direction graphic

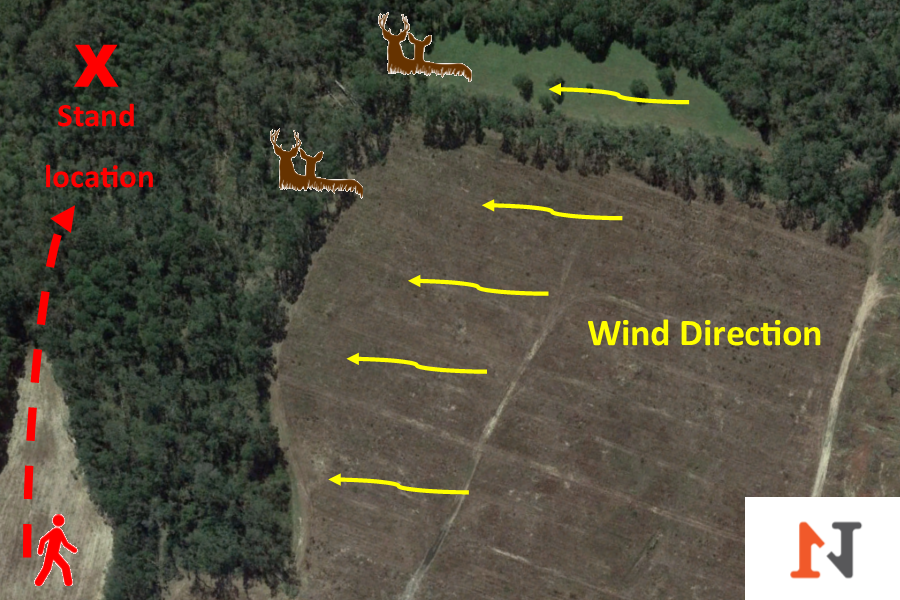
In this graphic, the yellow indicates wind direction. If deer are typically in the location indicated in this graphic, a hunter would want to approach the stand location from the “downwind” side of the deer, so they would not be alerted by the hunter’s scent.


It’s not just about being in the stand

So, let’s say you are in the stand (or from the ground) and you’re overlooking a field where you know the deer feed. You are downwind of where you think the deer will eventually be. You are golden, right?

Well, maybe not.

You’re scent doesn’t just matter when you are in the deer stand. It matters well before you even sat down!


Entry and exit routes when hunting

One thing deer hunters often ignore is how their entry and exit to and from their deer stand impacts the deer they are hunting.

So, the hunt actually begins before you take one step toward your hunting location.

When you are making your way to your deer stand, the wind is carrying your scent just as it does from the stand.

So, unless you want your hunt to end before it even gets started, you need to be sure that you have thought through the wind direction as it pertains to how you are going to get to your stand.

ladder stand pic

If you are going to use the wind to your advantage, your hunt begins long before you actually sit down in your stand.

This means you need to know where the deer typically are during the time you plan to enter. Are they bedding? Are they feeding? Where are these locations in regard to your entry route?

And it’s the same for your exit route. If your scent gets blown toward the deer when you leave your stand, you have just educated those deer to your location.

So, if you are trying to avoid danger, are you going to continue to go back to where the danger is every day? Well, neither would a deer. They are trying to stay alive and that means avoiding the danger, which in this case, is YOU!

So, be sure you are paying attention to wind direction as it pertains to your entry and exit routes.


X-Stand Treestands The Comrade X 18' Two Man Ladderstand, Black
Buy Now
We earn a commission if you make a purchase, at no additional cost to you.


How to fool a deer’s nose… well…

Let’s be clear, you can never truly “fool a deer’s nose.”

But, there are some things you can do to make it harder for them to bust you.

whitetail buck in grass

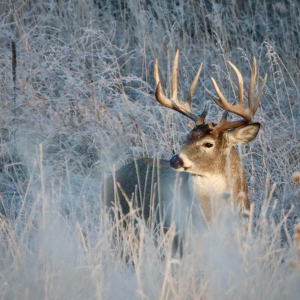
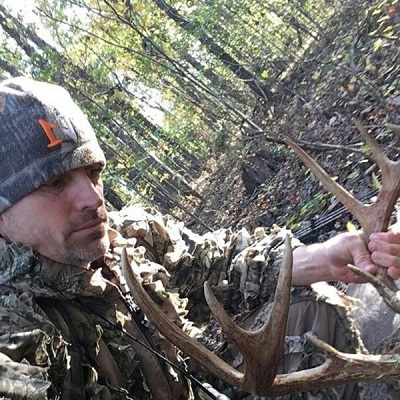
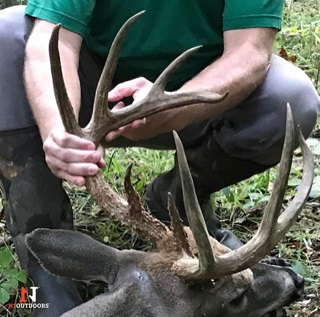
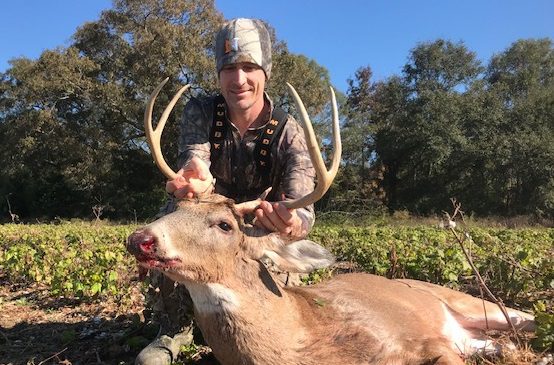
You can never totally fool a buck’s nose, but you should do everything you can to make things more difficult for him to bust you. (photo by Jeff Coldwell)

Kill that clothing scent

Take a whiff of your laundry detergent. Smells nice, doesn’t it?

Not to a deer.

What might smell great to you could make a deer want to leave the county. So, what can you do about that?

It’s a good idea to wash your clothes in a scent-free detergent. Baking soda is also a good scent “eliminator.” There are lots of these types of scent-killing hunting detergents on the market, so you’ll have no trouble finding them at you local sporting goods store.


Shower, for goodness sake!

Should you shower? For everyone’s sake, YES!

But, when it comes to deer hunting, that sweet smell of typical detergents that we discussed above… you want to avoid that in your shower soap as well.

Be sure to get a good scent-killing soap to use when showering before the hunt. And, don’t be afraid to be generous. You’re after an animal that lives and dies by its nose, so give yourself the best chance possible to NOT STINK!


Pitts are the pitts… don’t ignore them

Once you’re done showering, one more precaution you can take is to use a scent-free/scent-killing deodorant. There are lots of options out there.

Don’t forget to really scour those armpits. That is where a lot of the scent-causing bacteria is going to congregate, so be sure to cover ’em good!


Sweat the details, but please don’t sweat…

Sweat is your enemy.

When you sweat, odor follows. And, if you’ve been paying attention so far, you know that is not what you want when hunting deer.

So, how can you avoid sweating?

Well, one thing to be careful of is how much clothing you wear when you are walking to and from your stand or hunting location.

But, what if it’s cold outside?


Don’t let THIS happen to you while hunting!


Well, of course you want to have hunting clothing that will keep you warm in cold weather, but that doesn’t mean you have to wear all of it while you are walking to and from your stand or hunting location.

Plus, if you sweat on your way to the stand in an attempt to stay warm, you are going to end up being cold anyway when the sweat cools your body down. Nothing like being we in cold weather, right?


Many hunters are hunting on public land, which can mean a long trek to the final hunting destination. So, if you have a long walk to where you are headed and know you are going to work up a sweat, consider starting out by removing a layer or two. You might be a little bit cold when you start walking, but your body will warm up as you get moving.

Then, once you arrive at your stand or hunting location, you can put the layers back on, so that you will stay warm during the hunt. By doing this, you not only will be warmer, but you’ll avoid much of the odor that sweating causes.

This could be the difference in having hunting success… or getting busted.


SCENTBLOCKER Scent Blocker Dead Quiet Suit Jacket & Pant, Realtree Xtra, XX-Large
Buy Now
We earn a commission if you make a purchase, at no additional cost to you.


Clothe your body with… nothing

No, don’t hunt naked.

But clothe your body with the most “invisible” clothing possible.

This means wearing scent control clothing and using scent killing sprays.

Scent control is a big market in hunting apparel world, and there are a wide variety of options to choose from. So, take advantage of some the products that can help shield human scent.

It’s also a good idea to spray down your clothing, as well as your boots and gear with a scent elimination spray.


“But, isn’t all of this overkill?”

Well, remember, wind direction is the most important scent control tactic you need to pay attention to, but if you can gain any kind of advantage in harvesting a whitetail (especially a mature buck), should you do it?

Use cover scents

The use of covers scents can be helpful in shielding a deer from your scent. There are a variety of cover scents available, such as racoon or fox urine, acorn scent, pine, etc.

Just be sure to native to your area. So, if there are no oak trees in your area and you use an acorn cover scent, this could have the opposite effect you are intending.

A deer may be on high alert when smelling this, since it is not a smell they are used to in that particular area. So, take care in choosing the “right” cover scent.


Conclusion

So, remember, paying attention to the wind direction is paramount in your quest to consistently give yourself a chance to see deer.

Hopefully, when the moment of truth comes, you’ll shoot straight!

Hunt safely and good luck out there!

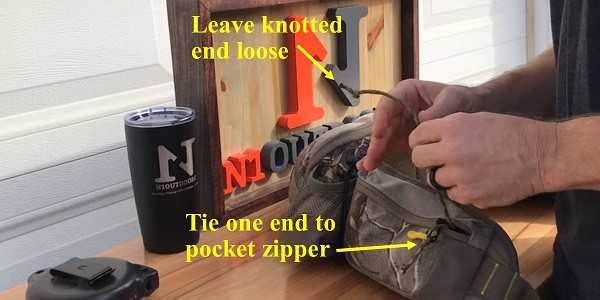
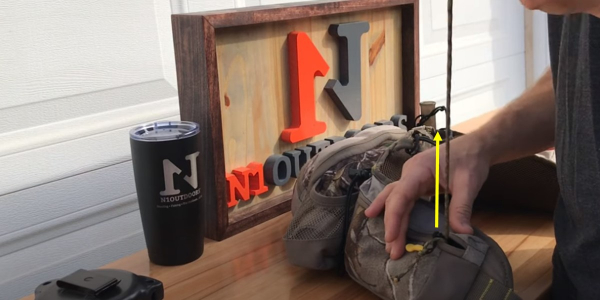
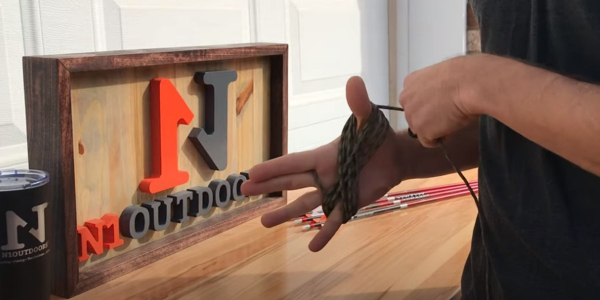
Check out the video below and learn how to play the wind to your advantage for better whitetail deer hunting success!

(Wind Direction video transcript)

>>Read about all the N1 shirt designs

Find out what deer hunting and playing the lottery have in common. Stick with us for the N1 Outdoors N1 Minute.

Suppose I knew the five winging numbers to the lottery and all you had to do was guess the order they go into to win. How many of you would refuse that information and instead, decide to guess the numbers yourself and the order they go in?

Hopefully none of you, but that’s exactly what many deer hunters do every season by not paying attention to the wind.

Wind direction is critical in deer hunting

All the scouting and trail can picture is in the world won’t make up for poor planning when it comes to wind direction.

For you bow hunters out there, it’s even more critical. Always be aware of which way the wind is blowing, not only in regards to stand location, but also in relation to the entry and exit routes to and from your stand or hunting location. The last thing you want is for your hunt to end with deer blowing before it even gets started.

Stay downwind of the deer in all situations. For those of you not familiar with the terms “upwind” and “downwind,” an easy way to remember, is to be sure the wind is in your face when approaching and hunting your favorite trail or location.

Paying careful attention to wind direction certainly won’t help you win the lottery, but when combined with effective scouting, planning and accuracy, it will increase your chances of seeing and taking more deer.

We hope you have a great week and remember… “where the moments happen, we’ll meet you there.” We’ll see you next time.

header image for pull up rope

Hunting problem solved! | DIY tangle-free pull-up rope for your gun or bow

It’s an issue affecting a deer stand hunters that rarely gets talked about but can be very frustrating…

It’s getting your bow or gun up to you in the deer stand.

A pull-up rope or paracord is often the method of choice; tie the rope to the bow or gun and then pull it up to you in the stand. Easy enough, right?

Well, in theory, yes. But here’s the problem… You stuff the rope in your pocket and when you pull it out, it’s all tangled.

Stop this madness!

tangled paracord
I needed a tangle-free pull-up rope solution!

So, I’m going to show you how to make a tangle-free pull-up rope for your bow or gun that will easily unwind and not get tangled.

Hunting gadgets can be problematic

I bowhunt… a lot.

I used to hate having my pull-up rope tangled when I pulled it out of my pocket. There is nothing more frustrating than needing to quickly and quietly get up in your deer stand and then have to spend extra time untangling your pull-up rope.

Something had to give.

So, for years I used a gadget called a hunting hoist. It worked well enough, But, it was an extra 1-2 pounds of gear that I didn’t want to be weighed down by when walking to my stand. Also, the thing stip-like nylon material made a very unnatural noise when retracting.

hunting hoist for pulling up bow or gun to deer stand
For many years I used a hunting “hoist” like this, but the weight and unwanted noise made me look for other alternatives.

It’s hard enough to kill a deer. I don’t need any extra noises making it more difficult.


So I made another change.


#ad

Bushnell 4x21 Hunting Laser Rangefinder Bone Collector Edition in Realtree Xtra Camo
$103.43
Buy Now
We earn a commission if you make a purchase, at no additional cost to you.
03/07/2024 01:56 am GMT

I needed a pull-up rope for my bow that wouldn’t get all knotted up

I wanted to get rid of the unwanted noise as well as the extra weight. So, here’s what I use now and it works like a charm.

No tangles, no mess, and I don’t have to deal with any unwanted noise.


How to make your own tangle-free pull-up rope for your bow or gun [step-by-step]

So the first thing you’re going to need is some paracord. I like to use 1/8-inch paracord. It’s big enough to do what I need to do, but it’s also not so bulky that it can’t be handled easily.

1-8-inch paracord for tangle free pull up hunting rope
I prefer using 1/8″ paracord for my pull-up ropes. It strong, but also not too bulky.

Now, I cut the paracord to 30-feet, simply because when I’m using a climbing stand, I like to climb a bit high in the tree when bowhunting. The last thing I want is to have 20 feet of this rope and climb to 25 feet in the tree and have my bow hanging 5 feet off the ground because I didn’t have enough rope.

So, keep in mind how high you typically climb or how high your fixed tree stand is when making this rope.

I like to carry a waist pack to hold a few extras, like spare broadheads for the hunt, a rangefinder, a few extra lighted nocks, and some other odds and ends.

So, in this example, I’m going to show you how I incorporate that pack into making my pull-up rope.


#ad


Time needed: 2 minutes

Here’s how you can make your own tangle-free pull-up rope for your bow or gun so that you can easily and quietly raise your bow or gun to your deer stand.

  1. Tie a knot in one of the tag ends

    Take one end of your paracord and tie a small overhand knot.

    paracord tag end for tangle free pull up rope

  2. Put knotted end between index and middle fingers

    Take the knotted end that you just tied in step 1 and put it between your index and middle fingers. This will serve as somewhat of an “anchor.”

    putting paracord in between fingers for gun and bow tangle free pull up rope

  3. Begin the “figure 8”

    With the knotted end anchored between your fingers, take the paracord and wrap it around your little finger first and then around your thumb and back around your little finger.

    paracord figure 8 for pull up rope

  4. Continue “figure 8” to desired length.

    Repeat the process from step 3 until the rope is at the desired length for what you will need to lift your bow or gun up to your tree stand height.

    wrapping paracord in figure 8 for bow pull up rope that wont tangle

  5. Remove “figure 8” rope from your hand

    Once you have come to the end of your rope (pun intended), pull the it off your hand, keeping it in the same “figure 8” form it was while on your hand.

    removing rope from fingers for pull up rope

  6. Wrap remainder of paracord around the center of the “figure 8.”

    Once you have removed the paracord from your fingers, take the length that is left and wrap it a few times around the center of the “figure 8” bundle of paracord.

    wrapping tag end of tangle free pull up rope around itself

  7. Put paracord bundle in your hunting pack pocket

    Take the neat bundle of paracord that you have and tuck it into the pocket of your hunting pack. Be sure to leave both tag ends handing out of the pocket.

    putting paracord in pack pocket

  8. Tie the non-knotted end of the paracord to the zipper or other part of the hunting pack.

    Take the non-knotted end of the paracord and tie it to the zipper of the hunting pack pocket and zip shut, leaving a small opening for the knotted end to hang out.

    ends of paracord when in pocket

  9. Knotted end is ready to be pulled out of pack.

    Tie the knotted end of the paracord to your gun or bow. As you are climbing the tree or ladder stand that you will hunt from, the paracord will begin to come out of your bag, TANGLE FREE!

    pulling pull up rope out of hunting pack

  10. Putting the paracord back

    When your hunt is over and you have descended from the treestand, simply repeat steps 1-8 and your tangle-free pull-up rope will be all ready for your next hunt!

    wrapping paracord in figure 8 for tangle free pull up rope for bow


Video instructions on how to make a tangle-free pull up hunting rope.

Conclusion

So, there you have it. A tangle-free pull-up rope for your bow or gun that will neatly stow away in your pack and easily unwind without the tangled mess.

And maybe the best part? You can do all this for a couple of dollars.

Now you can focus on harvesting a deer without getting all tangled up!

Giles Canter of N1 outdoors with archery buck
Giles Canter of N1 Outdoors
how to make a european mount

DIY Deer Skull | How To Make Your Own European Mount

Have you ever wanted to learn how to make your very own European mount of your recent big game harvest But weren’t sure where to start? We’ll show you how easy it is!

6-point buck

The European mount is a great option for a buck you won’t be taking to the taxidermist. And, it can be done very inexpensively.

The European Mount | A Great DIY Opportunity

On a recent bow hunt trip to South Georgia, my partners and I had identified a wide 6-point with spindly antlers and very small brow tines, as a buck that we felt like would be a good one to go ahead and harvest if given the opportunity.

Well, that opportunity presented itself the very next morning, as I was able to able to take this buck with my bow at about 12 yards, which is always fun and always a blessing.

However, this management buck was not one I was going to take to the the taxidermist.

So, we felt like this would be a great opportunity to show those of you at home how to do your very own European mount.

The “euro mount” process is not near as difficult as it might seem. You can do the entire process as home for as little as $10.

How Much Will It Cost To Do A European Mount?

You might be wondering, how much will it cost to do a European mount? Well, if you’re willing to do it yourself, you can use some supplies you already have around that house and most likely do your own for about $10!

So, let’s take a look at what you’ll need…

Supplies You’ll Need To Make A European Deer Mount

We’ve got a few essential materials that you will need to do European mount. I will go through those with you in just a second.

I want you to know that I’m not a taxidermist. I’m not a professional doing this. But, I have done it several times and over the years and through trial and error, have figured out some of the best practices in doing a Euro mount.

items for euro mount

It doesn’t have to be expensive! You can make your own Euro mount for around $10!

I’ve gotten the product where it has turned out almost as good as what you would get from a taxidermist. So, hopefully this video helps you out.

A few supplies that you are going to need to the European mount are obviously, a knife to skin the head from the skull, a good set of forceps, a screw driver.

You will also need two quarts of hydrogen peroxide and some liquid dish soap. You’ll also need some dark wood stain, masking tape, clear shrink wrap, and a pitcher or a big cup to add water to the pot as it’s boiling.

  • Knife for skinning
  • Forceps
  • Screwdriver
  • 2 Quarts Hydrogen Peroxide
  • Liquid Dish Soap
  • Dark Wood Stain
  • Masking Tape
  • Clear Shrink Wrap
  • Water Pitcher

#ad


How To Make A Euro Mount Step-By-Step

boiling deer skull

In just 5 hours, you can have a European mount for your deer skull that you can be proud of.

Time needed: 5 hours

How to do your own European mount…

  1. Remove the skin of the deer head

    Using your knife, remove the skin from the deer head and remove the lower jaw.

  2. Boil the skull

    Add 1/4 cup (for other measurements, you can convert ml to mg also) of liquid dish soap to the water in the pot you will boil the skull in. On a very slow boil, simmer the skull for 4 hours.

  3. Remove tissue

    After you remove the skull from the water, use your knife and forceps to remove eyes, tissue and tendons from the skull. Use the screwdriver to remove the ear buds so you can access the brain cavity. Remove the sinus tissue with the forceps. Use a water hose to spray in the brain cavity to remove the brain tissue.

  4. Add Peroxide

    Add 2 quarts of hydrogen peroxide to your boiling water.

  5. Wrap antlers

    Use shrink wrap to wrap around the bases of the antlers to protect them from being bleached. Secure the plastic wrap with masking tape.

  6. Boil skull again for 30 minutes

    Put the skull back in the water containing the peroxide for another 30 minutes.

  7. Remove shrink wrap and touch up as needed

    Remove the deer skull from the boiling water and touch up the bases of the antlers with the dark wood stain if there has been any bleaching.

Read a more detailed set of instructions on making the Euro mount in the sections below:


>> Get the Nside scoop on all the N1 Outdoors apparel!

Time Requirements

This whole process will take about 5 hours. You will boil the skull on a very low boil for 4 hours. Then, you’ll need to budget about 30 minutes or an hour for cleanup and for bleaching the skull (bleaching will take about 30 minutes.)

The key to the process is the 4 hour boiling time. If you do it for 3 hours, it’s not going to come off as good. Slow simmer for 4 hours works best. If you boil it too hard, it’s going to weaken the bone and you’re going to break some bones. So, be sure it’s a slow simmer. Don’ try to do it too fast.


#ad

X-Stand Treestands The Duke 20' Single-Person Ladderstand Hunting Tree Stand, Black
Buy Now
We earn a commission if you make a purchase, at no additional cost to you.


Remove Meat and Tendons

removing tissue from deer skull

After boiling, remove the eyes and the tissue from the skull.

After 4 hours of boiling the skull in the liquid dish soap, the meat around the skull will be very tender. You just work your knife in and remove the meat and the tendons as best as you can. Much of the meat will just fall away during this process.

You don’t want to get too aggressive with it because you can pop a bone loose.

The most aggravating part is around the eye sockets because all the eye sockets connect to the inside of the skull in the brain (we’ll cover how we are going to get the brains out shortly) and it makes them a little bit harder to get to.

Remove The Ear Buds

All After you’ve gotten all the meat scraped off, it’s now time to pop the ear buds out. This is how we get the brains out.

Take your screwdriver and work it around in the ear buds and pop them out.


Freak accident while shooting bow!

Remove Sinus Tissue

removing sinus tissue from deer skull

Remove the sinus tissue from the from the skull with forceps.

Now use the forceps to remove all the sinus tissue.

You need to get everything out of the sinus cavity because anything that you leave, will cause the bone to turn yellow. It may take two or three years for it to happen, but I’ve had it happen.

Be gentle while the skull is hot, because if you are too rough while removing the tissue, you could break the bone.

And, if you do break the bone, don’t worry. Sometimes the bones at the bottom of the nose will come loose if these tendons get cooked too long. If they do, you can put them back with super glue. So, don’t worry if they come off. You can super glue them back.

Get as much of the sinus tissue as you can from the front side and then you can get the rest under the brain cavity.

Remove The Brain

rinsing out deer skull brain

Use a water hose to rinse out the brain cavity.

Once you get the ear buds popped out and you get the sinus cleaned out, you’re going to need a water hose to rinse out the brain tissue.

Some people will use a pressure washer for this step. I don’t like using a pressure washer because if you’re not careful, you can damage the bone.

Put the water hose into the hole where the brain is located and flush out the brain matter. Anything left over will break loose once we boil the skull for the second time in the peroxide.


#ad

ATN Thor LT Thermal Rifle Scope w/10+hrs Battery & Ultra-Low Power Consumption
$859.99
Buy Now
We earn a commission if you make a purchase, at no additional cost to you.
03/07/2024 06:15 pm GMT

Prep Antlers And Boil Skull In Peroxide

antlers in pot with peroxide

Wrap antlers in shrink wrap and masking tape and boil a second time for 30 minutes.

Once you are finished rinsing the brain matter out of the brain cavity, it’s time to boil the skull for a second time in order to bleach the bone white.

Add two quarts of hydrogen peroxide to the existing pot of water.

NOTE: Some people will ask, “can I use bleach on the euro mount instead of peroxide?” You should never use bleach on your Euro mount, as it will erode the bone. So, stick with the peroxide!

Wrap the base of each antler tightly with shrink wrap and secure it with masking tape. There’s not really any particular way that you need to do this other than to just get them wrapped from the base up to the bottom of the brow tine.

Once the skull is placed into the boiling water, the plastic wrap will shrink tightly to the antlers and keep out the majority of the water. Some water may find its way through and that’s why we have the dark stain.

We can come back and if some of these darker parts around the base get bleached a little bit, we just use a q-tip to re-color it and you’ll never know the difference.

Once the antlers have been adequately wrapped, place the skull back into the boiling water and peroxide for 30 minutes.

The Finishing Touches

After the 30-minute boil in the peroxide and water, remove the skull and take the plastic wrap off.

touching up bleached antlersq

Touch up any bleached areas of the antler base with wood stain and Q-Tip.

The plastic wrap will seem sticky and gummy, sticking tightly to the antlers. And, that’s what you wanted to do because that keeps the peroxide off of the antlers and prevents it from bleaching.

If there has been any unwanted bleaching on the base of the antlers, use a very small amount of the dark wood stain and apply to those areas with a q-tip. You can repeat as many times as you like to get the desired darkness.

But, how do you get the skin off the skull initially?

I wanted to go back and cover the preparation process of the skull before you even start to boil it.

Obviously, you have to cut the deer’s head off. And preferably, you would want to cut it at the last vertebra that connects to the back of the skull. (Normally what happens because the deer’s neck and ears compressed on the spine, is that most people naturally cut about one vertebra back, so you have to two things to cut off before you can start boiling the skull.)


brain lobe of deer skull

To remove the last vertebra, cut just behind the brain lobe as pictured here.

The place you want to be careful about is this lobe on the back of the skull where the brains are. Be careful not to cut into that lobe. Just use it as a guiding point as you cut. Once you cut around it, you will be able to remove the last vertebra.

But while the deer head is lying on the ground, get your knife between the teeth and just cut back toward the back of the head. There’s going to be meat back there, so you want to cut that on both sides, so that you can open the deer’s mouth.

Once you’ve cut, pull the jaw all the way back until the bones that joined up under the brain cavity are loosened. Then then you can remove the meat from around those bones and pop that bottom jaw off.

Now, you are ready to start boiling!

Conclusion

We hope you’ve enjoyed this instructional article and video on how to do your very own European mount. We hope you have a great deer hunting season, and remember… where moments happen, we’ll meet you there!

Euro Mount Instructional Video

BONUS: Watch N1 Outdoors® co-founder, Josh Wells, teach you the Euro mount process, step-by-step! Be sure you watch to the end of the video where Josh teaches you how to prep the head and the skull for this process that he shows you. We hope you learn something. Link below… enjoy!

Check out this euro mount instructional video!