As a deer hunter, a whitetail deer is a welcome sight, but not necessarily a rarity. But, catching a glimpse of the incredibly rare piebald deer is a scarce and beautiful sight.
Every now and again, hunting enthusiasts get to witness rare images of a piebald deer on social media, discovered by a “lucky” select few hunters.
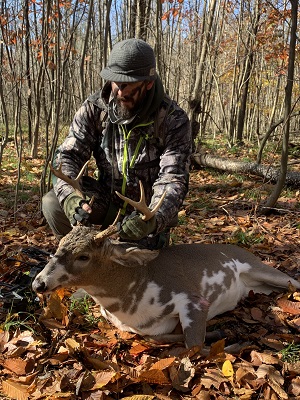
If you are a hunter and have the opportunity to harvest a piebald buck, consider it an extremely rare event.
DID YOU KNOW? The name “piebald” originates from the word “pie” – short for magpie, a black and white bird in the crow family. Piebald deer look bald because of their patchy appearance… Pie + Bald = Piebald! – VIDEOS BELOW!
This unique deer features impossible-to-miss white markings, standing out like a unicorn in a forest full of horses. In fact, many hunters focus exclusively on these hard-to-find critters – determined to add a new trophy to their collection.
But – what exactly is a piebald deer and just how rare are they?
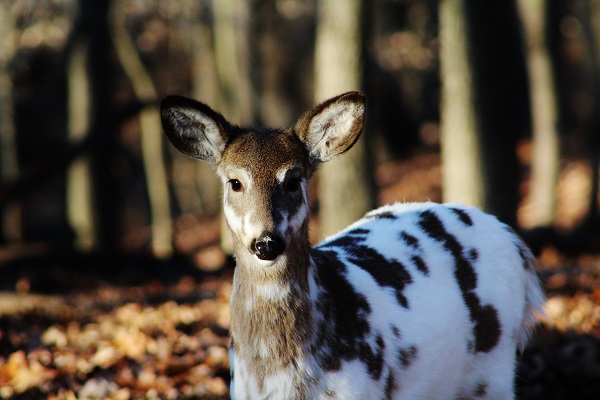
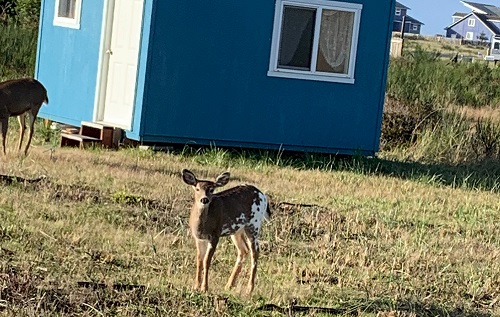
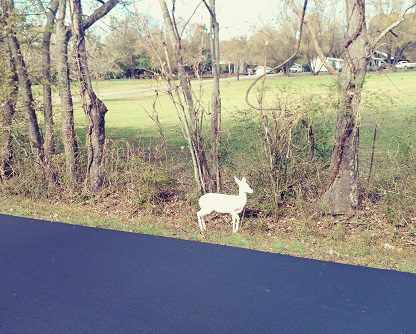
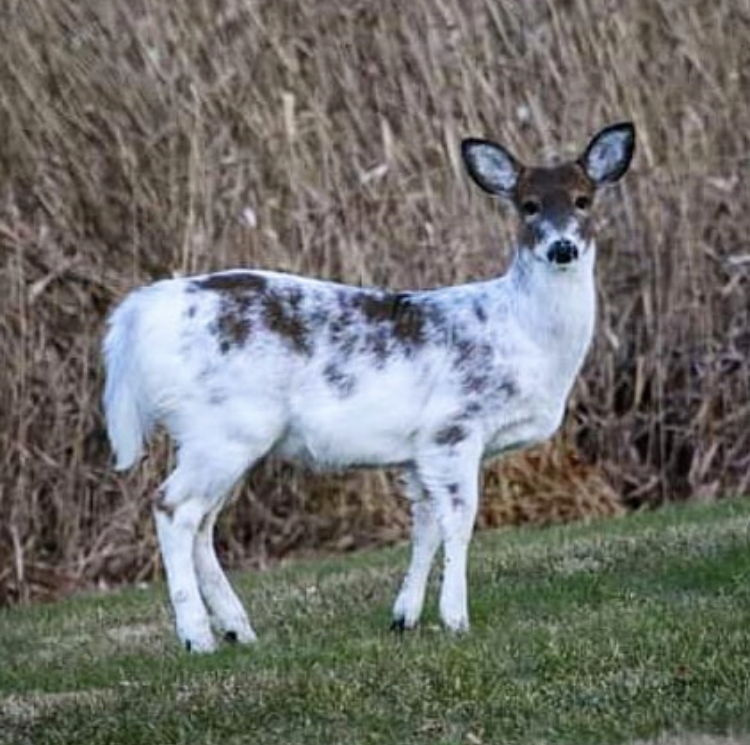
Piebald deer can have small areas of a splotchy, white pattern, or large areas of white, like this one pictured.
What is a Piebald Deer?
Contrary to what many hunters believe, piebaldism is not a combination of a regular whitetail deer and its albino counterpart.
Piebaldism is a genetic abnormality responsible for the piebald deer’s appearance. It’s a rare condition that affects less than 2% of the whitetail deer population.
Every piebald deer is especially unique, making them an incredible sight to hunters and non-hunters alike.
According to geneticists and researchers, the name “piebald” originates from the word “pie” – short for magpie, a bird in the crow family. The magpie has black and white plumage.
The piebald deer has a genetic abnormality, causing patches of white across its body. This patchy look gives it a mixed up appearance, in which the patches, or lack of pigmentation almost make it “bald.” Pie + Bald = Piebald!
Sometimes piebald deer are also referred to as a “pied deer.”
Piebald definition:
Composed of incongruous parts. Of different colors, especially: spotted or blotched with black and white. A piebald animal (such as a horse)
Merriam-Webster
Piebald deer come in a range of colorations and variations. There is no stock-standard. Some piebald deer look as though they’ve been splashed with white paint. Others may look almost “airbrushed” or spotted.
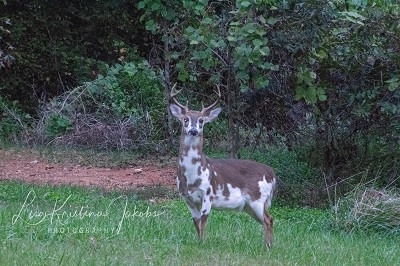
Piebald bucks like this one are a rare but beautiful sight.
It is believed that this recessive trait must be carried by both deer-parents, maternal and paternal, in order for the offspring to be piebald. That’s what makes the condition of piebaldism so exceptionally rare.
SCROLL DOWN TO VIEW MORE PHOTOS AND OTHER DETAILED INFO ON PIEBALD DEER
Piebaldism presents itself in many different forms, varying from moderate to severe depending on the circumstances. While some piebald deer can live normal, long, happy and healthy lives, most aren’t so lucky.
Interestingly, piebaldism isn’t just isolated to deer. Throughout nature, we see many other species experiencing this genetic abnormality, including horses, certain dog breeds, python snakes, moose, bald eagles, and on some cases, even humans.
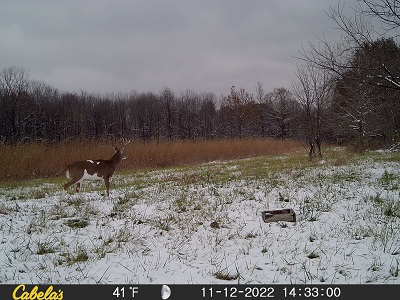
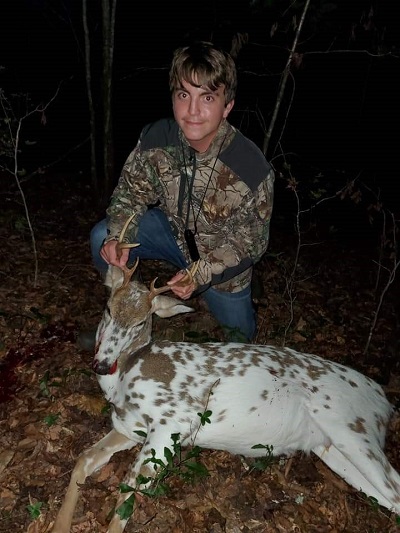
That’s not snow on that deer… it’s just piebald markings!
-
Sale!

The N1 Outdoors® “OUTDOORS™” Tee
$15.00 Select options This product has multiple variants. The options may be chosen on the product page -
Sale!
Ntruder Buck Tee by Daniel Cliburn
$9.00 Select options This product has multiple variants. The options may be chosen on the product page -
Sale!
N1 Outdoors® Compass Tee
$9.00 Select options This product has multiple variants. The options may be chosen on the product page

Piebaldism | More Than Just A Coloring Abnormality
Apart from the strikingly unique coat, a piebald deer usually has other distinguishing features, include shorter-than-normal legs, an arched spine (scoliosis), and a prominent oral overbite.
Beyond the surface, a piebald deer normally experiences certain organ deformities, and even arthritis.
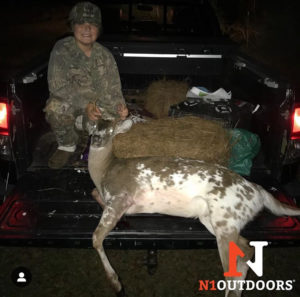
Piebald deer are a rare sight, but harvesting one is a feather in the cap for some!
According to geneticists, this boils down to something called “pleiotropy,” which causes one single gene to control numerous traits. The affected traits range from pigmentation to bone development and more.
It’s not unusual to see a piebald deer with debilitating genetic mutations and severe birth defects. Combined, these factors make it exceptionally challenging for piebald deer to survive in the wild – let alone make it to adulthood.
In one recent case study, Missy Runyan, a New York-based wildlife rehabilitator, was called to the scene of a distressed fawn in May of 2017.
The white-as-snow piebald fawn was plagued by severe birth defects, including life-threatening internal genetic mutations.
The fawn didn’t live for much longer, but Runyan managed to X-Ray the fawn’s body and detect numerous internal abnormalities. The results showed internal defects that made it impossible for the fawn to survive in the wild.

Piebaldism Vs. Albinism
The genetic causes for piebaldism and albinism differ, something you can easily spot by gazing into the affected deer’s eyes.
While an albino deer’s eyes are pink, accompanies by a pink nose and hooves with pink hues, piebald deer have brown eyes, a brown nose, and black hooves.
Some believe that a piebald deer is a cross-breed between an albino whitetail and a normal whitetail, but this is not the case. There are clear differences between albino deer (above) and piebald deer.
Piebald deer should also not be confused with melanistic deer, which typically lack brown or white color variations and usually appear to be black across their entire bodies.
While geneticists and scientists are still hard at work to fully understand the genetic mutation that causes piebaldism, one thing is for sure: If you see one, you should count yourself lucky. Few hunters will ever get the chance to get a glance of this rare creature out in the wild.
Piebald Deer | To Shoot…Or Not To Shoot?
More and more hunters are emerging on social media, slammed for their short-lived success at when taking rare trophy piebald deer. In various parts of North America, these rare white animals are seen as “sacred,” and not to be harmed.
Certain indigenous communities see piebald deer as “returning ancestors,” serving as a “reminder that something of significance is about to happen.”
There are various myths and legends, stating that by capturing and killing a piebald deer, you will “experience bad future hunts,” or, “guarantee your own death in a year’s time.”
Laws Regarding Piebald Deer | Check Your State Hunting Regulations
If you aren’t superstitious, do your homework by researching the rules and regulations of your state.
For example, it is illegal to shoot any white deer in Wisconsin, as herds of white deer are rising in numbers, making locals rather protective of the rare animals.
While certain jurisdictions have laws in place to protect piebald deer, among other white animals, many locations allow (licensed) hunters to lawfully harvest these rare creatures without consequence.
According to Brian Murphy, wildlife biologist and the Executive Director of the Quality Deer Management Association, there is no biological reason to protect piebald deer or albinos.
Spotting a piebald deer in the wild is a rare opportunity that many hunters don’t get to experience. Piebaldism affects just 2% of the whitetail population. (photo credit: Kevin Oldenburg)
Protecting them should not be regulated by the state, but rather, should be the decision of the landowners and hunters.
While piebaldism is indeed rare, population problems are apparently not a concern. Emerging research shows that the act of hunting a piebald deer will have no significant impact on the deer population, let alone damage it.
If you would wish to take such a rare trophy (and meat) back to your home, and if it is legal to hunt them where you live, there’s no reason not to hunt piebald deer.
Have you ever seen a piebald deer out in the wild? Leave a comment on this post or share your photos with us here at N1!
You can also view bow hunting tips videos and other hunting and fishing tips articles by visiting our blog.
-

N1 Outdoors® Flagship TriBlock Leather Patch Hat (Kelly Green)
$29.99 Select options This product has multiple variants. The options may be chosen on the product page -
Just Pass’N Through™ Leather Patch Hat (Black/Grey)
$29.99 Select options This product has multiple variants. The options may be chosen on the product page -
Sale!
N1 Outdoors® Multicam Logo Beanie
Original price was: $17.99.$9.99Current price is: $9.99. Select options This product has multiple variants. The options may be chosen on the product page