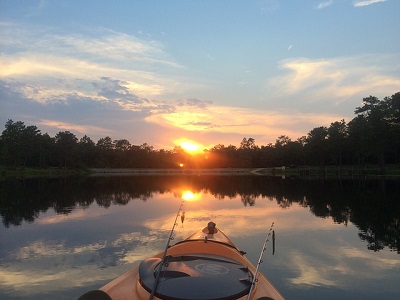
Kayak fishing has seen a massive surge in popularity in recent years, and the reasons for this explosion in popularity make sense.
So, lets’ take a look at the benefits of fishing from a kayak and tips to help you make the most of your time on the water.
Surge In Kayak Fishing Popularity
One of the main reasons for the surge in anglers fishing from a kayak is affordability.
While top-of-the-line fishing kayaks can cost several thousand dollars, they are still far more affordable than even a small bass boat or multi-species fishing boat.
Fishing kayaks can range from a few hundred dollars to several thousand dollars for top-of-the-line models.
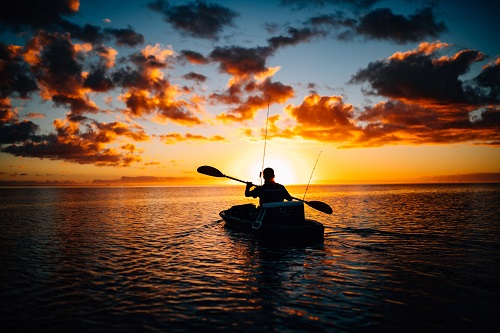
Another reason for this newfound popularity is mobility and accessibility.
Kayaks can be hauled by small trailers, by securing them to the roof of a vehicle, or in the box of a pickup truck. Anglers also do not need a large space to store a kayak compared to larger fishing vessels.
Being light and highly mobile, coupled with the fact that kayaks can go into very shallow water, means that anglers can access waterways that might not be accessible to large boats or do not have public boat ramps.
Kayaks made for fishing are a far cry from traditional kayak designs that most people are familiar with. Most fishing kayaks are built with wider beams, equating to better stability, allowing one to fish while comfortably standing.
-
N1 Outdoors® Fishscape™ Outdoor Tee
Price range: $28.99 through $32.99 Select options This product has multiple variants. The options may be chosen on the product page -
Sale!
Put a Hook N1™ UPF30 Marlin Performance Fishing Shirt (White)
Original price was: $34.99.$9.00Current price is: $9.00. Select options This product has multiple variants. The options may be chosen on the product page -
Sale!
Put A Hook N1™ Hydroglyphic™ Bass Fishing Tshirt
$5.00 Select options This product has multiple variants. The options may be chosen on the product page
Adaptability And Customization
Modern fishing kayaks also allow for high levels of customization, which translates to adaptability. This allows anglers to change their kayak setup based on water body type and target species.
Fishing kayaks allow for mounting GPS fish finders; some even have mounting options for trolling motor setups and battery compartments.
Kayaks allow for multiple options to fit your fishing situation, including baitwells, rod holders, storage areas, trolling motor mounts, etc.
There are also shallow anchor options similar to those used on bass boats today, consisting of stakes, so that you can anchor your kayak in shallow water environments despite wind and current.
Fishing kayaks also come with small baitwell options, multiple rod holder options, and ample storage to house everything an angler needs.


Kayak Fishing For Beginners | Tips and Tactics
Now that we have taken a look at the reasons for the surge in popularity among anglers let’s now take a look at some fishing tips and tactics so you can learn how to fish from a kayak!
Pick The Right Days To Fish
Kayaks are light and small, making things difficult on windy days or on bodies of water with heavy currents.
Wind can make fishing very inefficient when done from a kayak, and you will likely struggle to hold a position on fish-holding spots, along with the kayak rotating and making it difficult to maintain position.
-

N1 Outdoors® N-Tune™ Patch Trucker Hat (Lt. Gray & Black)
$26.99 Select options This product has multiple variants. The options may be chosen on the product page -
Sale!
N1 Outdoors® Fleece Logo Tactical Beanie
Original price was: $17.99.$9.99Current price is: $9.99. Select options This product has multiple variants. The options may be chosen on the product page -
Sale!
N1 Outdoors® Leather Patch Trapper Hat (Bowhunt design – various patterns)
Original price was: $29.99.$9.00Current price is: $9.00. Select options This product has multiple variants. The options may be chosen on the product page
High waves due to wind can also be a safety concern, along with making it difficult to do any precision casting.
Try to pick the days you plan to fish by closely monitoring the weather forecast. This will not only allow you to enjoy your time on the water as everything is easier, but it will also help prevent accidents from occurring while kayak fishing.
Lure Selection
Lure selection for kayak fishing should be simple, with highly effective lure choices that combine search baits and finesse baits.
Bring your confidence lures with you on your kayak fishing trip. Focus on lures that will allow you to cover the body of water you are fishing quickly.
Lures like spinnerbaits, topwater, inline spinners, and crankbaits are great for covering water quickly. In addition, lures like jigs, soft plastics, and jerkbaits are great for picking apart an area after you make contact with fish using search baits.
Your storage space in a kayak is a fraction of what it is in a fishing boat, so bring only the essential lures and your confidence lures that you know will work in most fishing conditions.
Pick a Few Rods
Having only one rod might seem like a good idea due to your small vessel, but it’s actually the opposite of a good idea for a one major reason.
Fishing with one rod means you will be tying on different lures while developing a pattern or searching for fish, and tying lures on all the time is much more tedious in a kayak.
Instead of using only one fishing rod, bring 3 to 4 rods with you, and have each one rigged up with a different lure type, such as a topwater, jig, spinnerbait, and crankbait.
Having multiple rods rigged for different conditions will make your time on the water incredibly efficient and allow you to focus more on fishing than tying lures on your line or digging for gear.
How To Land A Fish From A Kayak
Landing fish is quite different when done in a kayak, and you can’t just lean over willy-nilly to grab a fish.
Being on the water is a great experience, but you probably don’t want to go IN the water when kayak fishing, so use these tips when landing fish from a kayak..
When attempting to land a fish, you should make sure you reel the fish closer to your rod tip than you normally would, with the length of line equivalent to your arm’s length if you intend to hand-land the fish.
For mid-sized fish species like bass, pike, and walleye, a short-handled net might be the best approach, and there are some great nets out there today that cater to kayak fishing enthusiasts out there.
For larger fish like muskies or saltwater species, things can get very interesting when attempting to land the fish, and if a net isn’t possible, consider using a tool like a Boga grip.

You will also want to have all release tools needed, such as needlenose pliers, jaw spreaders, and hook cutters, within reach at all times to make the release of the fish quick and safe.
Safety First
When fishing from a kayak, a life preserver should be non-negotiable. Life preservers today are far from the bulky and uncomfortable life jackets of decades passed, so wearing one is a non-issue.
It would also be wise to let a friend of family member know where you plan a kayak fishing trip, and when you plan on getting home.
A First aid kit and signaling tool like a flare gun are also good ideas, mainly when fishing far from shore, or when saltwater fishing.
Keep your phone fully charged and in a waterproof case if you need to make an emergency call.

Final Thoughts On Kayak Fishing For Beginners
Though it will take time to adapt, fishing from a kayak can be very rewarding, and it’s easy to see why many anglers are doing it either on a limited basis, or full-time.
With time on the water, you will find that it is far more productive than you might think and that the pros can definitely outweigh the cons. So, get that kayak launched and get to fishing!