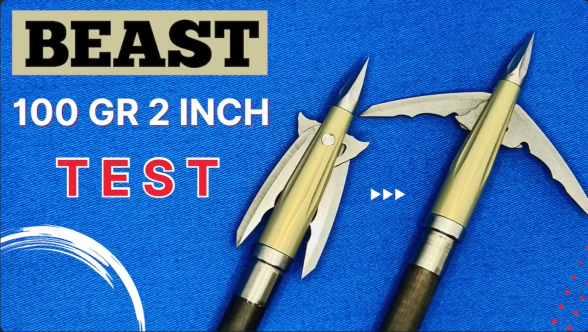
I am excited about the broadhead I’m testing in this review… It’s the new BEAST Broadhead by Bowmar.
BEAST is actually an acronym that stands for Bone Evading Advanced Spring Technology.
This broadhead has a lot of cool features, so let’s go through those features and specifications and then we will put it to the test!
For these tests, I used my Bowtech CP28 set at 72 pounds, 27-inch draw. I used Bishop FOC King Arrows for most of the shooting, but then I’m using the Bishop FAD Eliminators for the really hard impact shots.
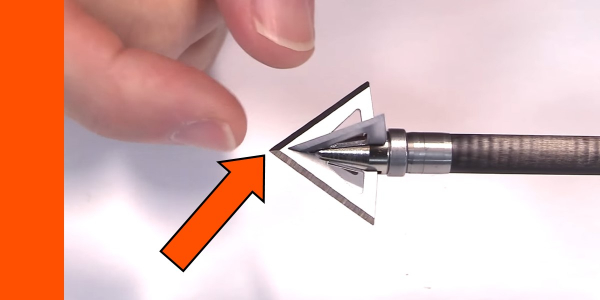
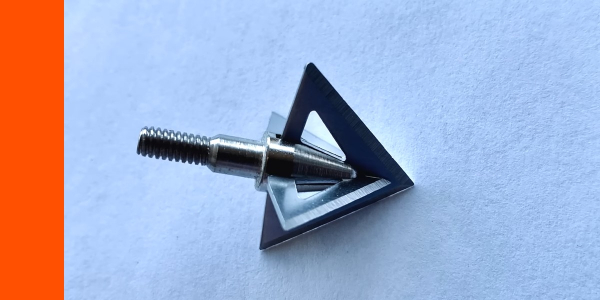
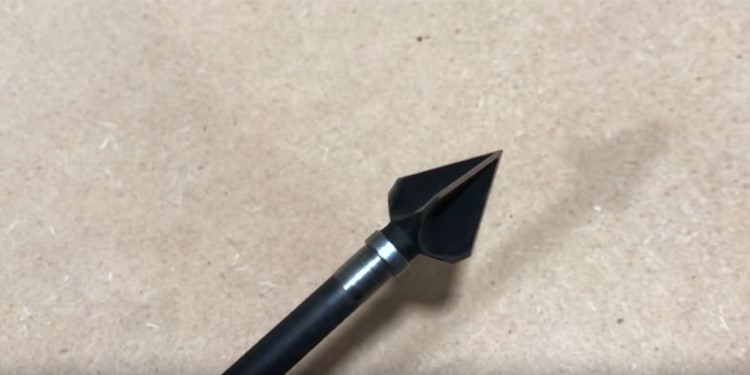
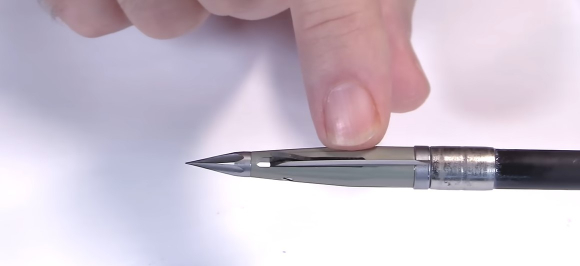
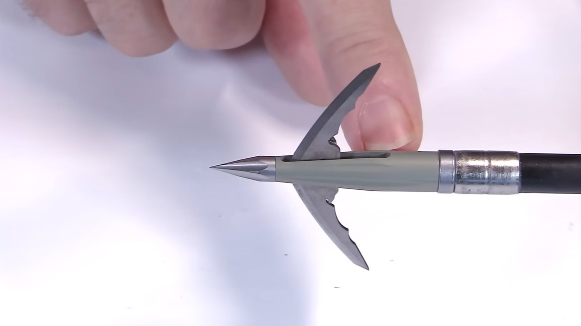
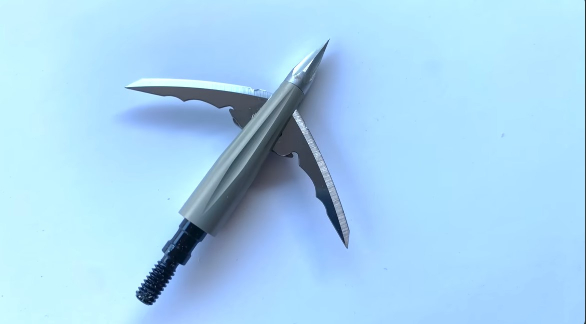
The Bowmar BEAST 2-Inch Broadhead up close
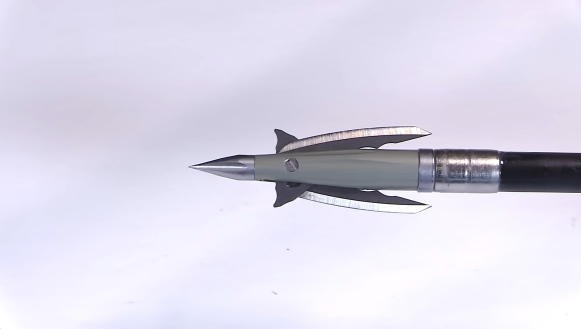
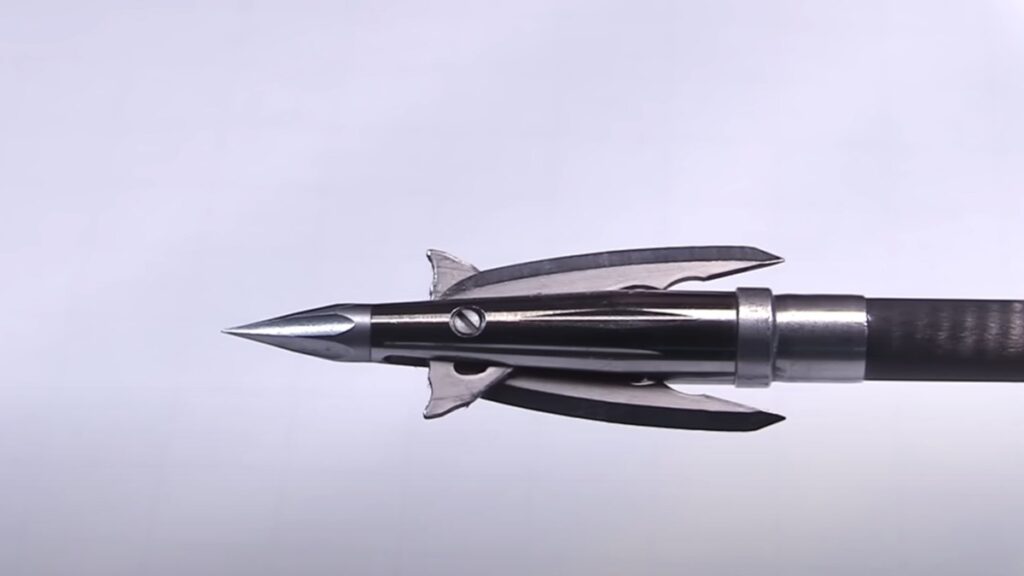
Here’s a good look of the BEAST. And man, it truly is a beast of a broadhead! There is so much going on here. First of all, you see it here in the close position, 2-blade broadhead. This is a 2-inch cutting diameter. In the closed position, it closes to 0.64″, so I assumed it would be very streamlined in flight and fly extremely well.
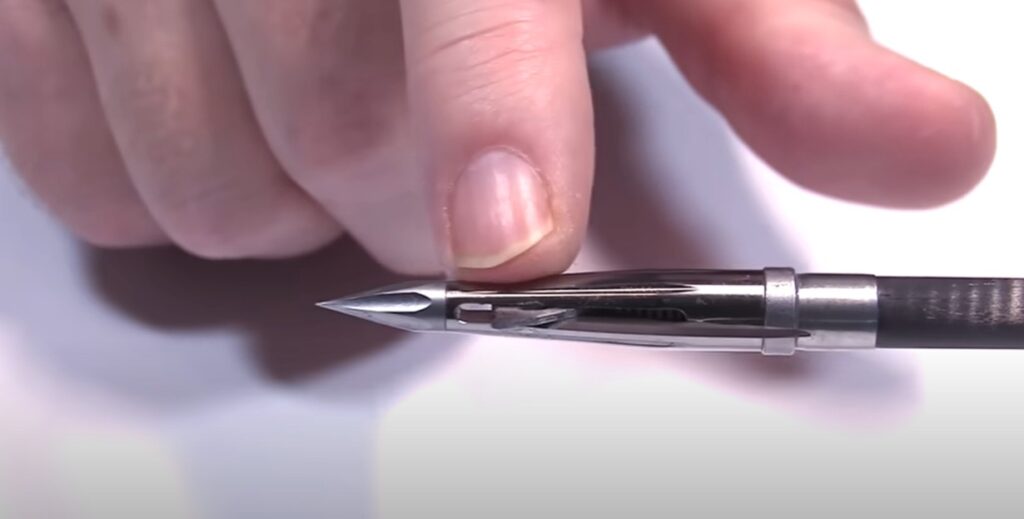
The point of the BEAST broadhead is a needle point tip. I actually thought I had cut myself when I touched it!
You can see here that the ferrule starts really narrow at the tip, and then gets larger. That’s going to help in arrow dynamics and flight forgiveness as well as penetration. Also, notice the multiple groves in the ferrule as well as the tip and that’s going to aid in flight forgiveness as well. As it rotates around, it traps air in there and makes it a bit more forgiving as well as helping with durability.
The blades take 1.3 pounds of force to deploy, and they deploy with 15 pounds of force at 750 miles an hour. So, they are not losing the energy with that penetration.
They are actually gaining some with that stored energy that allows those blades to cut through the hide in an even faster way than they would have if they didn’t have that spring inside them.
The two little wings at the front that impact the hide are not sharpened. But, when they impact, a spring is released and then the blades spring open at 750 miles per hour! (On the package, it says 650 but they have since added an extra component inside that actually increases the deployment speed to 750 miles an hour). That’s actually breaking the sound barrier! Plus, if you’re shooting it at 250, 300 feet per second, it’s all the faster.
Bowmar wanted to get a spring that could stay closed like this for a long time and then still work. And so, they looked all over the world and found these springs in the auto industry by a company that makes them for Lamborghini and Ferrari.
The spring has 15 pounds of stored energy inside the broadhead, but can stay in a closed (contracted) position and still retain 95% of its energy for 3-5 years. There’s never been a spring used like this in a broadhead application; it’s not just your normal little spring!
-
 N1 Outdoors® Just Pass’N Through™ Broadhead Badge TeePrice range: $24.99 through $28.99
 -
 N1 Outdoors Just Pass’N Through™ Leather Patch Hat (Grey/Lt Grey)$29.99
 -
 Just Pass’N Through™ Green Camo/White Leather Patch Hat$29.99
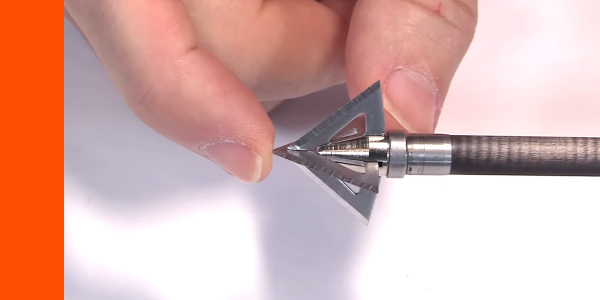
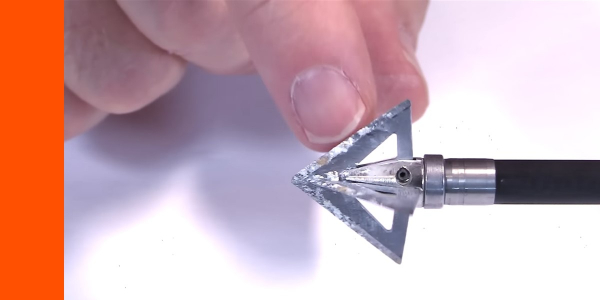
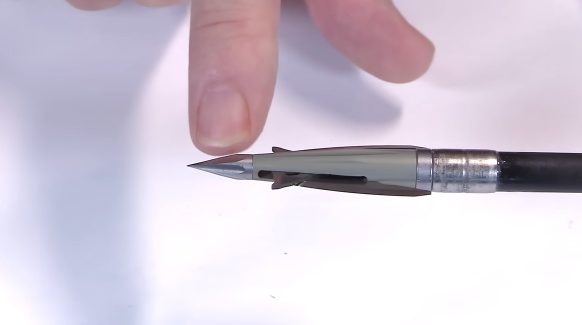
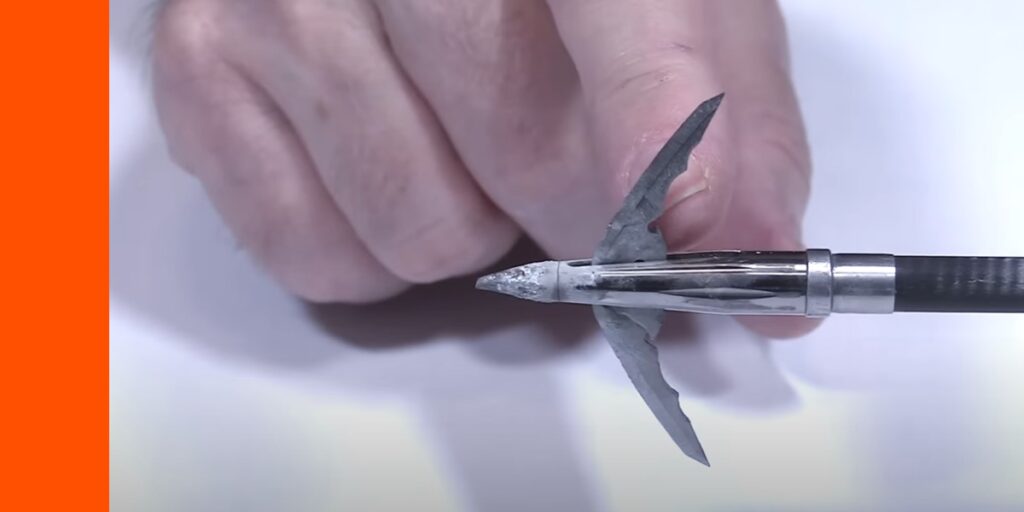
The blades of the BEAST broadheads are 0.035″ thick. They have a nice curve to them when they are open. That curve is going to aid in penetration and cut as well.
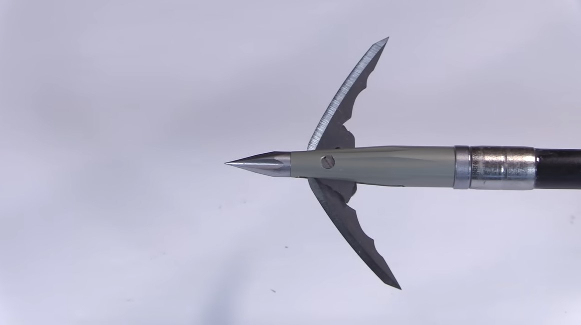
Here are the blades of the BEAST in the open position.
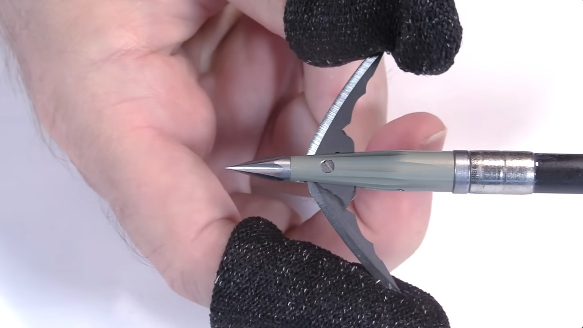
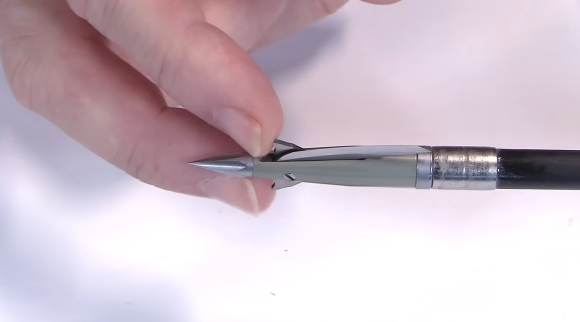
Note that each pack comes with two little finger gloves so that you can grab the blades, and that’s what you need to wear when you want to close them again. You just grab them and pinch them down. It works really well. Don’t try doing it with your bare hands, as the blades are extremely sharp.
Once the spring is deployed, it pushes the blades into the open position. It’s not barbed because these blades can fold back beyond just their barb stage. But, I will say they are difficult to get out of a target.
I shot them into a target and though they do bend back, they don’t bend back so much that they’re super easy to get out of. So, I wouldn’t be shooting them into targets too often.

But here, the springs serve a secondary purpose after being opened. If bone is encountered, then the blades can compress back, and that allows them to stay straight as they continue to penetrate and not lose their edge and not lose the energy. They just can go right around that blade and then they spring back into place after a quarter of an inch. So that extra tension can allow them to go right between or around bone and then spring back to their full open position.


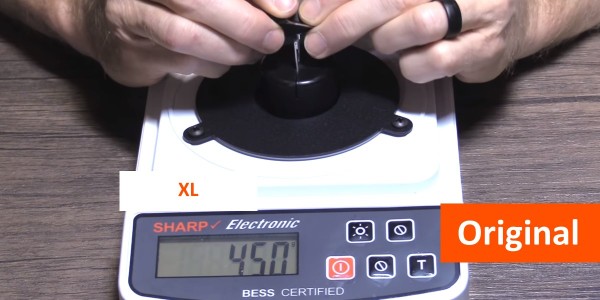
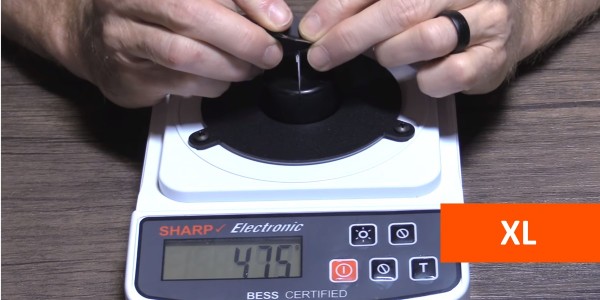
This head is the 100 grain and so it uses an aluminum ferrule (7075 aluminum) which is a really good aluminum. I always say if you are going to use aluminum, that’s a good one to use. It’s stronger than some steels. But, perhaps in heavier models that come out in the future, they will use all steel, not sure.
-
N1 Outdoors® N-Tune™ Nock Tuning Reflective Arrow Wraps – Dropp’N Hammers™
Price range: $18.99 through $27.99 Select options This product has multiple variants. The options may be chosen on the product page -
N1 Outdoors® N-Tune™ Nock Tuning Reflective Arrow Wraps – N-vasive™
Price range: $18.99 through $27.99 Select options This product has multiple variants. The options may be chosen on the product page -
N1 Outdoors® N-Tune™ Nock Tuning Reflective Arrow Wraps – Sling’N Stix 2.0™
Price range: $18.99 through $27.99 Select options This product has multiple variants. The options may be chosen on the product page
Bowmar BEAST Broadhead Testing
I was eager to put this BEAST broadhead to the test! Here’s what I learned…
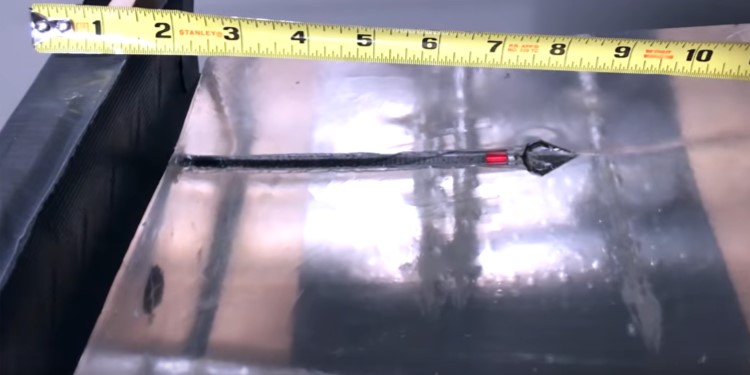
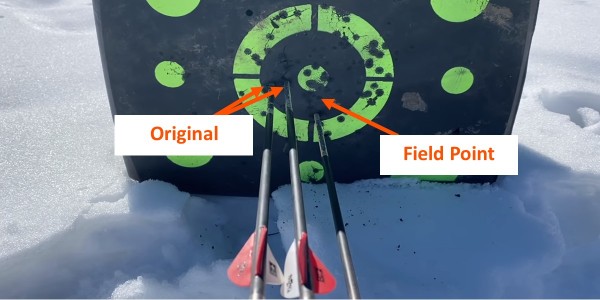
Flight Forgiveness (1 field pt then 1 broadhead @30 yds)
As you can see, the BEAST flew right next to the field points, as you would expect from an expandable.
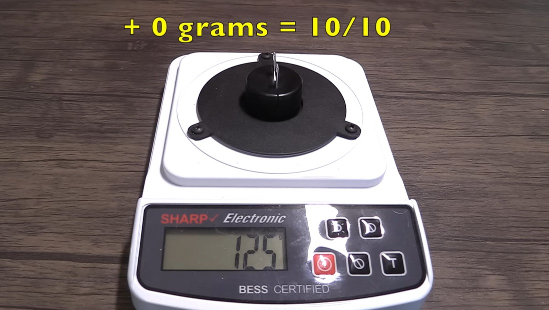
Initial Sharpness
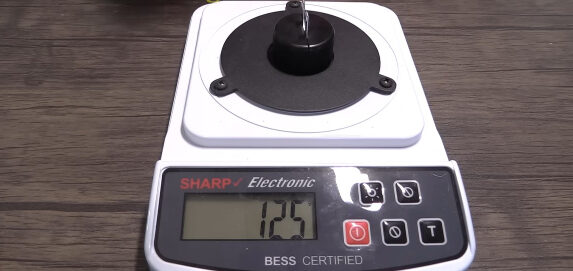
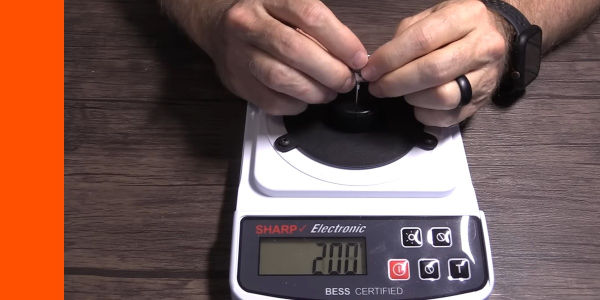
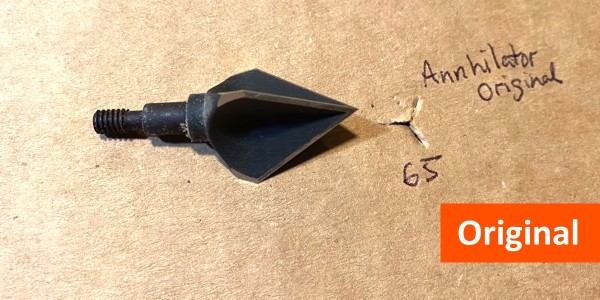
It only took 125 grams of force to cut through the wire which is a 10 on a 10-point scale.
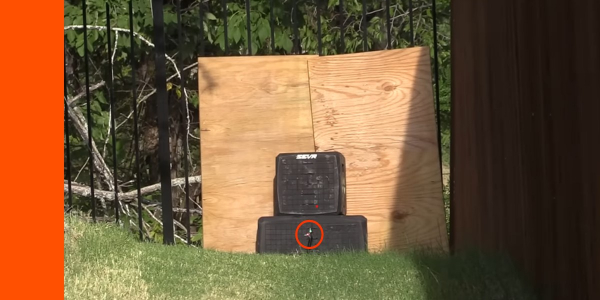
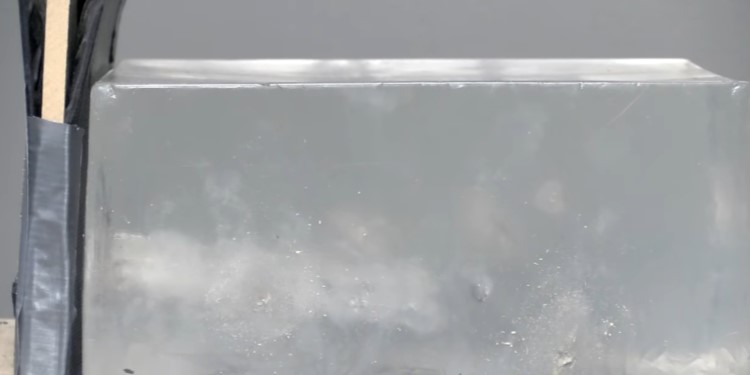
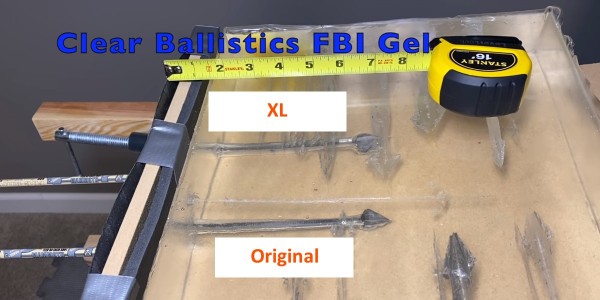
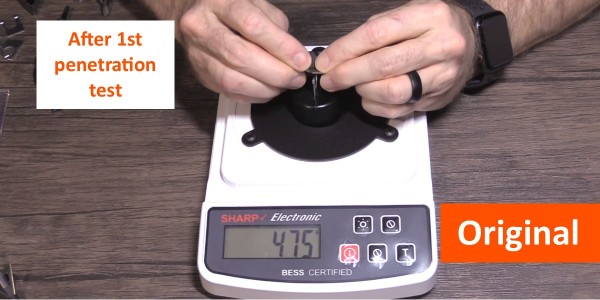
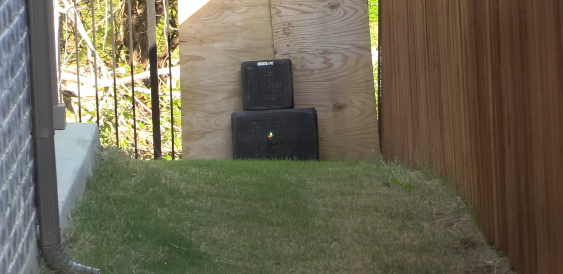
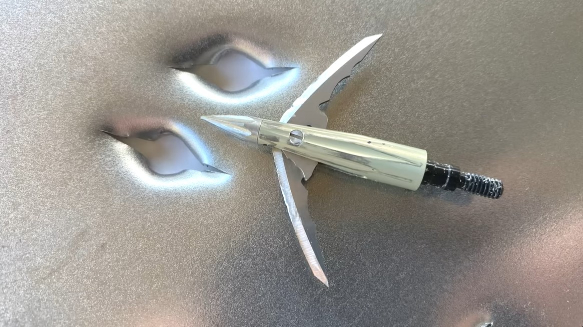
Penetration Test 1 (2/3″ rubber mat, 1/2″ MDF, FBI Gel)
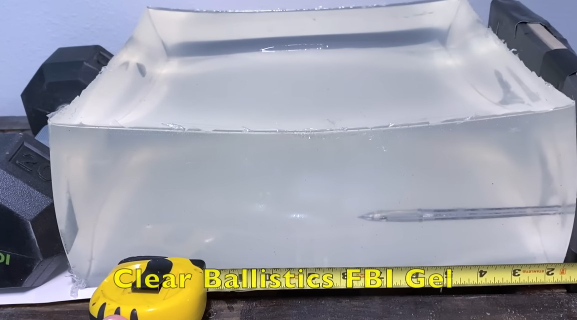
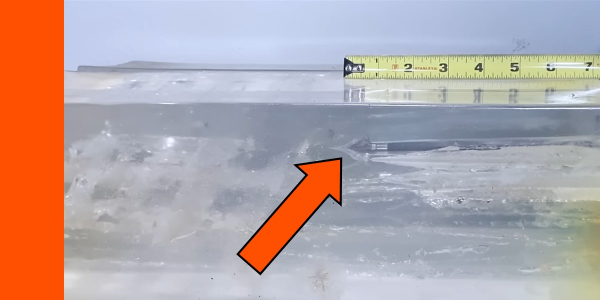
It penetrated 7-3/4″. And here’s the entrance hole. It opened an inch and a half on this medium and it’s not uncommon for heads to not fully open on this medium so I’ll do a more formal opening test in a minute.
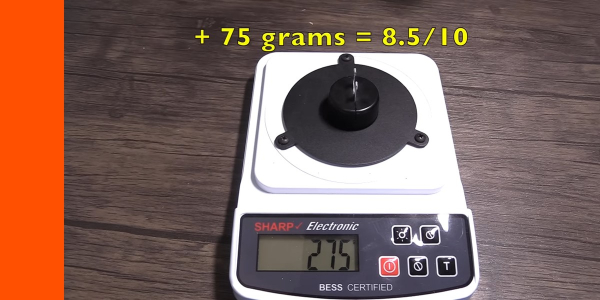
Edge Retention Test (sharpness after Penetration Test 1)
Wow! It took no additional force to cut through the wire, which is a 10 on a 10-point scale.

Penetration Test 2 (layered cardboard)
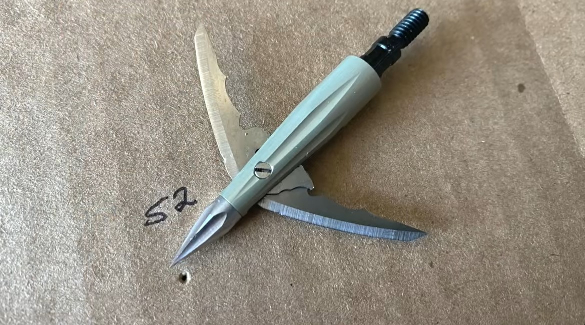
The BEAST penetrated through 52 layers of cardboard.
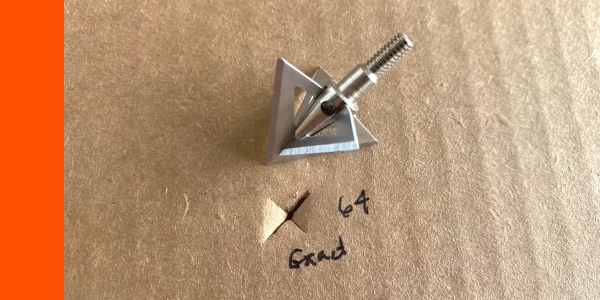
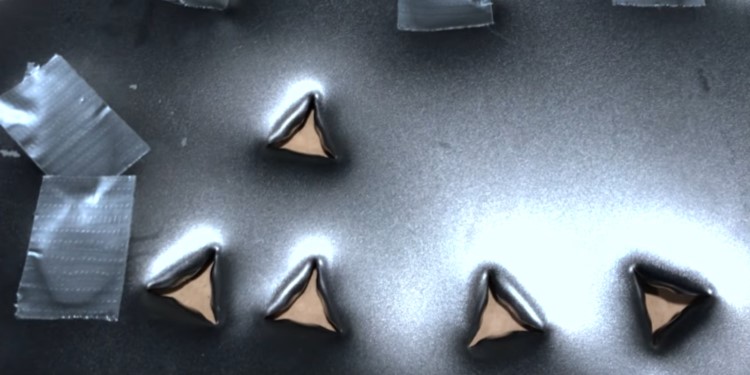
Opening Test (Leather stretched over box)
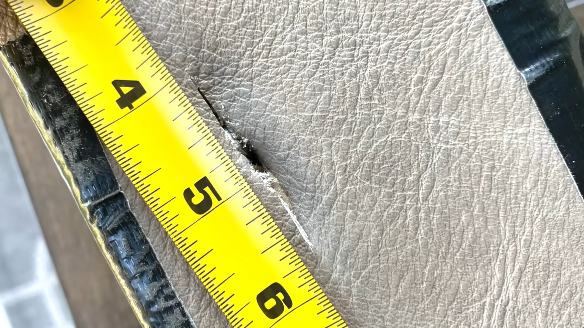
The entrance hole was 1-3/4″. But, on the back of the box, it had opened up to almost 2-1/2″.
Angled Shot Test (1/4″ MDF/Carpet)
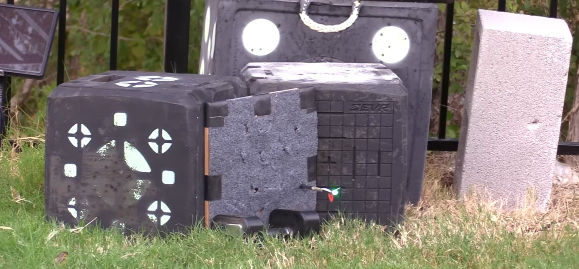
It had no problem with the angled MDF.
Durability Test (1/2″ MDF max 3 shots)
It was in great shape after 3 shots through the MDF. The only signs of wear are right close to the ferrule where you can see the blades kicked forward into the tip and made a little bit of a dent in the blade there.

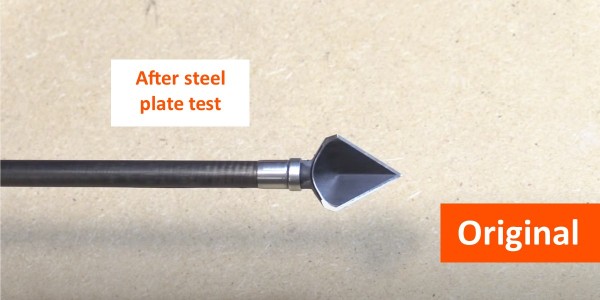
Durability Test (22 gauge steel plate max 2 shots)
It held up very well through the 2 shots in a steel plate. You can see it got a little bit of edge chatter in the edges of the blades and the tip got a little bit rolled over. And then you can see the holes. They are a little smaller than the cutting diameter and that’s just because of that spring mechanism. They can’t open fully when going through a steel plate, which is understandable.
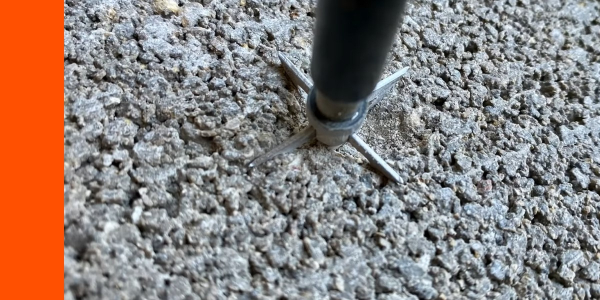
Concrete Test

I shot the BEAST into a concrete block. The tip embedded really deeply into the concrete which was pretty cool to see. There’s no getting that thing out!
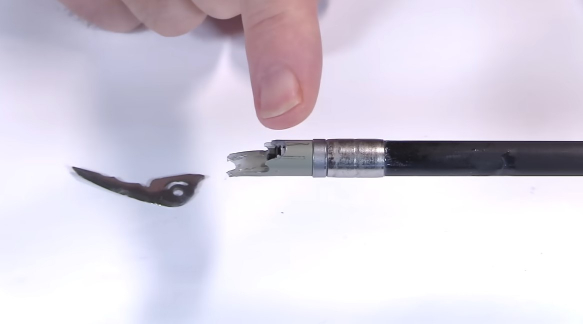
So here it is after impacting the concrete. And as you can see, it broke right there in the ferrule. I managed to find one of the blades that had flown quite a way across the yard. And I as I say all the time, the concrete test is not like a pass-fail. It’s not like, “Oh, this broadhead failed because it didn’t hold up to the concrete.” That only accounts for 3% of the overall score. As for the durability of this, man, it held up very well through the MDF and the steel plate as well.
Final Thoughts On The Bowmar BEAST Broadheads Review
So what do you think of the BEAST?
Man, there’s a lot to love about this broadhead! I love the low profile and the flight, as well as the super secure retention system blades. There are no O-rings and no clips. And, I love the spring action that they have in there.
I get the feeling that they’re going to be a lot more effective on animals than my testing really allows. There’s only so much you can do with standardized tests. But, even so, it did well in my testing, and I think it’s going to do even better on animals the way the spring causes those blades to just pop forward with such force.
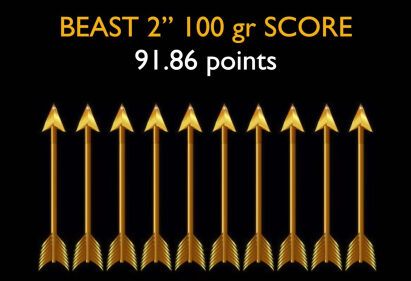
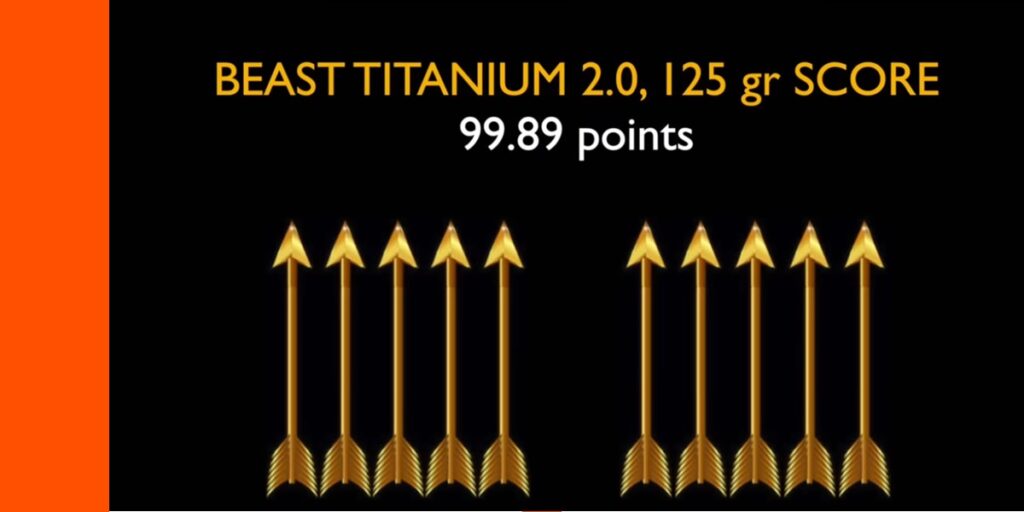
The BEAST broadhead scored 91.86 out of 100 on my Lusk Grade scale!
I love the blades and the sharpness. And then there’s the edge retention! That’s the sharpest and the best edge retention of anything I’ve tested. I’ve tested others that were 125, but this one was was 125 grams of force after going through penetration test 1. That’s super rare! I’ve never seen that before.
So again, just a lot to like about this broadhead. I look forward to seeing the future models that they come out with!
Josh Bowmar, you’re on to something really good here. I appreciate all your hard work and ingenuity in designing this head.
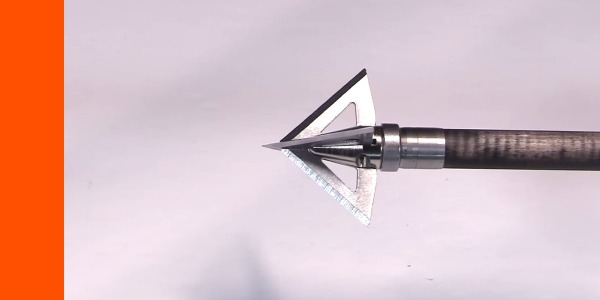
Beast Titanium 2.0 Review
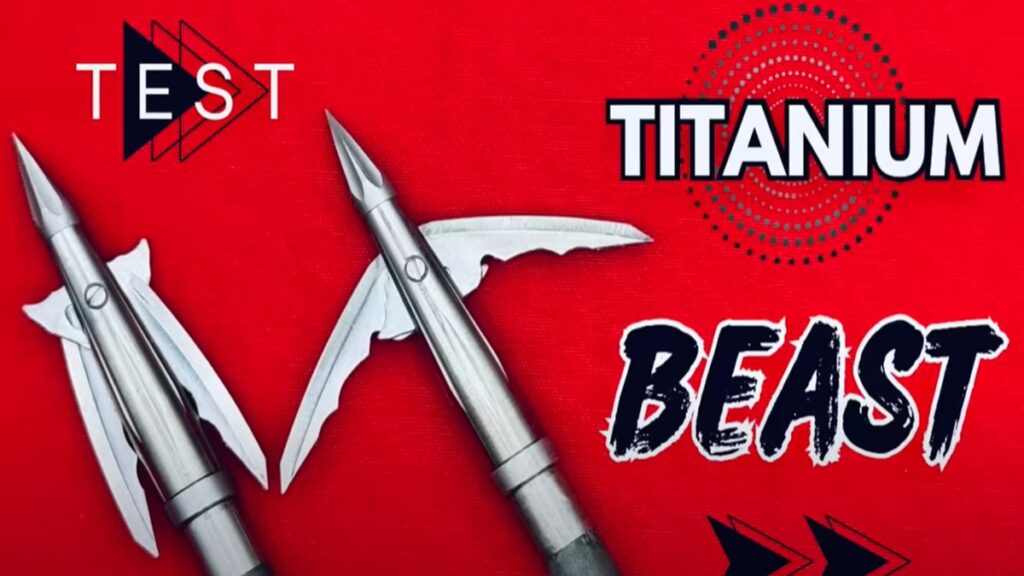
All right. Let’s zoom on in here. Go through some of the design features and specifications and then put this Titanium Beast to the test.
So, here’s a good look at the 2.0 titanium broadhead. Man, it just looks really impressive. One thing I say about this Beast broadheads and I’ve said about a few other heads in the market at as well, is that when you take it out of the package, you don’t wonder where your money went. You really just feel the quality… quality materials, quality craftsmanship, and tight specifications. You feel like you’re getting your money’s worth.
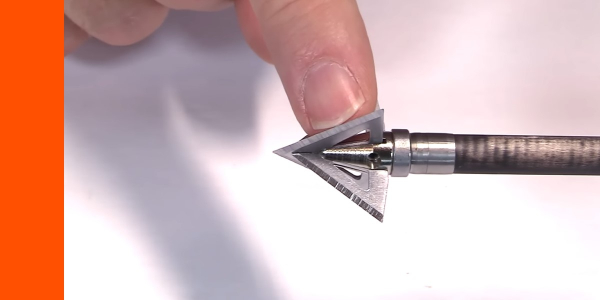
Let’s start with the materials. The ferrule is a grade 5 titanium, with a good strength to weight ratio. It has a hardened steel tip to provide greater strength, while having a narrower, smaller tip to aid in penetration. The blades are 0.035″ thick and they’re German Lutz Blades. They’re brought to a Rockwell hardness of 58 to 60, which they say they can get away with bringing it to that hardness because of the proprietary cryogenic and heat treatment that they use to harden them. They don’t get too brittle. So, they are able to be super sharp, hold their edge well, but not be too brittle.
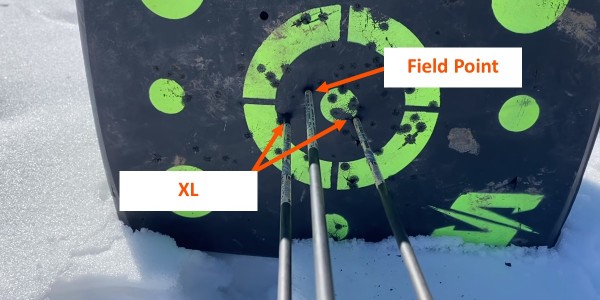
Flight Test (1 Field pt then 1 broadhead @30 yds, Killer Instinct Logix 435 Crossbow 675 gr Bishop Bolt, 310 fps):
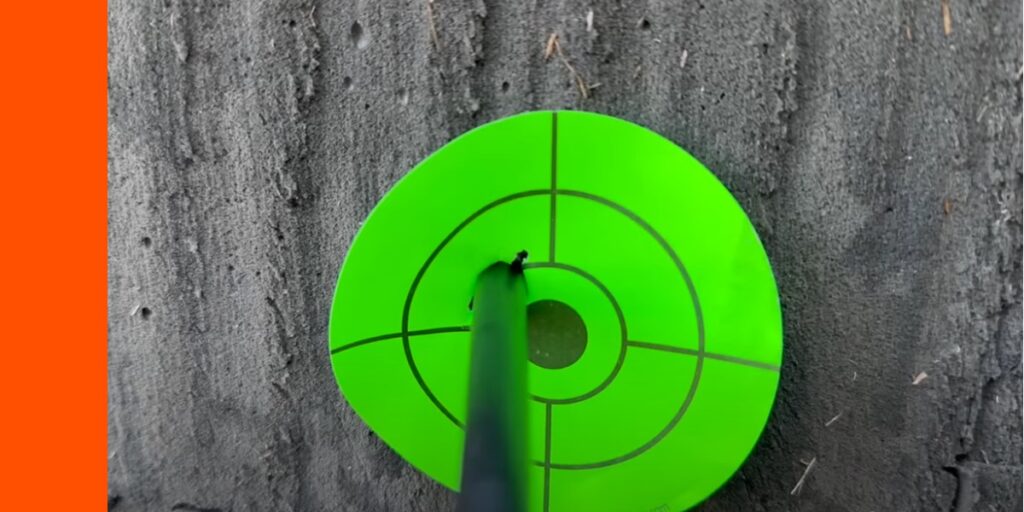
This got the 10-ring, just missed the bullseye by like a millimeter.
Edge Test 1 Initial Sharpness Test (Grams of force to cut copolymer wire):
It only took 83 grams of force to cut through the wire which is a 10 on a 10-point scale. Plus, it ot a huge bonus for being proportionately under the threshold of 200. And, I believe this is the sharpest out of the box blade that I’ve ever tested by a long shot.
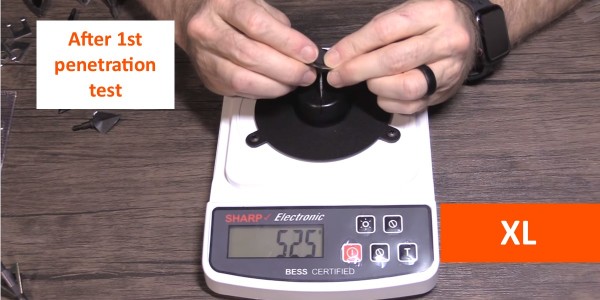
Penetration Test 1, (2/3″ Rubber Foam Mat, 1/2″ MDF, Clear Ballistics FBI Gel):
It penetrated 7 3/4″.
Edge Test 2, Edge Retention Test (Sharpness after Penetration Test 1):
It only took an additional 18 grams of force to cut through the wire, which is a 9.64 on a 10-point scale. However, it gets a bonus for both the sharpness and edge retention being under 200 grams of force. That’s the threshold. And then it gets an extra bonus for it being – both of them being just about 100 or less. That’s incredible. Never had one test this sharp after Penetration Test 1. Very impressive blades.
Penetration Test 2, (Layered Cardboard):
It penetrated through 55 layers, which is a 7.86 on a 10-point scale.
Opening Test (Leather Stretched Over Cardboard Box):
It opened right at 2″.
Durability Test 1, (3 shots 1/2″ MDF):

The blades were in near perfect condition after the three shots through the MDF. The only damage is at the very top of the blades, where you can see a little nick, and that’s where they pressed back against the ferrule. It’s not really damage from the shot itself, and yet, it kind of is. We just take half a point off for that.
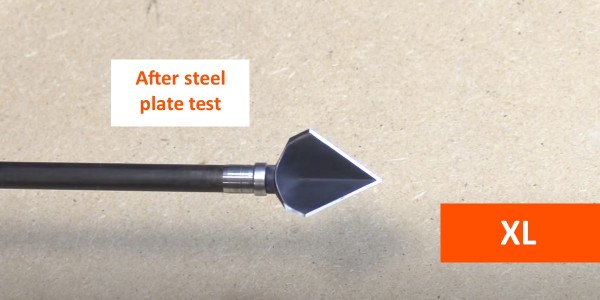
Durability Test 2, (2 shots 22 ga Steel Plate):

And here it is after the two shots through the steel plate. The blades held together very well as did the ferrule. There’s a little bit of edge chatter on the blade and a little bit of blunting to the tip. But structurally and otherwise, in really good shape.
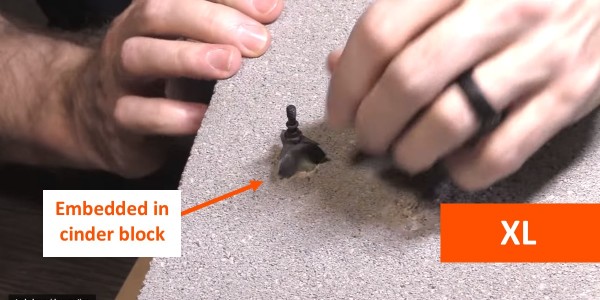
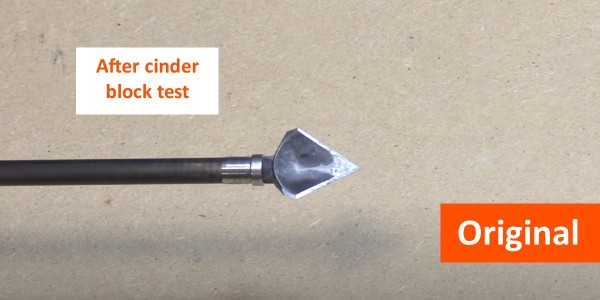
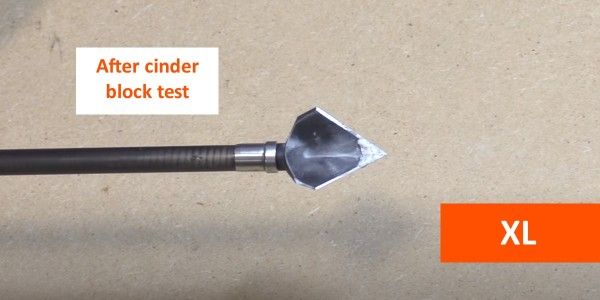
Durability Test 3, (1 Shot Cinder Block):
And into the cinder block, it also held intact. It actually penetrated really deeply into the cinder block with that tip. But you see, it got a bit of a bend in the ferrule. Actually, you can’t even make that out in the ferrule. And then mainly the bend was in the tip. The tip just got a little bit bent out but still held in place fairly. It got a bit blunted there but a little bit of a bend to it as you can see. But overall structurally, really impressive durability here.
Final Thoughts on The Bowmar Beast 2.0 Titanium
Man, the Titanium 2.0 Beast is a fantastic broadhead! I mean my goodness, first of all, the blades… what can you say about the blades, the sharpness and the edge retention still after my first penetration test! It’s sharper than I think every other broadhead that I’ve ever tested! That’s saying a lot. I mean that’s – it’s sharper after that first test, going through MDF, gel, and rubber foam mat than other ones are out of the package. Wow! That’s impressive.
So, amazing blades, amazing flight. And with this titanium body, much, much improved durability. Amazing durability and the blades. I mean really just did not have a weakness.