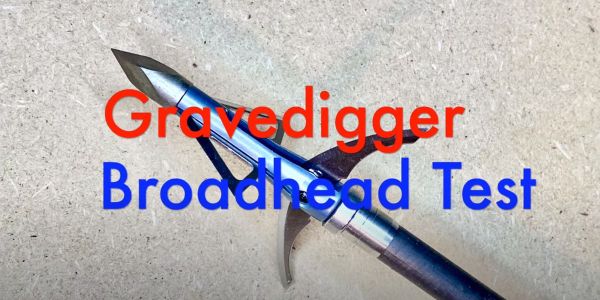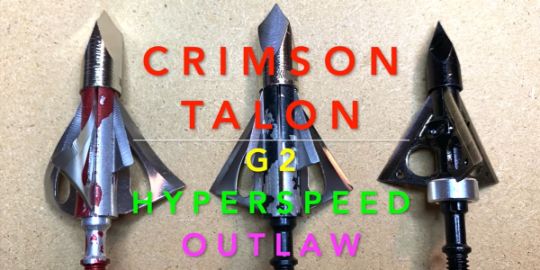
In this review, I tested three models of the Crimson Talon fixed-blade broadheads.
Crimson Talon makes the G2, the G2 Hyperspeed and the Outlaw.
The Crimson Talon lineup features the G2, the G2 Hyperspeed and the Outlaw.
The G2 Broadhead Specs
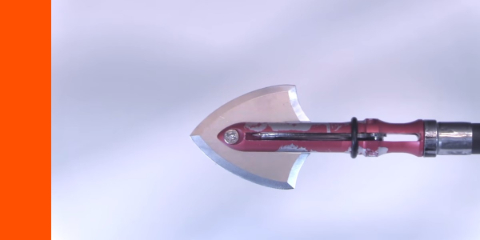
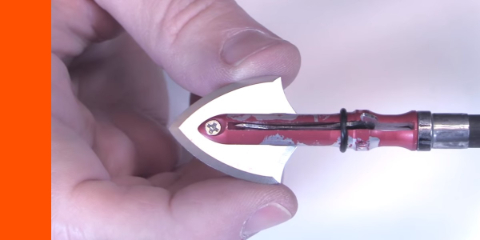
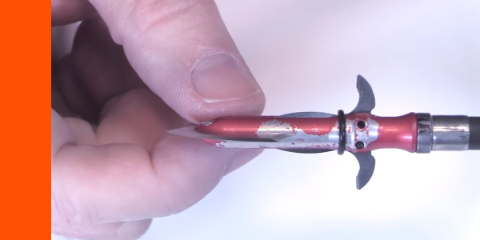
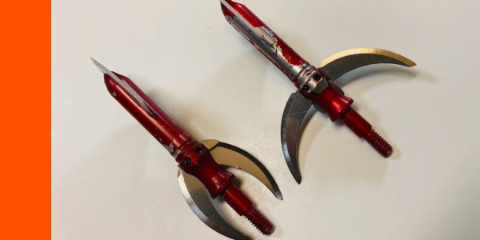
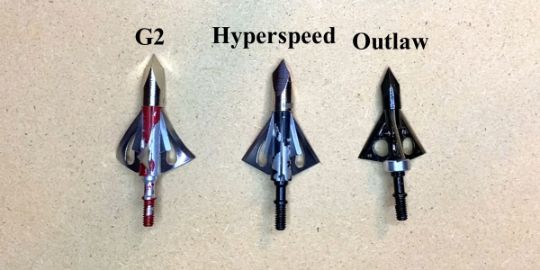
First we have the G2. It has a camouflage ferrule that they refer to as “ferruleflage.”
What initially stands out about the G2 is that it has six total blades – three main blades and three bleeders.
The main blade’s diameter is 1.25 inches, which is a big cutting diameter for a 3-blade head.
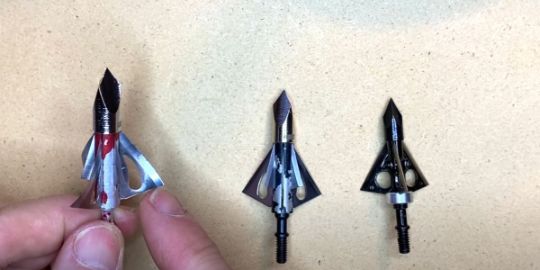
The G2 broadhead has curved blades as well as a camo ferrule they call “ferruleflage.”
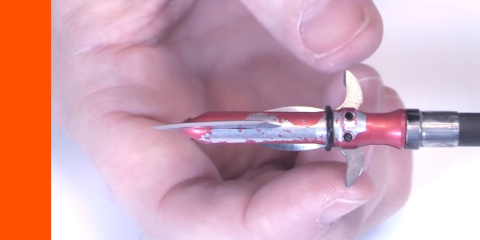
The cutting diameter of the smaller bleeder blades is 1/2 an inch. So, although they are shorter, they help with the cut.
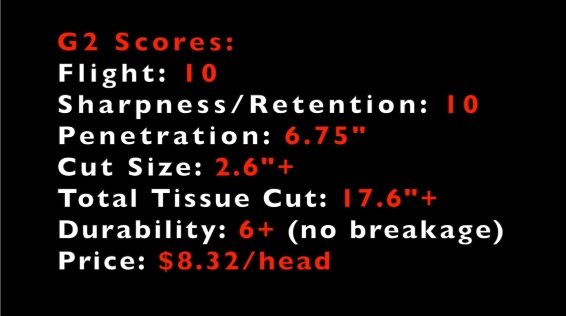
The total cut of this head is 2.6 inches!
The bleeders are also offset at a 60-degree angle, so that allows them to create an even better wound channel and do damage that is difficult to close up.

But the biggest differentiating factor on the G2 broadhead is that the main blades are curved. This apparently creates two advantages…
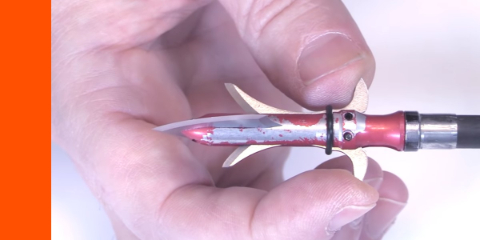
The other advantage of the curved blades is that once they hit the animal, they continue to rotate, causing a spiral wound channel. Combine that with the 1.25 inches of cutting diameter and 2.6 inches of blade cutting, and that creates a wound channel that is very difficult to close up.
Crimson Talon calls this curved blade feature their “spintite” airfoil technology. As the arrow flies, the curved blades function as vanes or fletchings would, creating quick rotation of the shaft, which results in more accurate flight. This is supposed to prevent arrow planing.
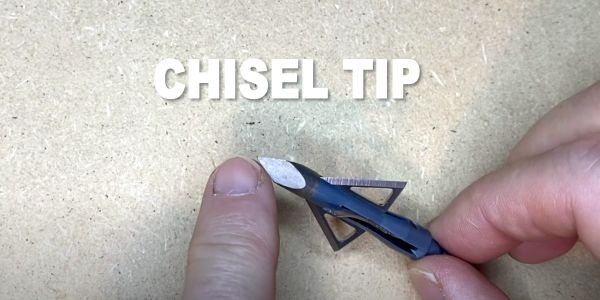
The tip is made out of A2 tool steel, so a really tough, beefy chisel tip of a very high quality steel. The ferrule is 7075 aluminum, which is a very stout, durable aluminum, stronger than some steels.
The blades of the G2 broadhead are 420 G2 stainless steel. The main blades were 0.028 inches thick, which is relatively thick compared to some other blades. But, with so much blade cutting action going on, that probably isn’t going to be an issue.
-
N1 Outdoors® Stain The Vanes™ Bowhunting Tee
Price range: $24.99 through $30.99 Select options This product has multiple variants. The options may be chosen on the product page -
Sale!

N1 Outdoors® Just Pass’N Through™ Arrowhead Tee (Various)
$19.99 Select options This product has multiple variants. The options may be chosen on the product page -
N1 Outdoors® Tine Lines™ Whitetail Deer Antler Tee
Price range: $26.99 through $29.99 Select options This product has multiple variants. The options may be chosen on the product page
We’ll see how it does in the durability test below.
One of the cool things about all of the Crimson Talon broadheads is that they have 100% lifetime warranty for any breakage, for any reason, with no expiration and no limitations. So, if any of these heads break, you just send them in and you get a replacement. That’s pretty nice especially at the price point that they are sold at.
G2 Hyper Speed Specs
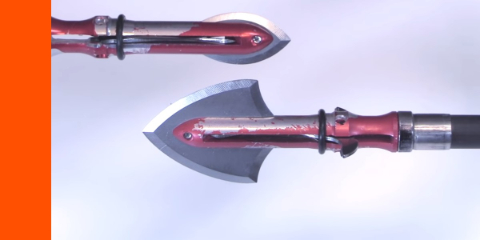
The next broadhead I tested was the G2 Hyperspeed. It’s the same head as the G2, but without the airfoil design. So, the blades are all straight.
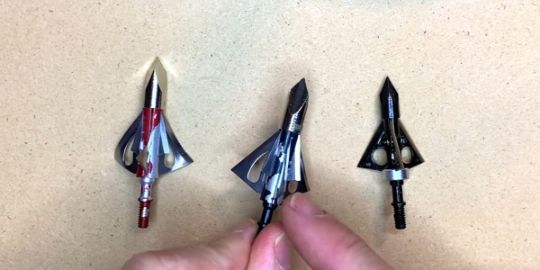
The Hyperspeed broadhead is like the G2, but without the curved blades.
Now, the bleeders are still offset at a 60-degree angle, but everything is just a straight blade. Some people that don’t want the airfoil designs will like this head.
I remember when I lived in Colorado, the Crimson Talons were illegal (at least at that time) because the blades had to exist in a continual single plane. They couldn’t be curved.

The Outlaw Specs
The last Crimson Talon head I tested was The Outlaw.
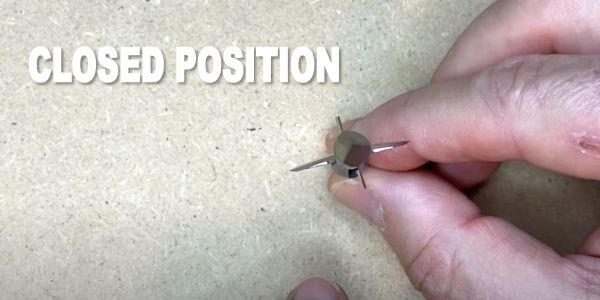
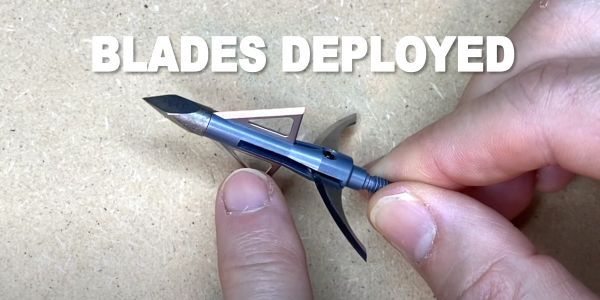
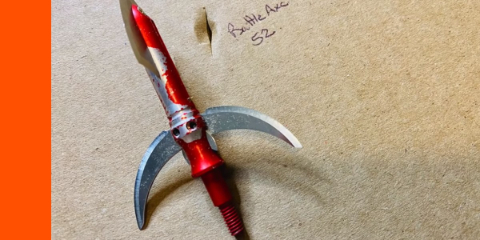
The Outlaw is it’s really basic in some ways and unique in others. It’s basic in the sense that it’s a 3-blade head with a 1-1/8 inch cut. It’s a little bit different in that all three blades are offset. The 0.040 inch thick, stainless steel blades are an offset design, to create a better wound channel.
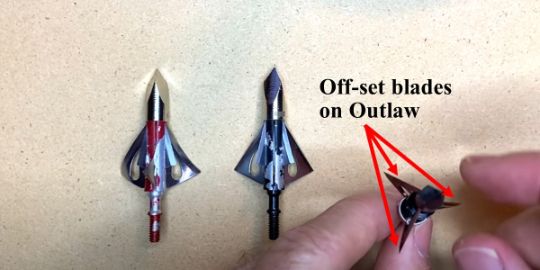
The Outlaw broadhead has offset blades and a 1-1/8″ cut.
The tip is hard stainless steel and the ferrule is solid titanium. It also has a 3-blade locking system, keeping the blades in three different places, which is supposed to make these heads very durable and have really good blade retention.

Crimson Talon Broadhead Testing
I was eager to put all of these heads to the test.
I tested them for flight, edge retention, sharpness, penetration and durability.
Let’s see how this Crimson Talon lineup performed.
-
N1 Outdoors® N-Tune™ Nock Tuning Fluorescent Arrow Wraps
Price range: $18.99 through $27.99 Select options This product has multiple variants. The options may be chosen on the product page -
N1 Outdoors® N-Tune™ Nock Tuning Reflective Arrow Tracers (24-pack)
Price range: $18.99 through $27.99 Select options This product has multiple variants. The options may be chosen on the product page -
N1 Outdoors® N-Tune™ Nock Tuning Reflective Arrow Wraps – Flame Thrower™
Price range: $18.99 through $27.99 Select options This product has multiple variants. The options may be chosen on the product page
Even more killer arrow wraps HERE!
Crimson Talon Flight
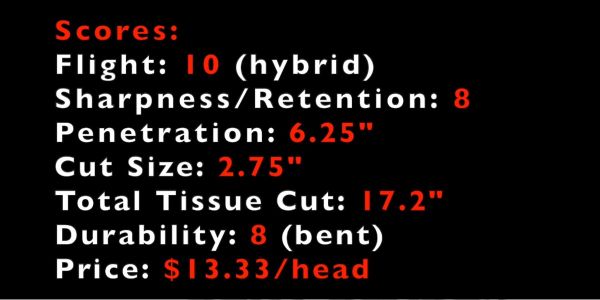
All three of the Crimson Talon heads were able to pop a balloon at 70 yards.
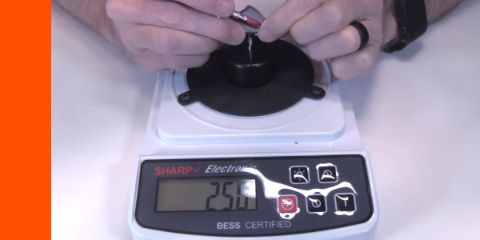
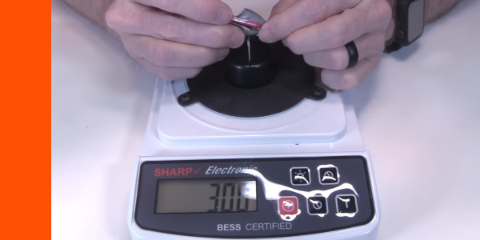
Edge retention results (out-of-the-box sharpness)
For the Crimson Talon G2, I just tested the sharpness and edge retention of the straight blades (Hyperspeed), because it’s too difficult to get it all lined up with the curved blades and they are the same blades anyway.
The Crimson Talon G2 Hyperspeed cut paper after 5 strokes of the arrow.
The Outlaw cut paper after five strokes of the arrow.
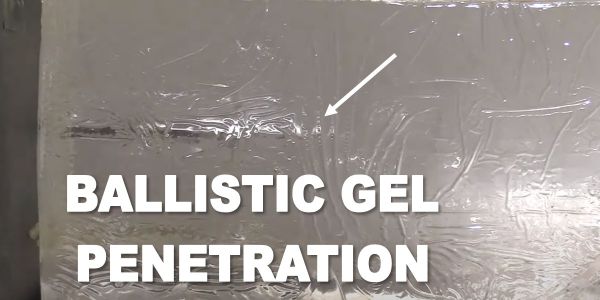
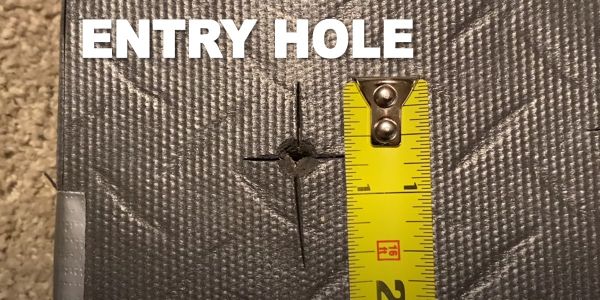
Penetration results (ballistic gel)
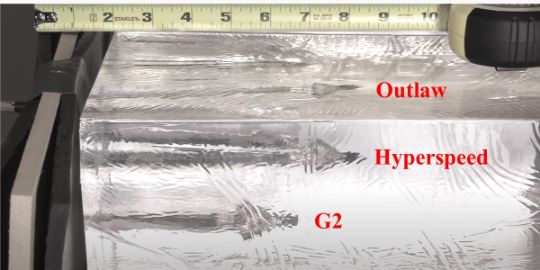
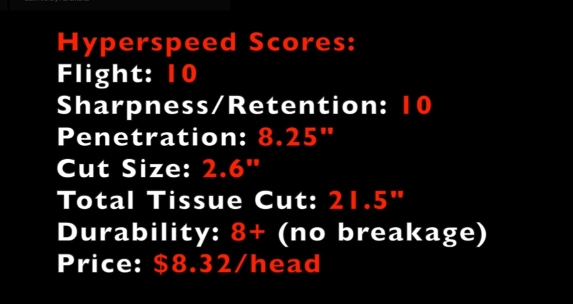
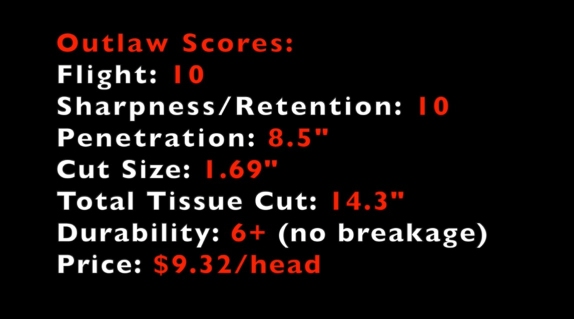
The penetration of these heads was pretty much as expected. The Outlaw penetrated the most at 8 and a half inches, followed by the Hyperspeed at 7 and a quarter inches. And then the G2 with the curved blades penetrated 6 and 3 quarter inches.
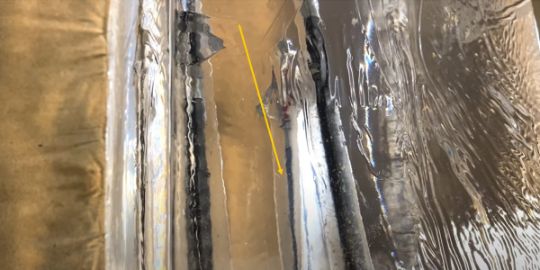
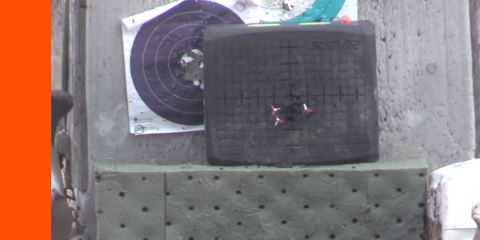
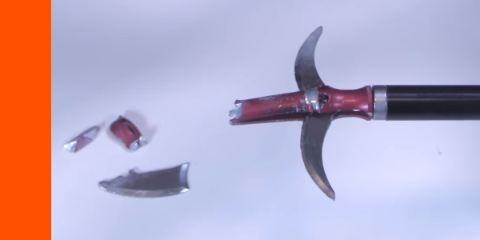
Down at the bottom there in the middle, you can see the wound channel of the G2 and you can see that rotation. The blades actually rotated from initial impact with the rubber foam mat to their final resting place. They rotated 90 degrees. So that’s pretty cool. That’s like a single bevel, 2-blade head in terms of rotation. And, that’s a wicked-looking wound channel as well.
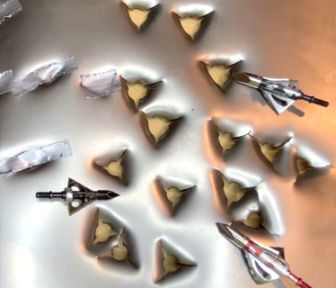
Here are all three heads after going through the 22-inch steel plate five times each. I was definitely impressed with the durability. I really didn’t expect any of them to make it through all five times. I expected them to lose blades on maybe the second or third shot. But, none of them did. All of them held their blades together really well and stayed intact.
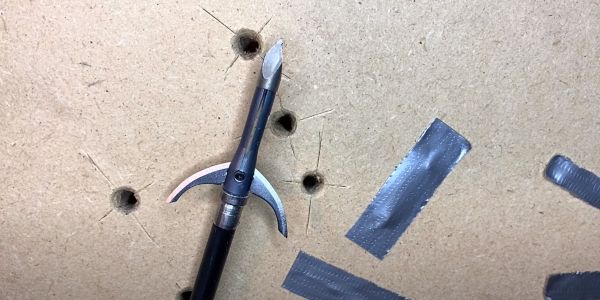
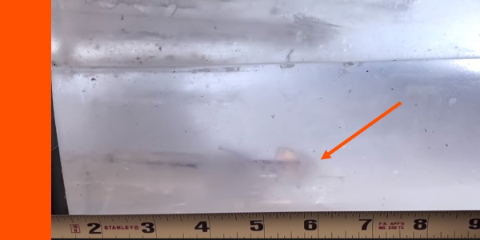
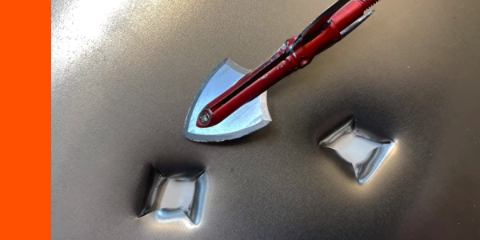
Penetration (steel plate)
If you look at the holes that the heads made in the steel plate, it’s really interesting. You can see that the Hyperspeed (top right) made the most impressive holes. It made really big, triangular holes with extra wide cuts in the tips.
Notice the G2 with the curved blades. I’m really surprised that it held together like it did. The blades did not straighten out when going through the steel plate five times. They really stayed curved together, which is really impressive. Also, the holes are still really big. You can see the curls in the ends. It didn’t make as big of a triangular hole as the Hyperspeed for some reason, but it still made a really impressive wound channel with those “S-cuts.”
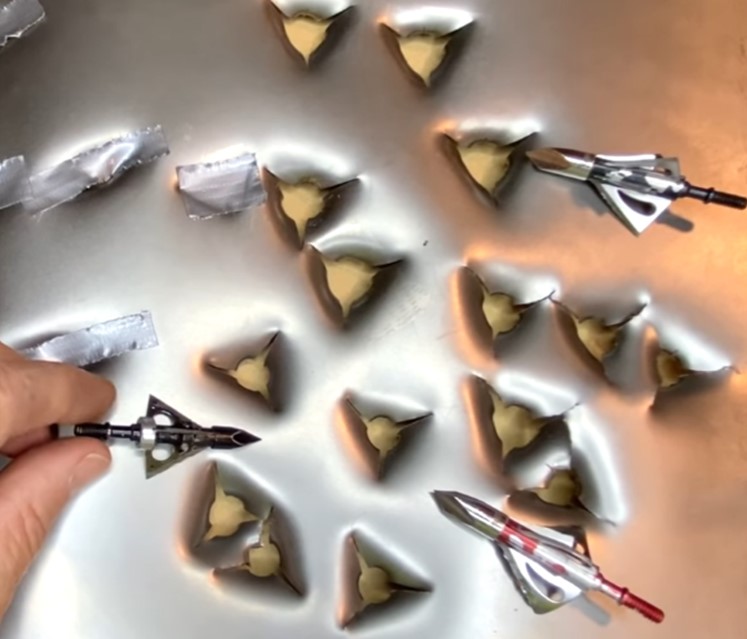
The Outlaw held together as well. And you can see the holes are a bit smaller there, that at a 1 1/8 inch cut.
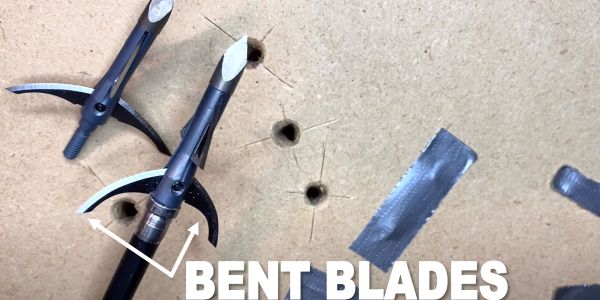
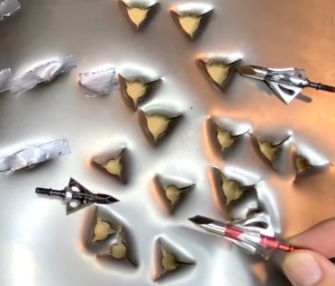
Edge Retention (steel plate)
Now, in terms of the edge retention and the durability of the blades themselves after going through the steel plate; again, all of them stayed intact. None of them bent out of shape. But, all of them did get really nicked up.
The one that probably got the most nicked up was the G2. Because of those curved blades, the head hits the steel in a new place each time as it curves around. And so, those edges would have had to be replaced after probably the third or fourth shot. But they still held intact. You can imagine there might be some damage when coming in contact with a rib, shoulder or other bones of a deer.
The Outlaw has the thickest blade, so they took a big brunt of the impact on the steel and they got next most nicked up (although the tip held together perfectly and the A2 tip on the G2 and on the Hyperspeed look brand new).
The Hyperspeed got the least amount of damage on the blades. It made it through four times before it would have had to be replaced. So, it stayed in relatively good shape. Some of the blades were still perfectly intact and some were nicked up.
So overall, really impressed and surprised with the durability of these heads.
Crimson Talon broadheads: Final thoughts
So what do you think of the Crimson Talons? I’ve got to say, I was really impressed.
When I first saw the price point looked at the heads, I thought, “Man, these things are going to fall apart.” I just thought they were kind of cheap.
But man, I was wrong! They really did perform in each one of the tests that I did on them. I was pleasantly surprised.
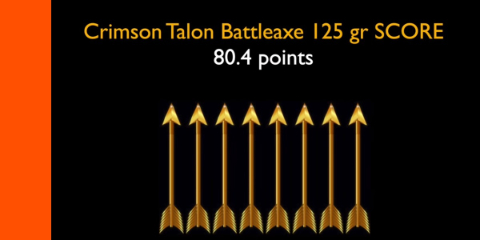
So, you can check out the score sheets below and see how they rank compared to each other and compared to other heads.
After reviewing these heads, if I had to pick a winner between them, it would definitely be between the G2 and the G2 Hyperspeed. And which one would be the winner would be based on my setup and on what animal I’m pursuing.
If I’m going after a really big animal or I have a lighter setup where I need to maximize penetration, then I’m going with the Hyperspeed.
If I’m using a setup that has a little bit more momentum, and I’m going after an animal like a whitetail sized animal, I’m going with the G2 because that is one wicked-looking wound channel!
But these two heads are fantastic heads. If I decide to pick one for my setup then it would be the G2. But, I’d be a 100% confident using both of them on an animal.
Great job, Crimson Talon. Give these a look.