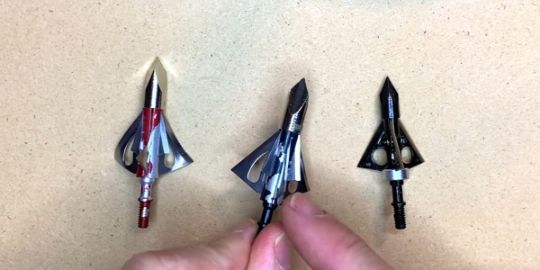
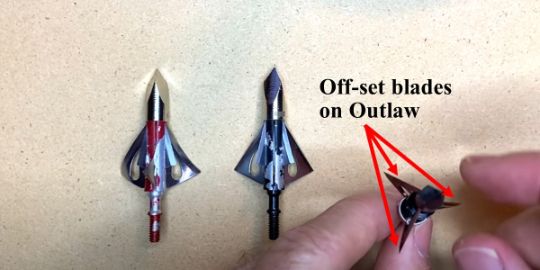
afflictor fixed blade and hybrid broadheads

Afflictor Broadheads Review (Fixed Blades & Hybrids) | The Inside Information

I had been wanting to test the Afflictor Hybrids as well as their fixed-blade broadhead offerings for a while. So, when I finally got my hands on some I was excited to test them out. (If you want to jump straight to the section of the review you are interested in, you can do so by clicking the links below:

Afflictor Hybrid Construction

I have used tested and used other hybrid broadheads on the market, but the Afflictor heads are different than other designs. They have a main cutting tip that’s about 1/8-inch thick, made of 420 stainless steel that is extremely thick and sharp and will not fold over.

They also have a feature they call a “drive key,” that also functions as a bleeder blade that opens up the main blades, but also cuts extra tissue.

The Afflictor Hybrid heads have a “Drive-Key”

Afflictor 1-3/4″ K2 Hybrid vs Afflictor Ultraviolet (Hybrid X Mini) | The differences

On the 1¾-inch Afflictor Hybrid (or, K2 Hybrid as Afflictor calls it), the drive key has little prongs on it. They are designed in such a way that if they hit hard bone, they will shear off by design, so that the head can continue to penetrate. In fact, everything about this head is designed for penetration.

Afflictor also offers a head called the Ultraviolet, that is purple in color (now called the Hybrid X Mini) . At the time of this publication, it is the only purple broadhead on the market.

The Ultraviolet has a little bit different design. The main tip of the Ultraviolet is longer and more swept than the original Afflictor Hybrid. Due to that design, it has a little bit better penetration.

Another difference is that the Ultraviolet has non-shearing drive key that functions as a bleeder blade. So it’s a half-inch wide and will open up the blades and continue to cut tissue.

With the Ultraviolet broadhead, you get a 1¾-inch cut and plus the ½-inch bleeder, for a total of a 2-inch cut.

Afflictor also makes a 1½-inch  model of this as well and it also has the ½-inch bleeder, for a total cut of 2 inches.

afflictor broadheads

The Ultraviolet (now the Hybrid X Mini) head has a longer tip and more swept design.

Both versions of this broadhead fly extremely well. They are both 5/8-inch thick in profile, which is like most other mechanical heads on the market. The specs and construction are top-notch.  They also spin very well in flight.

On impact, the drive key comes down and the blades open. There is also a pretty strong o-ring that keeps the blades from rattling during flight.

The NAP Killzone is my standard for comparison testing, as it’s been around for many years. It’s a really reliable and super strong head. However, it doesn’t penetrate very well, so anything I test should penetrate better than the Killzone.


For comparative purposes, I tested penetration and durability in comparison to the NAP Killzone broadhead.


Penetration Testing | The Setup

If you have seen any of my broadhead tests on mechanicals, you know that when I do comparative tests, I don’t test them on animals. The reason I don’t do this is because they don’t hold any value.

Different bones have different densities and bone geometries. Every animal is different. In addition, shooting angles on animal bone could have varied results, which would not provide good insight into how the broadhead truly performs.

So, I use a uniform medium to simulate animal anatomy as best as I can. I use carpet on the front and the back to simulate animal hide. I also use a rubber foam to simulate tissue and ½-inch plywood in the middle to simulate the bone.


afflictor ultraviolet vs nap killzone penetration

Penetration test using Afflictor Ultraviolet, Afflictor 1-3/4″ Hybrid and NAP Killzone.

Then I use a few more layers of rubber foam toward the end for padding, followed by another 3/8-inch plywood at the end just in case it were to make it through all of that.

I also have a thin sheet of cardboard in the very front to get a visual on how well the heads deploy on impact.  


Penetration Test #1

I first tested the Killzone head, followed by the Afflictor 1¾-inch head and the Afflictor Ultraviolet.

In the penetration test, the Ultraviolet out-penetrated the others by a wide margin. Of course, the Ultraviolet it has that more swept initial tip and also has the 1½-inch cut, and that solid drive key. Those factors made all the difference in this penetration test.

Take a look at the Afflictor 1¾-inch cut broadhead. The 1¾ inches plus the ½-inch bleeder provides 2¼ inches of cut. The blades came all the way through the ½-inch plywood after going through the carpet and the rubber mat and the cardboard.

The NAP Killzone tip came through the wood, the blades did not. The NAP has a good, long tip that’s really tough. But the blades didn’t do any cutting on this test. All the broadheads in this test held up well in the penetration test.


Spot Hogg Fast Eddie XL Long Bar Wrapped Bow Sight Single 1-Pin .019 Right Hand
$319.49
Buy Now
We earn a commission if you make a purchase, at no additional cost to you.
01/23/2025 04:04 am GMT


Initial Cut Size

When inspecting the opening cut, the Ultraviolet opened 1½ inches from the main blades and then ½-inch from the bleeders and the bleeders stayed intact.

The 1¾-inch Afflictor Hybrid opened 1¾-inch on impact and then had the drive key bleeders cut  a ½-inch and those stayed intact as well.

The NAP Killzone advertises a 2-inch cut, and it actually cut a little over two inches (2-1/4 inches).

So, all the heads in this test opened well.

afflictor hybrid broadheads cut comparison vs nap killzone

This shows the initial cut size of the Afflictor Ultraviolet and Afflictor 1-3/4″ Hybrid vs. the NAP Killzone.


Penetration Test #2: Angled Shot

In the next test, I performed a steep angled shot.

I first shot the Killzone and it stuck right in. Then, I shot the Afflictor 1¾-inch Hybrid. It stuck in, but angled off a bit. Lastly, I shot the Afflictor Ultraviolet.

In the diagram below, you can see that the Killzone and the Ultraviolet penetrated through the back of the wood. The Killzone point come through the wood but not the blades. The Killzone also broke off at the ferrule and broke my arrow.

The 1¾-inch Hybrid went through all the layers of carpet and foam and cardboard and made a deep cut in the wood, but it skimmed across the top of the plywood.

afflictor broadheads penetration vs nap killzone angled shot

In the angled shot test, all three heads penetrated, but the Afflictor 1-3/4″ Hybrid slid on impact.


afflictor ultraviolet vs nap killzone angled penetration test

Afflictor Ultraviolet and NAP Killzone penetration through back of the plywood on angled shot penetration test


broken nap killzone broadhead on angled shot

The NAP Killzone broadhead broke off at the ferrule during the angled shot penetration test.


Shooter Buck 3D Deer Archery Target with Replaceable Core, brown
$119.99
Buy Now
We earn a commission if you make a purchase, at no additional cost to you.
01/23/2025 02:38 am GMT


Penetration Test #3: Afflictor Ultraviolet into 22-gauge steel

In this test I shot the Afflictor Ultraviolet into 22-guage steel, backed with a 3/8-inch sheet of plywood, a ½-inch sheet of plywood, 4 rubber mats and a Rinehart target behind it.  

Because I didn’t want to break another arrow, I used the Mammoth Arrow by Bishop Archery, which are guaranteed for life.


The Ultraviolet went through the 22-gauge steel plate and poked through the back of the 3/8-inch board about a ½-inch. The tip held up really well.

The blades of the Ultraviolet not only went through the steel plate, but they opened up as well, which is very impressive.

When I have shot other heads into steel and plywood in this manner, they only hold up when the blades don’t reach the steel plate. But here, the blades held up and even opened up inside of the steel plate. Even the drivel key was still intact.

afflictor ultraviolet penetration into 22 gauge steel plate

Ultraviolet penetrating steel/wood and deploying blades.


afflictor ultraviolet tip after shot into 22 gauge steel plate

The tip and blades of Ultraviolet post steel plate test.

BONUS: Afflictor K2 Mini Hybrid Tests

I’ve shot the Afflictor K2 Mini broadheads not only in tests that I perform, but also in the field. I’ve killed turkeys, hogs and deer with these heads and they’ve always performed very well.

The K2 Mini is basically the same as the other hybrids (the Afflictor 1-3/4” Hybrid and the Ultraviolet). The K2 just has a shorter overall profile.

I have shot these at long range and know that they fly very well, so I did not put them through a flight test as I typically do with the other heads.


K2 Mini Up Close

Below you can see the K2 Mini up close. And again, it’s just like their other K2 Hybrid, only it has a shorter ferrule, which is going to aid in flight, since it has less surface area.

k2 mini broadhead in closed position

The K2 mini has an aluminum ferrule, but in my testing so far, it has done really well. They are quite strong. Of course, everything else is steel.


afflictor k2 mini in deployed position

The Afflictor K2 Mini broadhead with blades in the deployed position.

So let’s put it through the test and see how the Mini performs.


K2 Mini out-of-the-box sharpness test

The K2 Mini was able to cut paper after two strokes of the arrow but not after the third.

afflictor k2 mini blade sharpness test

The K2 Mini was able to cut paper after three strokes of the carbon shaft of an arrow.

Penetration test of K2 Mini

I shot the K2 Mini through a rubber mat, backed with 1/2″ MDF and ballistic gel. The results are below.

afflictor k2 mini penetration into ballistic gel

The K2 Mini penetrated in ballistic gel right at 8 inches.

K2 Mini durability testing

I shot the K2 Mini through 1/2″ MDF that was backed by a Rinehart target. See below.

afflictor k2 mini broadhead after going through MDF 4 times

The blades and tip of the K2 Mini held up well after going through the MDF and Rinehart target four times. The small drive keys that deploy the blades broke off, but that is by design.


Summit Treestands 81120 Viper SD Climbing Treestand, Mossy Oak
$297.67
Buy Now
We earn a commission if you make a purchase, at no additional cost to you.
01/23/2025 03:05 am GMT

K2 Mini steel plate test

Usually, I don’t do this test with expandable broadheads, but I also shot the K2 Mini into a .22 gauge steel plate because they typically don’t make it through the first time. But, this one made it through the first time just fine. The second shot did some damage. See below.

afflictor k2 mini after second shot through steel plate

This was after the second shot through the steel plate. You can see that it got pretty dinged up. The ferrule is in great shape. It lost those drive keys again. Tip is in perfect shape and the blades got a big dinged up there as you can see. So the blades would have to be replaced, but the head could be good to go.

It was pretty impressive for a mechanical like the K2 Mini to make it through the MDF four times and through the steel plate twice.


Hybrid X and K2 Mini Hybrid Improvements (2021)

In 2021, Afflictor made some modifications and improvements to their line of Mini hybrids.

Let’s cover some of the improvements made to the K2-Mini Hybrid the Mini Hybrid-X. Then, we’ll put them to the test.

Hybrid X Improvements

afflictor hybrid x mini closeup

Here’s a good look at the Hybrid-X Mini close up. This used to be called the Ultraviolet but now they call it the Hybrid-X Mini. In the closed position, you’re getting around 0.6 inches of cut from the main tip. From the bleeders that are the drive keys that open the blades, you’re getting another ½-inch of cut. So you’re getting over an inch of cut even in a close position, which is nice.

afflictor hybrid x mini cutting diameter

The blades are held together by a small retention ring. On impact, the retention ring is forced back the pressure on the drive keys open the blades into their full position. The cutting diameter on this Minis is 1.5 inches, which is a nice, healthy cut.

afflictor hybrid x mini bleeders

Plus, you’re still getting the bleeders that  cut another half an inch, so you’re getting a total cut of 2 inches. That’s the same for each of the Hybrid Minis, both the Hybrid-X and then the K2-Mini.

afflictor hybrid x mini weight collar

Now, another unique thing about these heads is they have a weight collar. So without the weight collar, you have a 100-grain head and with the weight collar, you boost it up to 125 grains.

afllictor hybrid x mini improved tip screw

The pen that holds the blades in place is now made of a much stronger steel than on former models, making it more durable.

The blade bevel angle has also changed from former models, making the blades not so thin. They used to have quite an extreme bevel, which made them really sharp, but they didn’t hold an edge quite as well and would get pretty nicked up on penetration. So, the bevel is now steeper, making the blades tougher.  


K2 Mini Improvements

K2 Mini closed position

The K2 Mini looks really similar to the Hybrid-X Mini, although it’s green.

afflictor hybrid x mini tip vs k2 mini tip

However, you can see here how the tip of the Hybrid-X (purple) is longer thant the tip of the K2 Mini, which also makes the overall profile of the K2 Mini (green) shorter as well.  

Tests of the Hybrid X Mini and the K2 Mini (2021)

I tested for out of the box sharpness (225 for both), as well as ballistic gel penetration, edge retention (300), layered cardboard penetration, blade opening and concrete penetration.

hybrid x mini vs k2 mini ballistic gel test

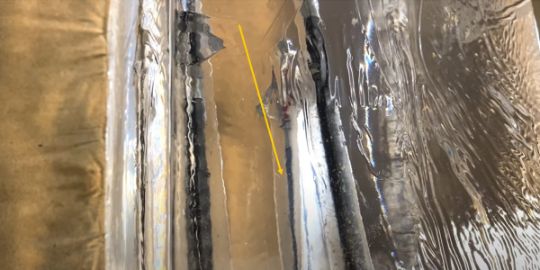
Each of the heads penetrated exactly at 7 inches. I know it’s hard to see the K2-Mini there. It’s weird with the glare and the refraction, the way it works with those gel, but it’s there. And they both penetrated 7 inches.

hybrid x mini vs k2 mini cardboard test

They each penetrated through 52 layers.

I wanted to test how well these heads open and see what their entrance hole is like on a cardboard box with a thick layer of leather stretched tightly over it.

hybrid mini x blade opening test front and back of box

The Hybrid-X opened 1-1/4 inches on the initial impact (corner pic). You can see on the back of the cardboard box, it was at the full 1-1/2 inches (larger pic).

k2 mini blade opening test front and back of box

The K2-Mini opened 1-1/2″inches on the initial impact (corner pic) and then on the back of the box it stayed right at 1-1/2 inches (larger pic).

I also shot both heads 5 times each through 1/2″ MDF. There were no signs of wear whatsoever. Everything held together perfectly well including the drive keys, they function, the blades can still close and open. No bend on the ferrule. I was really impressed with the durability!
hybrid x mini after concrete test

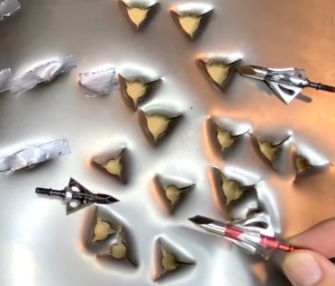
Here’s the Hybrid-X after impacting the concrete block. As you can see, it did not hold up very well to that hard impact test. It just broke into a lot of different pieces. And the pieces I could find, I put down here. Now, the tip was really durable and it stuck into the concrete well. But the rest of it there just kind of blew apart. (I didn’t do the concrete test with the K2-Mini because it’s the same design. And, it’s interesting that the durability of these Hybrids, it’s so good through the MDF and other impacts like that. I’ve even shot them through steel plate before. And they’re one of the more durable with a cutting impact like that. But, in a zero penetration test, they just have their limitations.

Now, does the concrete test have a real world application? That’s up to you to decide.

I’ve hunted with these many times and they’ve done very well. So, they definitely have their strengths and anybody using a mechanical doesn’t use them just because they are the toughest, most durable heads on the market. They are using them because of their small size in flight and then their big opening, not their durability.

But it’s interesting to see the way that this head performed in that zero penetration test.


Final Thoughts on Afflictor Hybrids

So, what do you think of these new Afflictor Hybrid Minis?

I didn’t really know what to expect from these heads. But, I have to say I was impressed. They have a very low profile and will fly really well and shoot accurately.

I like that overall cut size that they have to maximize penetration.


Bushnell 4x21 Hunting Laser Rangefinder Bone Collector Edition in Realtree Xtra Camo
$139.99
Buy Now
We earn a commission if you make a purchase, at no additional cost to you.
01/23/2025 03:04 am GMT

I didn’t expect them to open so well, penetrates so deeply and hold up as well as they did through the mediums, unlike some other heads I’ve tested.

The Ultraviolet (Hybrid X Mini) penetration was extremely impressive, especially on the angled shot, as they not only penetrated the steel plate and the plywood, but also deployed the blades.

Now, in the zero penetration test, in the concrete, they did not do very well. There are so many parts and components that that kind of zero penetration, that’s just not their strong suit.

But like I said, I’ve used them so much in the fields and that has never been an issue. So, it’s up to you to determine with each of these data points, how important are they to you in your hunting situations and for your hunting needs?


As for which one I really like the most, I like them both. I mean they performed so comparably. I probably lean towards the K2-Mini just because it’s a little bit shorter overall. But both of them are really good.

And, I applaud Afflictor for strengthening that pen. I could notice that in some of the testing and just my own testing about it just on the side as well as the edge durability and changing that bevel, that really does help and makes a difference.

If you are looking for a fool-proof hybrid mechanical head, the Afflictor Hybrids have qualities of a mechanical and a fixed blade and are going to fly like a dart and hold up well so you can kill some big game!

So, check out the score sheet. See how they perform in the areas that matter to you the most and see if maybe they are the right head for you.

scorecard hybrid x mini and k2 mini
Scorecard for Hybrid Mini X and K2 Mini heads


The Afflictor Fixed Blade Head Offerings

In the following review, I’m going to be testing some of the the fixed-blade heads in the Afflictor lineup.

Afflictor Fixed-Blade Broadheads

afflictor k2 and ext broadheads

The Afflictor K2 and EXT fixed-blade broadheads are similar in design, but the K2 has a shorter profile.

There are a lot of good companies in the archery business, and Afflictor is certainly one of them. Afflictor has a passion for testing, they are ethical and they are faith-based.

Now, before testing the fixed blade heads from Afflictor, I was already a big fan of the Afflictor Hybrids. I’ve taken deer, turkey, and hogs with them. They’ve always performed really well. They flight great. They penetrate deep, they hold up well and they inflict a lot of damage in animals.

So, when Afflictor sent me the fixed blade heads, I thought, “Well, I really like the hybrids.” But, then when I started shooting the fixed blade heads, I thought, “Man, I really like these too!”

I first tested the K2 and the EXT models. They’re similar in design, but obviously, they have different specs. (Further down in this review, I also tested the Heavyweight versions of these heads).


An overview of the fixed heads

When I first looked at the fixed blade heads, I thought, “Okay, they’re just like normal 4-blade fixed blade heads.”

And yes, they are, but there are some unique things about them.


Low profile

First of all, the K2 has a super short, low profile design. That’s why it flies so extremely well.

I would put the K2 up there with any fixed blade head as being the very best flying. There are several that I put in that category that just are top of the food chain in terms of long distance flight. This one is one of those.

The EXT also flies very well, but at super long ranges, it’s not quite as good as the K2, and that’s just because there’s more surface area.

You can see the total length is greater on the EXT heads, and therefore more surface area. That’s why the K2, with less surface area tends to fly better at long distances.


Blade thickness

Another unique feature of the K2 is that the blades themselves are extremely thick. They are 420 stainless steel, so they are a decent stainless steel. But beyond that, they are really thick.

The standard for many fixed blade heads is 0.030 or 0.035 inches thick. I have always liked how the QAD Exodus blades are 0.040 inches of thick. Well, the K2 blades are 0.059 inches thick. That’s impressive! (All four of the blades on both the K2 and EXT are 0.059 inches thick).

K2 and EXT tips

This tips of the K2 and EXT are also very unique. It’s not like a chiseled tip on other broadheads. It’s not like a true “cut on contact tip” though it does cut on contact. But it’s really thick. It’s actually double the thickness of the blades themselves. It’s 0.125 inches thick!

With that thickness, what that translates into is two things. First of all, durability. But, secondly, it’s going to make a really thick cut through the deer or animal. And, I found that with all things being equal with penetration, the thicker the blades, the harder it is for that wound channel to close up.

Afflictor K2 and EXT broadhead tips

The tips of the Afflictor K2 and EXT is extremely thick.

This results in better blood trails.

That’s why these Afflictor fixed blades perform so well for me in the field and have created such good blood trails; it’s the blade thickness.

A Horizontal blade cross? Yes, and here’s why

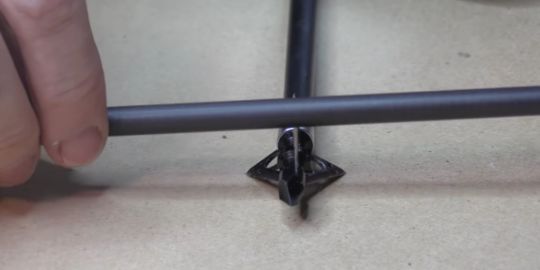
Another thing that is unique about these fixed heads is if you look really closely, the top of the cross blades are actually horizontal for a little bit and then at an angle.

This feature is not by accident.

Now, you might look at that and say, “Well, that’s going to impede penetration.”

Actually, what Afflictor found is just the opposite.

k2 and EXT horizontal blades crosssing

The K2 and EXT have a horizontal blade crosssing that actually aids in bone penetration.

In all their testing, the folks at Afflictor weree surprised to see it that sometimes what really happens during penetration seems like it defies the laws of physics.

They found that the penetration through bone has actually improved by having a little bit of horizontal cut because the head is able to breach the bone. It pushes the bone out of the way more effectively with that angle as well.

I was interested to see how it does this in my own testing.


Higher FOC

With the extra thick tip and with the cross blades being moved up on both the K2 and the EXT, it allows for a greater FOC. So, compared to other heads that have similar dimensions, these are going to have more weight toward the front end. That’s going to aid in forgiveness in flight and it’s also going to aid in penetration.


Fixed-blade ferrules

The ferrules on the K2 and EXT are aluminum. Now, I’m not typically a big fan of aluminum… unless it’s this kind of aluminum. The aluminum ferrules on these heads are made of 7075 T6 grade aluminum.

So, this aluminum is stronger than many steels. I haven’t had any problems with it in the field. Let’s see how it did in the testing.

For each of my tests, I used my Bowtech SR6 on the comfort setting, set at 72 pounds, 27-inch draw. I used Bishop FOC King Arrows (460 grains), Nockturnal Nocks and FOBs.

What I tested for

Because of the weather at the time of these tests (we were in the middle of a blizzard here in Iowa), I did not go outside to test long range flight.

I’ve already shot the K2 at longer ranges in the field and I know it is absolutely fantastic, the best of the best at longer ranges. I would give it a 10. It flies like at ATAC, Iron Will original, or a Bishop Holy Trinity… very, very good flight.

I would give the EXT a 9. It does really well out to about 60 yards. But, it’s a little more touchy beyond that. I can still pop balloons at 80 yards but I have to really focus on it.

I did, however test for penetration, durability, and edge retention.


Penetration testing of Afflictor fixed blade broadheads

I tested penetration by using a 1/2-inch inch layer of MDF, surrounded by 1/3-inch layers of rubber foam matting. On the back side of that medium is ballistic gel, made by Clear Ballistics. The clear gel allows you to see exactly what the broadhead is doing inside the gel.

I also measured the penetration, so that it can be compared to how other heads penetrate the same medium.

k2 and ext broadheads in ballistic gel

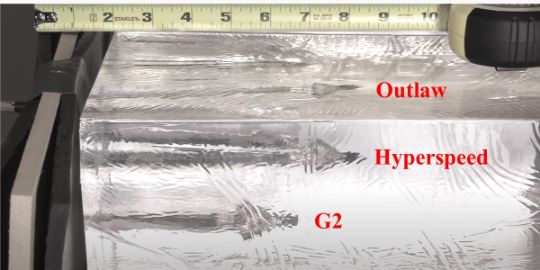
Here, you can see the penetration of the two. And as expected, the one with a smaller cut, penetrated more deeply than the one with a larger cut, though it wasn’t by much. The EXT here at the bottom penetrated 8 and 1/4 inches and the K2 at the top penetrated 7 and 3/4 inches.

Durability and edge retention testing

I shot these heads through a 22-gauge steel plate. In this test, I will shoot through the steel plate as many times as possible (up to 5 times), until the blades really start to get damaged. When the blades start to get significant damage, I stop.

For the purposes of scoring, each time I shoot without them getting significant damage, I give the head 2 points. The maximum a head can receive is 10 points. The maximum is 5 shots.

As for the blades themselves, I shot both the K2 and EXT into the steel plate and examined them after each time. Both heads made it 3 times into the steel plate before the blades began to get pretty mangled.

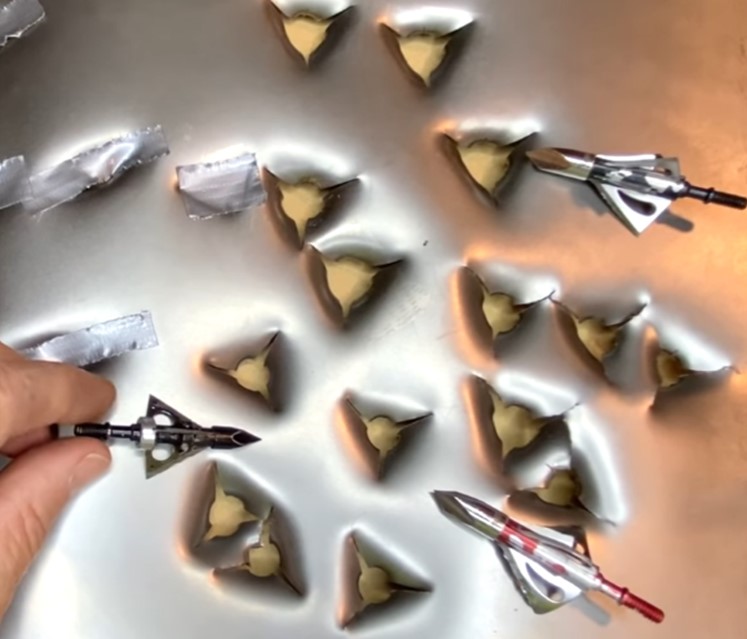
holes in steel plate made by afflictor k2 and ext broadheads

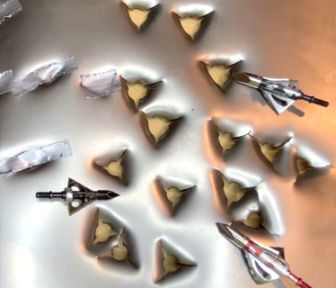
Here are the holes that the K2 and EXT made in the 22-gauge steel plate. And you can see, the ones at the bottom are by the K2. The ones on the top, the EXT. The K2s really punched a big hole. You can see why they would open up a big hole in an animal. That wound is not going to easily close up. Really, really impressed by that.

The blades were not bent way out of shape, but they were definitely getting nicked up enough to stop shooting. So, three shots through the steel plate at that range is pretty impressive. The blades are replaceable and would need to be replaced. But, they will get a score of 6 because they made it three times into the steel plate.

K2 and EXT blade damage after going through steel plate

Notice that the tip is just like brand new. It did not move at all. And that’s what really matters the most when it’s going into an animal. So, I was really impressed with that. And then it was actually the same for the EXT. So, you can see the blades there getting pretty nicked up and you can see those cross blades there getting a little flared out, a little bent out of shape. And again, the tip just pristine.

Both the K2 and EXT are really good heads. For flight, for total cut size, and for damage being inflicted, I go with the K2 but both of them are really good heads.

Actually, in the field, I would say the K2 does even better on animals than it showsin the testing.


The Afflictor K2 and EXT heavyweight fixed heads

In addition to the K2 and EXT, I also tested the Heavyweight versions of these broadheads. All of the heavier Afflictor fixed blade broadheads are stainless steel and they vary in weights from 155 to 200 grains. In my tests on the heavier fixed blade heads, I specifically be testing the 200-grain models.

afflictor EXT and K2 broadheads heavyweight lineup

Here’s a look the Afflictor Heavyweight lineup of their fixed-blade heads.

How the heavier fixed blade heads are different

The heavier versions of the Afflictor EXT and K2 differ from each other, as well as their lighter counterparts…

The tips and ferrules of the heavyweights

One main difference between the EXT heads and the K2 heads is the tip (The EXT tip is also used on the EXT Hybrids and the K2 tip is also used on the K2 Hybrids).

The biggest difference in the heavyweight heads over the 100 and 125-grain models is that the heavyweight versions are all stainless steel. The ferrules are no longer 7075 aluminum as they are in the lighter weight models. Now, they are stainless steel.

For example, the 155-grain model is basically the exact same head as the 125-grain model but with stainless steel ferrule, which adds the extra weight.


The tips on both of these heads are extra thick. By my measurement, it came out to 0.14 inch thick in that leading tip of both.

Now, some people note that the tip on these heads is not super sharp. And, that’s right, it’s not.

But don’t let that fool you in terms of its performance. It’s really about edge-integrity.

The tips on these heads promotes edge straightness, (the lack of chips and dings and bending that affects penetration) and they are really tough, holding a straight edge all the way into an animal. Then, the blades behind them do the cutting.

afflictor heavyweight fixed blade broadhead bleeders

The tips of the EXT differ from the tips of the K2, but they are both extremely thick.


heavier afflictor heads with weighted washers

The heavier heads are basically the same heads as the lighter models, except that they have stainless steel ferrules and weighted washers, which, in addition to larger blades, gives the extra weight.


bleeder blades of Afflictor K@ and EXT

The bleeders on both the K2 and EXT are very thick.


Blades, bleeders and cutting diameter

I really like the way Afflictor increased the weights of these heavyweight broadheads by beefing up the blades themselves. Very well done.

Some other things you’ll note about the different models is the EXT has a cutting diameter on the main blades of 1-1/4 inches and then the bleeders are 11/16 of an inch.

And then on the K2, the maximum cut 1-1/8 inches and then the bleeders are 1 inch. So, it’s kind of cool that you have different dimensions to choose from based on your setup and what kind of a hole you want to put in the animal.

Some other things that are noteworthy are the main blades on both the EXT and the K2 are both 0.053 inch thick. That’s a thick main blade!

Typically, bleeders are thinner and weaker, but not on these heads. These bleeders are 0.059 inch thick. So really thick bleeders right there.

I’ve taken a number of animals with the 125-grain fixed versions and they all performed really well.

So, as you can see, for many reasons, I was eager to put these heavier weight broadheads to the test.


Heavyweight Afflictor fixed-head penetreation test

I didn’t test the heavyweight heads for all the things that I tested the 125-grain model with, like flight. They are basically the same dimensions (just differing weights), so they’re going to fly the same.

I’ve also already tested them for edge sharpness and edge retention and they did very well.


But, I did test them for penetration and durability. And for that, I’m used the 200-grain version, just because I was curious to see how that heavier weight makes a difference in terms of the penetration and the durability.

So, let’s see how this heavyweight lineup of the EXT and the K2 Fixed-Blade Afflictors performed.

For the penetration test, I shot into a foam mat, backed by ½” MDF and a block of ballistic gel.

Check out the penetration results below:

afflictor k2 200 grains ballistic gel penetration

The K2 200 grain head penetrated 9 inches into the foam mat/MDF/ballistic gel.


afflictor EXT 200 grain penetration ballistic gel

The 200-grain K2 penetrated 9 inches. The EXT penetrated 9-1/4 inches.

Durability testing of K2 and EXT

I shot both heads into a .22 gauge steel plate. Both the EXT and the K2 heads really punch a hole, as opposed to “slits” like some other heads make. That’s what I look for in a fixed-blade head. I want something that punches a big hole, because it’s going to be a lot harder to close up that wound channel.

Both heads were impressive in this test, but I give a slight edge (in the way the hole looks) to the K2.

afflictor k2 and EXT broadhead durability test

If you look at the heavyweight K2 here, you notice that it really does make a bigger hole. It’s interesting because the heavyweight EXT is a bit wider just by an 1/8 of an inch. But because the bleeders are so wide over here in the K2, man, it just makes a nice big hole. You can see the same type result with the EXT here. The tip and ferrule are in perfect condition, but those blades got a bit nicked up. But very impressive holes and impressive durability.

Now, as for the durability of the heads themselves, they both held up fairly well. Of course, the tips and the ferrules are all in perfect condition. The tip is really durable. You can’t even tell it has been shot into anything, let alone steel.

But, the blades got really nicked up, and that started on the second shot. You could see them start to get nicked up on the first shot and then a little more with each subsequent shot.

Now, they are replaceable blades. Their gradual bevel makes them really sharp, but it also makes them a little prone to a bit of edge bending and nicking when shot into a super hard medium like steel.


Final thoughts on the Afflictor heavyweight fixed heads

So what do you think of the Afflictor Heavyweight K2 and EXT broadheads?

I’ve used them in hunting situations and they perform really well. I’ve been impressed with how beefy these fixed blades are (I especially love the Hybrids).

Like a few other broadhead companies out there, I’ve been so impressed with the Afflictor lineup,

So, check out the score sheets below and see how these things performed, and consider them.

If you’re looking for a little more “oomph” and more FOC, they might be the broadheads for you.

afflictor EXT test scorecard
Scorecard for the Afflictor EXT 200 grain broadhead.
k2 broadheads testing scorecard
Scorecard for the Afflictor 200 grain K2 broadhead.
hunting video gear

Start Filming Your Hunts | A Self-Filming Checklist

I sat there stunned at what just happened.

I had traveled 500 miles for this particular moment, only to sit and watch this big Kansas buck walk right out of my life.

And, it wasn’t because I didn’t have the opportunity to let an arrow fly.

I actually took aim, settled my pin, and painfully watched my arrow hit right in front of his body.

big kansas buck

When you film your own hunts, moments like this will be captured indefinitely to not only relive yourself, but share with others.

I could not believe my eyes! I’ve made that exact shot in my yard 10 out of 10 times.

As I sat there 20 feet up in that oak tree, trying to figure out what happened, I heard something behind me coming down the same trail. I turned to catch a glimpse of a wide Kansas buck heading my way.

I couldn’t believe this was happening so soon after I had missed the other deer.

This time, I was even more determined to settle my pins and connect on this nice Kansas buck! 

As I released the arrow, I watched intently as it found its mark and sent the buck bolting through the woods to certain death.


Finally, after two years of hunting in Kansas, I was able to enjoy the fruits of my labor. It was a very exciting moment for me, as I anxiously texted my hunting buddies… “Big Buck Down.”

What makes this hunt even more special is the fact that I got it all on video.

Videoing my hunts allow me the privilege to watch them anytime I want to.

With today’s technological advances, it doesn’t have to cost an arm and a leg to get started filming your own hunts. Keep reading for two things that you will need to get started…

The scenario above happened almost a year ago. I went back and watched it five minutes before I wrote this article.

When I’m having a bad season and not seeing very many deer, I can always go back and watch the moment I killed my first Kansas buck.

Talk about a very rewarding experience.


First thing you need to film your hunts: Video Equipment

Choosing the right equipment is going to be a critical piece of the puzzle for creating quality footage of your hunts. This equipment can be as expensive or as cheap as you would like, depending on what you are after.

Let me just assume that most of us are on a limited budget but would still like pretty good equipment to capture our hunts.


The below list is certainly not all of the things that you could buy for filming your hunts. However, these are all of the things that you should buy for filming your hunts.

These pieces of equipment will help you be able to effectively tell your hunting story verbally and visually. 


Energizer 100AA Ultimate Lithium Long Lasting Leakproof Batteries
$201.00
Buy Now
We earn a commission if you make a purchase, at no additional cost to you.
01/23/2025 04:48 am GMT

There are five pieces of video equipment that are critical to getting started filming your hunts… and they won’t break the bank. Read on for specifics of each…

  • Camera
  • Camera arm
  • External microphone
  • Fluid head
  • Remote control

Video Camera

video camera for filiming hunts

The Canon 6D Mark 2 is a good camera for capturing your primary video while filming your own hunts.

Obviously, you cannot film hunts without a camera, but what camera do you choose? That’s a great question that gets asked often.

First, It is very important that you choose a camera that is “High Definition” and has good low-light capabilities. The high definition will help you have clearer footage and the low light capabilities will help you get a few extra minutes of film time in the morning and the evenings. After all, you never know when you’re going to see something so rare that you’ll wish you had footage of it later on.


It is also important that you get a camera that has an external mic jack. If you are self-filming, it is important for you to choose a camera that has a good auto focus setting.

We currently use a Sony Ax-53 ($800) and a Canon 6D Mark 2 ($1500.)

Secondary cameras are also a big help to capture extra footage, such as GoPro, Spypoint or Tacticam.


Camera Arm

fourth arrow video camera arm for hunting videos

It’s important to be sure you have a camera arm with enough length to film in some of the awkward positions hunting can put you in.

It wasn’t until a recent hunt that I realized how important stabilization was for a camera.

We were on a hunt and managed to forget the arm plate, so I had to free-hand film the hunt. A doe came into our location and circled around the tree and put me in an awkward position while filming.

When we watched the footage back on the TV, I was shocked at how shaky I was. This one experience made me even more of a believer in good camera arm.


It’s important to choose a camera arm that has some length to it. This will help when the deer puts you in an awkward position of filming across your body or around the back of your tree.

Fourth Arrow has some amazing camera arms that are affordable, ($100-$300) adjustable, and easy to use. Muddy also has some great camera arms that are reasonably priced ($100-$300) and easy to use.


Muddy Outfitter Camera Arm, Black, One Size
$112.96
Buy Now
We earn a commission if you make a purchase, at no additional cost to you.
01/23/2025 03:14 am GMT


External Microphone

rode external mic for filming hunts

An external mic will help you capture sounds from farther away than if just using the mic on the video camera.

Every camera you buy comes with a built-in microphone, and they work decent most of the time. However, they are just not as clear or as sensitive as they need to be when capturing the sounds of the woods.

There’s just something special about being able to hear the leaves crunching under the deer’s feet when you are watching your hunt on TV or on social media. You will hear a lot less of those types of natural sounds without an external microphone.


Another problem with not having an external microphone is when you put distance between the camera man and the hunter. An external microphone will give you a lot more range of distance than your standard camera mic.

It is true, most people will watch bad footage with good audio before they will watch good footage with bad audio. Rode Mics offer a variety of microphones for most cameras.

Trust me when I say, you will want to get an external microphone!


Fluid Head

sony 4k video camera for filming hunts and fluid arm and remote

The fluid head, as seen here attached to the tripod, helps you make smooth, controlled camera movements. The remote allows you to operate the camera with one hand, freeing up the other for your bow or gun.

Yeah I know, I thought the same thing when I heard about “fluid heads.”

So, what is a fluid head?

It’s an attachment that fits onto your camera arm that works by hydraulic fluid. The hydraulic fluid head allows you to make smoother movements with your camera. This creates better, higher quality footage for your viewing.

Pro Am has some very good fluid heads at reasonable prices. ($100-$300)


IFOOTAGE Video Tripod Head Fluid Drag Pan Head for DSLR Cameras, Camcorder, Monopod and Tripods, Komodo K5
$139.00
Buy Now
We earn a commission if you make a purchase, at no additional cost to you.
01/23/2025 04:13 am GMT

Remote Control

A remote control for your camera is very important, especially if you are self-filming. It enables you to basically do everything with one hand so you can use your other hand to grab you bow or your gun.

Most cameras have remote controls that can be purchased for them. I prefer to use the remote controls that are wired and plug directly into the camera.

Camera remotes are made to attach to your camera arm handle and can be a lifesaver when a deer walks into range. They help you minimize movement while your target animal is close.

Second Thing You Need: PASSION

hunting video equipment

Getting started videoing your hunts is not as expensive as you might think. There are many affordable options available for you to begin capturing those unforgettable outdoor moments.

Passion is nothing more than a strong desire for something. And, if you are going to film your hunts, you are going to need a strong desire to do so.

I promise you there are going to be moments when you will wake up and you are already late to your stand and taking time to get camera gear to the tree will make you even later.


Then, there will be times when you will forget pieces of equipment and the thought will run across your mind, “I don’t know why I even mess with this junk. I’m not doing this anymore.”

Possibly, even worse than that, you will have a big buck bust you because you were reaching for the camera instead of your bow. It’s during these moments that it will take passion to help you keep going.

To successfully film your hunts, the second thing you need is to have passion in the following three areas…

  • Passion for hunting: Passion for hunting is probably the most obvious one. You have to love the hunt! Passion for hunting is what is going to keep you in the woods experiencing all of the things that are film-worthy. If the idea of being perched up twenty feet in a tree with a bow in your hand anticipating a big buck coming near gets you excited, then congratulations, you have a passion for the hunt!
  • Passion for telling the story: I had a man tell me once, “You tell stories really good.” That’s because I have a passion about telling stories. When I tell a story, I want people to feel what I was feeling, hear what I was hearing and see what I was seeing. Being able to take your camera and video everything that you are experiencing in the woods is being able to tell your story. It gives the viewer an opportunity to see what you saw, hear what you heard and feel what you felt. You will need a passion for that in order to overcome the difficulties that come along with filming.
  • Passion for new challenges: It is an understatement to say that filming your hunts is a challenge. It is actually beyond a challenge to be able to put it all together and film a successful hunt, but it sure is fun trying. One of the hard parts is learning all of the new things that make you better at filming your hunts. Anything from positioning your camera to learning how to edit your videos. Each one of these things can provide its own set of challenges, so you will need to be excited about learning new things. If you have a passion for new challenges then you are going to love filming your hunts.


 Final Thoughts On Self-Filming Your Hunts

There are so many more things that can be written on the subject of filming hunts.

The further you dive into the process more questions will come about camera equipment, editing, producing episodes for social media, etc. However, if there was one more piece of advice I could give you on this subject, it would be to remind you to have fun.

The camera is just a great way to share the memories of the love of the hunt, it is never meant to replace the love of the hunt. Sometimes the pressure of trying to get it all to work out on film can rob you of the fun of the sport of hunting.

Make up your mind before you begin the journey that you will always love the hunt more than you love the camera.

Casey Johnson of Huntreal Outdoors
Casey Johnson is the founder of Huntreal Outdoors. Follow their Instagram and you can also follow Casey’s story on his YouTube channel.

Surface Explosion | Best Top Water Lures For Bass

on . Posted in Blog, Fishing

One of the most visual and fun ways to catch bass is with a topwater lure.

When you can actually see a monster largemouth fly through the water column and breach the surface, your adrenaline will be pumping to the max.

So, let’s take a look at some of the best topwater lures for bass as well as some tips and tricks for increasing hookups.

West Wells holding largemouth bass wearing N1 Outdoors fishing shirt

Topwater fishing for bass can be an experience you won’t soon forget. Let’s check out some different types of topwater options…

Best Topwater Lures for Bass | The Rundown

In this section, we will mention some top-tier topwater lure brands, but the main point is to cover the types of topwater lures, not necessarily specific models.

You can click any of the links below to jump straight to that particular topwater lure.

1. Hollow-Body Frog

hollow body frog for topwater fishing

A hollow-body frog is a great option where there is vegetation or other potential for snags on the surface of the water. (Photo: Drew Pierce)

“Frogging” is one of the most popular topwater strategies, as big bass love to munch on frogs. This is especially true in areas with algae, lily pads, and other things on the surface. Because the hooks are tucked into the backside of the lure body, you will not snag everything you hit on the surface.


LIVE TARGET Hollow Body Frog, 2.25", Green Yellow
$14.86
Buy Now
We earn a commission if you make a purchase, at no additional cost to you.
01/23/2025 02:39 am GMT


We specifically denote the hollow-body variation because it is the most common and easy to use. There are other types of topwater frogs, but this one tends to be the most versatile.

Companies like Scum Frog and Booyah do a great job of crafting hollow-body frogs. Once you can learn to walk the frog, the bites will come in full force.


2. Popper Lure

popper lure for bass

Poppers, when jerked, throw water in a forward motion, creating water disturbance that get bass’ attention. (Photo: Drew Pierce)

Especially for smallmouth, poppers are great topwater lures that provide more extreme action. Rather than being subtle with your action, poppers are made to throw water forward and cause a disturbance on the surface.

These are hard-bodied lures that feature two treble hooks on the bottom. The cupped mouth allows for the popping of water. With this build, it is perfect in open, clear water as it will not work correctly if it comes in contact with items on the surface.


Strike King KVD Splash Jr. / Natural Shad, 2 1/4-inch
$9.99
Buy Now
We earn a commission if you make a purchase, at no additional cost to you.
01/23/2025 03:28 am GMT


3. Buzzbait

buzzbait topwater bass lure

Buzzbaits are like a spinner bait that runs on the water’s surface, and they can lead to some violent topwater blowups! (photo: Drew Pierce)

Buzzbaits are basically spinnerbaits with a propelling tool. So, instead of diving down into the water column, they stay on the water’s surface and provide a sort of bubbling effect.

This gurgling and spinning is super enticing to bass and can be used in a variety of situations.

Use the same colors as you would with a spinnerbait, as white and chartreuse and black and blues can get the job done.


Megastrike Cavitron Buzzbait (1/4-Ounce, Gold Blade Chart/White Skirt)
Buy Now
We earn a commission if you make a purchase, at no additional cost to you.


4. Spook

spook topwater lure

While spooks can be expensive, there are many simple versions in basic colors that can help you land a topwater bass. (photo: Drew Pierce)

Although spooks are usually used in saltwater, bass spooks provide awesome action to seek out the larger fish. Spook lures are long, tube-like lures that are walked on the surface.

Spooks provide serious, big action that will weed out the smaller bites and focus on the trophies.

Spooks can be quite expensive, and there is really no reason to spend hundreds of dollars on the high-end stuff. Keep it simple with the classic colors, and spend your time perfecting the action.


Heddon Super Spook Topwater Fishing Lure for Saltwater and Freshwater, Red Head, Super Spook Jr (1/2 oz)
$8.49
Buy Now
We earn a commission if you make a purchase, at no additional cost to you.
01/23/2025 02:28 am GMT


5. Jitterbug

jitterbug lure

The Jitterbug is a topwater classic that mimics bugs on the water’s surface. (photo: Northwoods Lures)

A lure that is somewhat similar to a popper is the Jitterbug.

The classic Jitterbug is made by Arbogast, and has a bit of a different action from it’s cousin, the popper.

The Jitterbug features a couple-cupped front lip. This gives the Jitterbug a back-and-forth motion, so it can be used with a steady cadence.

Jitterbugs are also a bit smaller and chunkier than poppers, so they are good about imitating bugs that are warbling on the surface. Black and green is a really popular color for the Jitterbug, so keep that in mind.


Jitterbug Topwater Lure, 2", 1/4 oz, Frog/White Belly, Floating
$12.50
Buy Now
We earn a commission if you make a purchase, at no additional cost to you.
01/23/2025 02:38 am GMT


6. Popping frog

popping frog topwater bass lure

Popping frogs have a lip similar to popper lures that works well in open water. (photo: Drew Pierce)

Obviously, the first item on our list was the hollow-body frog, but a popping frog deserves its own section.

Popping frogs have cupped mouths to provide that popping action on the surface. This lure has its own section because the action and use is completely different.

A popping frog is best in open water and near edges rather than in the muck.  This type of action is super enticing and will add some spice when a regular frog isn’t getting it done.


Rebel Pop'N Frog Fishing Lure, Cricket Frog, 1 7/8 inches
$9.41
Buy Now
We earn a commission if you make a purchase, at no additional cost to you.
01/23/2025 02:53 am GMT


7. Floating Minnow

floating minnow for bass

A floating minnow resembles a jerkbait, but can be worked with “twitching” of the fishing rod. (Photo: Rebel, Amazon)

Finally, we have the floating minnow. A floating minnow looks exactly like a jerkbait, but you do not have it dive down into the water column, but rather work it on the surface.

The bill is there to shift the lure side to side and provide a swimming action. With the hard body and two treble hooks, hookups are strong and easy.

The key to a good floating minnow is a colorway that looks as natural as possible. When you pair a good color with the right action, you are in a great place for success.


Rapala Original Floater 05 Fishing lure ( Fishing lure (Gold, Size- 2)
$9.99
Buy Now
We earn a commission if you make a purchase, at no additional cost to you.
01/23/2025 02:33 am GMT


Topwater Bass Fishing Tips

Now that we’ve covered 7 of the best topwater lures for bass, let’s cover some tips that will help you get more topwater blowups!

Find a cadence

With many topwater lures, you need some sort of consistency. With a frog, you want to “walk” it back and forth on the surface. This gives your lure a super realistic action that bass love to munch on.

With lures like the buzzbait, this is much easier, as you just need to reel it in at a steady pace.

Either way, find what your bass wants to bite and keep it consistent once you have some success.

man holding largemouth bass wearing N1 Outdoors fishing shirt

Sometimes finding the right cadence is all it takes to get the topwater action to heat up.


Mix up the colors

Believe it or not, the colors of your topwater lure do matter when it comes to fishing for bass.

It might seem useless to put thought into the color because the bass are below and you might be thinking they can’t tell the differnece. That is not the case.

You need to put some thought into the colors of your lures and mix them up if something is not working. If a certain frog has an unappealing shade when the bite is slow, mix things up and it might get the job done.

colorful topwater frog lure

Color is an important factor in choosing the right topwater lure for the situation. Don’t be afraid to mix things (and colors) up!


Find structure

Similar to any bass fishing strategy, structure matters.

When there is structure under the surface, there are likely bass chilling there. Just because you are working a topwater lure doesn’t mean that structure doesn’t matter.

So, when you can find structured areas, you’ll likely find bass willing to come to the surface and strike your lure. Working across points and over structure will increase your bites tremendously.

fishing structure log in water

Just because you’re fishing topwater doesn’t mean you shouldn’t find structure. Find the structure and find the fish.


Final Thoughts On Topwater Lures For Bass

If you are new to the topwater game, it can be so much fun. You’ll see, when a huge bass rams through the surface and bites your lure, the feeling is like no other.

Use these lure recommendations and tips to give you a good starting point for topwater fishing. Good luck, and put a hook N1!