magnus stinger buzzcut vs black hornet

Magnus Broadheads Review | (Buzzcut and Black Hornet battle)

In this broadheads review, I tested the Magnus Stinger Buzzcut and the Magnus Black Hornet… and I tested them head-to-head!

Needless to say, I was really excited about this broadheads battle.

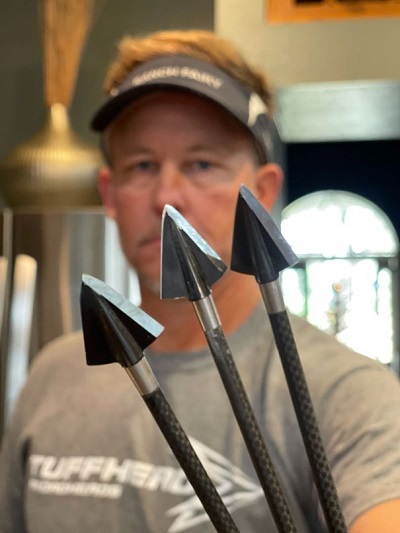
john lusk holding magnus buzzcut and black hornet ser razor broadheads

I tested the Magnus Stinger Buzzcut broadheads previously, but wanted to put them through more testing.

I wondered if I should call it, “The battle of the Magnuses…. or maybe “The battle of the Magni!”

I tested both the Magnus Stinger Buzzcut and the Magnus Black Hornet Ser Razor in 125 grains.
Both of these heads have the serrated edge. A serrated edge is more efficient than a straight edge. While a straight edge is better at chopping motion, the serrated edge is better for a slicing motion, and it holds its edge better. So, I like that Magnus has integrated that design into their heads.
Why the (Re)-test of the Magnus Broadheads?

Before we get to the results, let me explain why I did this test.

In my earlier days of doing broadhead testing, I was a bit harsh on some of the heads that didn’t utilize the premium steels that some other companies utilize. And, one of those that I was a bit harsh on was the Magnus.

The fact is, these broadheads have taken a ton of animals all over the world. They also come in at a really good price point. They have a lifetime warranty and they have a very loyal following.

And so, in recent times, I thought, “You know what? Let me rethink the way I critiqued them in the past and put them through some more testing.”

So, I purchased two packs of these and put them through the test. Let’s see how they did…


Broadhead Testing Format

I retested the Magnus heads with the same format that I have recently been testing with, so that all my tests have a consistent format. This way, you can look at all the different broadhead reviews and see how they measure up to one another.

  1. Long Range Flight: In this test, I shoot the heads on a range to see how well they fly at longer distance.
  2. Penetration: For the penetration test, I use a multifaceted medium consisting of ½” layer of MDF, surrounded by 1/3” layers of rubber foam matting, followed by clear ballistic gel. Because the gel is clear, I can measure it precisely to see how well each of the heads penetrated through that medium. I use MDF rather than plywood, because plywood grain can be very inconsistent. And, while MDF is not perfect, it’s much more consistent than plywood.
  3. Edge Retention: I shoot the heads through a 22-gauge steel plate for a maximum of five times. During the test, if the edges of the blades begin to get really mangled, then I stop. I give two points for each time the head was able to be shot through the steel plate without significant damage. The maximum a broadhead can get in this test is 10 points.

In this review, I’m using my Bowtech SR6 with a 27-inch draw at 72 pounds. I’m shooting a 460-grain Bishop FOC King Arrow. I’m using FOBs and I’ve got a Nockturnal lighted nock on the end of the arrow shaft.

So let’s learn a little bit more about these heads and then see how they performed!


#ad

WOSPORTS NV400 Night Vision Binoculars
Buy Now
We earn a commission if you make a purchase, at no additional cost to you.

Stinger Buzzcut and Black Hornet Ser Razor overview

magnus stinger buzzcut and black hornet broadheads
Here, you can see the two heads. The Stinger Buzzcut is on the left, and the Black Hornet Ser Razor on the right. You can see the total length difference… the Black Hornet Ser Razor is significantly shorter and has a wider cut. The Black Hornet has a 1-1/4-inch cut, the Stinger has 1-1/8-inch cut.
magnus stinger buzzcut and black hornet broadheads bleeder blades
The Stinger Buzzcut and the Black Hornet have different bleeder blades as well. In the 125-grain version of these heads, the Stinger has 6/8-inch of cut in the bleeders and the Black Hornet has a 7/8-inch cut in the bleeders.

Magnus 4 Blade Hornet Ser-Razor Broadhead (3-Pack), Black, 100-Grain
$39.47
Buy Now
We earn a commission if you make a purchase, at no additional cost to you.
09/12/2024 04:23 pm GMT

Long-range flight test results

I shot bot the Buzzcut and the Black Hornet from 70 yards and was able to pop a balloon. The black hornet flew very closely to a field point at this distance as well.

Stinger vs. Black Hornet in Penetration Test

First, I shot the Stinger Buzzcut and then the Black Hornet. Below you can see the penetration results.

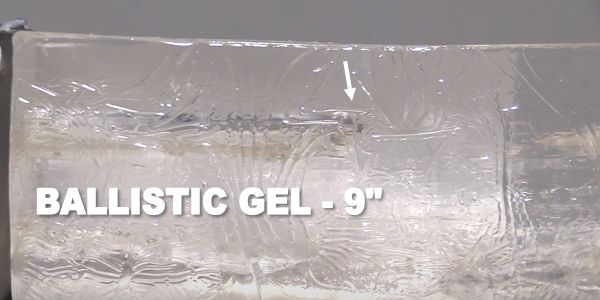
penetration of the magnus stinger buzzcut and the magnus black hornet into ballistic gel
Here you can see the penetration into the gel… They penetrated very well. This is some of the best penetration that I’ve seen. The Black Hornet on the bottom penetrated a full 9 inches and the Stinger on the top penetrated 9-1/14 inches.

Edge retention test results

I shot both of the Magnus Stinger and then the Black Hornet into a 22-gauge steel plate.

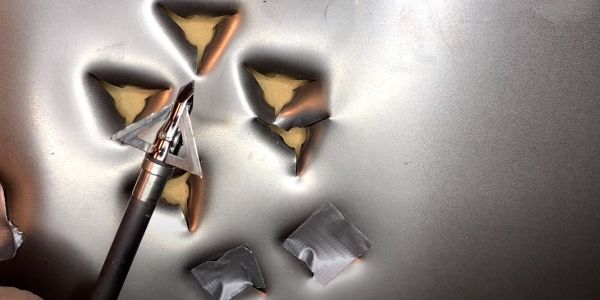
buzzcut and black hornet in steel plate
Here’s the hole size that you can see the difference in and that’s just the same as the cutting diameter. You can see that the Black Hornet, a bit wider on the right. And the Stinger on the left, not quite as wide.
magnus stinger buzzcut and black hornet shot into steel plate 5 times each
I shot both heads 5 times each into the 22-gauge steel plate.
tips of magnus buzzcut and black hornet broadheads after being shot 5 times into steel plate
Here you can see the damage to the heads (or the lack thereof). On the right, the Black Hornet held up very well through five shots into the steel plate. The tip got a little bit folded over. You can see that it just slightly folded over to the left. The Stinger held up remarkably well also. You can see the very tip got a little bit rolled over as well. But, they both held up extremely well for five shots through the steel plate.

Stinger Buzzcut 4 Blade Arrow Broadhead (Pack of 3), 125-Grain
$39.99
Buy Now
We earn a commission if you make a purchase, at no additional cost to you.
09/12/2024 03:59 pm GMT

Magnus Stinger and Black Hornets Post-Review

So, what do you think of the Magnus broadhead battle? I guess it’s not really a battle, because they are both Magnus heads and they are both great. Each head performed very well. Honestly, they both did better than I expected.

The flight was very good, out to long range.

The penetration was very impressive; 9 inches and 9-1/4 inches. The Stinger penetrated just slightly better than did the Black Hornet.

And then through steel, both of them held up extremely well through the steel plate and kept their edge through five shots.


Final Thoughts and Score Cards on Stinger Buzzcut and Black Hornet

So, I would just say that overall, both of these broadheads are winners. If you’re going to choose one or the other, I would say if you have a lighter setup, where you’re shooting less kinetic energy and less momentum, then maybe you want to go with the Stinger. It has a smaller cut. It’s going to be prone to penetrate a little bit more deeply.

If you have a heavier setup that produces more KE, and you’re looking for that extra cut, you’re getting an extra 1/8-inch cut in both directions with the bleeders and the main blades in the Black Hornet. They are also much thicker blades. So, they should be less prone to bend if they hit a heavy bone.

These are both great heads for my purposes. But, if I’m taking one out in the deer woods, it’s going to be the Black Hornet.


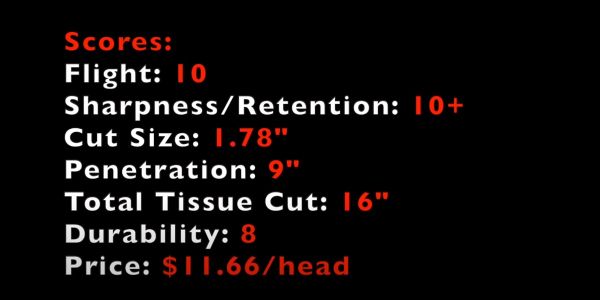
magnus stinger buzzcut scorecard
Magnus Stinger Buzzcut Final Scorecard.
magnus black hornet scorecard
Magnus Black Hornet Buzzcut Final Scorecard.
ozcut hurricane test header image

Ozcut Hurricane Broadheads Review | The Inside Information

In this review, I tested the Ozcut Hurricane broadheads.

Ozcut is a company outside of Australia and the time of this review, they are a relatively new company. I’ve been intrigued by these broadheads and was excited to test them out.

I have a passion for single bevel heads. So, I love it when someone comes out with a single bevel, 3-blade head.

Now, I’ve seen some other single bevel multi-blade heads that had some design flaws that prevented them from getting the full benefit of the single bevel.

However, I was intrigued by this one for a few reasons that we’ll get into right now.

ozcut hurricane broadheads
Ozcut hurricane broadheads

My Initial Impression of the Ozcut Hurricane

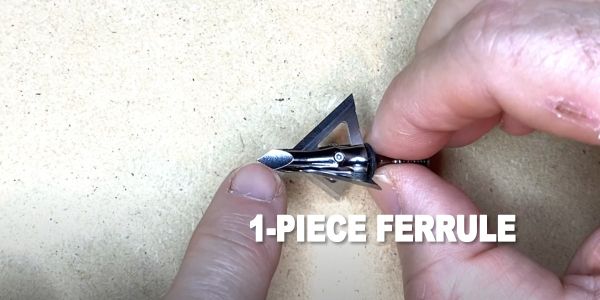
First of all, the Hurricane is one piece, solid construction, and made out high-carbon steel.

The blades are really thick. And, for a single bevel to be of a benefit, they need to be thick like that.

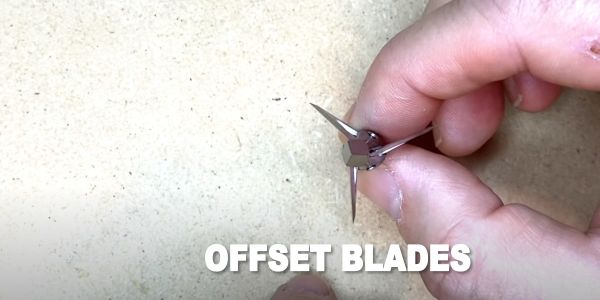
There’s a nice tanto tip, so it’s a really durable tip and the back of the blades are sharpened. So, if it doesn’t go all the way through the animal, that head is going to stay in there doing some cutting. It also makes it easier to pull them out of your target.

So, there’s a lot about this head that I really like. I did some of my normal testing. I shot it through a couple of different layers of MDF with a rubber foam mat in the front. I also shot it at long distance. And, I shot it through some steel as well as into a cinder block. I also shot into ballistic gel to test rotation.

So, let’s see how the head holds up, how it penetrates, and how it does in this testing.


OZCUT Hurricane 125 gr. Broadhead, 3PK
$39.99
Buy Now
We earn a commission if you make a purchase, at no additional cost to you.
09/12/2024 03:12 pm GMT

The cutting diameter on the Ozcut Hurricane broadhead is 1-1/16 inches.


Long Range Flight

The Ozcut Hurricane flew exceptionally well in the long-range shot testing. I was able to pop a balloon at 80 yards with ease.

Penetration Testing

The first penetration test was through MDF boards that had a layer of foam matting in front of them…

ozcut hurricane broadheads s-cut into mdf and foam

On the entrance into this foam mat, you can see you got a little bit of rotation from the Hurricane as evidenced by the “S-cut.”

ozcut hurricane first layer mdf penetration

Here, you can see the penetration through the first board right there.

ozcut hurricane penetration in second and third layer of mdf

And then through the second MDF board…

ozcut hurricane penetration in 3rd layer of mdf
edge retention ozcut hurricane after shot into mdf board

Upon inspection of the head after going through two layers of MDF, you can see that there are no signs of wear whatsoever. The edges maintain very well and they still shave nail.


Spot-Hogg Archery Products Spot Hogg Double Pin .019 Fast Eddie Sight, Right Hand, Black
$279.98
Buy Now
We earn a commission if you make a purchase, at no additional cost to you.
09/12/2024 04:23 pm GMT


Steel Plate Penetration Test

In the next penetration test, I shot the Ozcut Hurricane into a steel plate, followed by a layer of MDF behind it.

hole in steel plate from ozcut hurricane

There’s the hole of the steel plate. It made a nice, good triangular hole and you can see again the offset blades making that extra “S-cut.”

ozcut hurricane blades after the steel plate test

See the head after it went through the steel plate. You can see that the edge got quite a bit nicked up and dulled. You can see it here on the edges. Overall, it did well. And the structural integrity of the head was fantastic. This has now gone through three layers of MDF and one layer of steel plate there. But, the edges did get more dinged up than I would have expected.


Cinder Block Test

Because it’s a solid machine broadhead, I shot the Hurricane into a concrete block. Not many heads have held up really well through this. the Bishop held up well, and also the Iron Will. The Tooth of the Arrow broadheads, Exodus, and A-TAC broadheads also held up quite well.

Let’s see how the Ozcut does.

cinder block after ozcut hurricane broadhead shot at it

Here’s the chunk (right side) that the Hurricane head took out of the concrete block. Not as big as some of the other broadheads that I’ve shot but it did penetrate and take a chunk out of it.

ozcut hurricane blades after cinder block test

The Hurricane broadhead after it went into the concrete block. You can see that it got mangled quite a bit. It’s hitting concrete, so I understand that. (We are not hunting concrete. I understand that. But, I was testing it to see its overall durability and it stayed in one piece). If this did go into an animal like that, it would stay in there still cutting away but it did get mangled beyond repair going into the concrete.


Nockturnal Fit Universal Size Green Lighted Arrow Archery Nocks, 3 Pack, Model:NT-305
$33.29
Buy Now
We earn a commission if you make a purchase, at no additional cost to you.
09/12/2024 04:44 pm GMT

Ballistic Gel Test

I was curious to see how the rotation of the Hurricane would do in a ballistic gel. So, I shot it into the ballistic gel (below). I also had some MDF behind it.

In this test, I compared it to a single bevel, 2-blade head, the Bishop Scientific Method to see how it rotates in the same medium. I also compared it to the Exodus broadheads.

ozcut penetration through ballistic gel compared to exodus broadheads and bishop scientific method

You can see the penetration difference between these three heads as they all go through the gel and then stop. You see at the top, you see the Exodus that came in third and then you see the Ozcut Hurricane came in first right below that and then you see Bishop Scientific Method 2-blade right below that.


ozcut hurricane channel in ballistic gel

You can see the wound channel of the Ozcut in the middle. The lighter areas are where the blades are rotating around. It looks like it almost made one full rotation.

ozcut broadhead cutting diameter in mdf board
This the second layer of MDF after going through the ballistic gel. The Hurricane went through the first layer and then bulged out of the back of the second layer. This is where it went into that second layer. It doesn’t have the biggest cutting diameter, but it does make a really cool cut. You see it’s not just a typical 3-blade cut. You get a good glimpse of that S-rotation and that weird angle that it’s cutting at. You can imagine what that would be doing to tissue in an animal.


Final thoughts on the Ozcut Hurricane

So there you have it, the Ozcut Hurricane. This broadhead is a winner. There’s a lot I really like about it. It flies really well.

They say the single bevel design helps to speed up the rotation. I can’t verify that because I can’t quantify the rotation. But, I can tell you, I shoot a lot of single-bevel heads at long range and man, this one was really easy to pop balloons with. It was automatic.

report card for ozcut hurricane broadheads
Here is the report card for the Ozcut Hurricane broadheads.


I would say this is amongst the very best shooting long-range, solid fixed-blade broadheads that I’ve ever shot. I can’t think of any that fly better than this.

This head is right up there with the A-TAC. It just flies really well.

This head also penetrates really well. You can see through all those mediums and where it rotated really well through the gel. You could see that S-cut in the steel and see it starting into the wood as well.


Possible Improvements

There are two things about this head that I think they could have done differently.

What could have made it like even better is using a higher quality steel. Not that this is bad – it’s a good machined head, out of a solid chunk of carbon steel. But, when you’re using a single bevel broadhead, the rotational force and the pressure that is put on that one blade angle is intense. This calls for premium steel.


After shooting it a few times, you can see where it gets dinged up.

In addition, it’s not super easy to find that bevel to sharpen it just right.

I also wish there was a larger cutting diameter. And, although it penetrates really well, the 1-1/16 inch cutting diameter is not the best for opening up a very big hole. I just wish it was bigger.

If it was like 1-1/8 inch, even or 1-1/4 inch, that would be awesome. If it was just a little bit bigger entrance and exit hole, I would like it even more.

So, what is this type of head great for?

As it is, this would be a great elk or moose head for lower kinetic energy setups. I think it could also be great for deer hunting, for big hogs, bears or African plains game.

So, really cool design, really cool head. Give it a look.

diy lighted nocks

How to make your own lighted nocks for bowhunting

Ever wanted to make your own lighted nocks instead of spending a small fortune on the ones in the store or online? Well, I am going to show you step-by-step how to make your own lighted nocks for bowhunting.

Advantages of lighted nocks

Bowhunters understand that arrows and broadheads can be expensive. On top of that, you never want to lose the animal you just shot.

Now, if you lose your broadhead, your arrow, and your quarry, this can cause full-blown bowhunter’s depression.

That’s where lighted nocks come in.

diy lighted nock finished product

When you get finished, you’ll have something that looks like a regular arrow nock, but when the string impacts it, it will light up. Then, with a little pull back on the nock, you will be able to turn it off… all for about $2.50 cents each!

They can help you not only find your arrow in low light conditions, but in the event that you don’t get a pass-through shot, you will be able to get a better visual on where your deer or other game runs after impact.

For those of you who film your hunts, lighted nocks can also help you see the point of impact and other shot details upon video playback.


What you’ll need to get started making your own lighted nocks

There a few basic things you’ll need to get started making your own homemade lighted nocks:

  • Bobber lights (search for “bobber lights” on Amazon)
  • Arrow nocks (NAP and Carbon Express Launchpad precision nocks both sell nocks with a diameter large enough to house most bobber lights. They also tend to have a longer shaft, which gives you more room to house the bobber light).
  • Super glue
  • Sand paper (100-grit works great)
  • PVC pipe cutters or box cutter blade

Time needed: 2 hours

Step-by-step instructions to make your own lighted nocks:

  1. Remove (cut off) the back of an existing nock

    So the first thing we want to do is remove the back of an existing nock with the pvc pipe cutters. Be sure to cut evenly cut all the way around so there’s not a burr on it (if you get a burr, you can use the sandpaper to smooth it out).

    cutting lighted arrow nock with pvc cutters

  2. Be sure the end of the cut nock fits into the arrow shaft

    Once you have cut the end off of this nock, be sure it fits in shaft snugly. If you have a burr from cutting it, use the sandpaper to smooth it out.

    You want this part to be a tight fit in the arrow shaft, because whenever you get this inserted, you don’t want it to move back and forth when you’re pulling on the back of the full nock.

    making sure bottom of nock fits snugly in arrow

  3. Super glue the bobber light bottom into the back of the cut nock

    Put some super glue on the bottom end of the bobber light battery. Slowly insert the bottom of the bobber light into the cut nock.

    gluing end of bobber light into arrow nock

  4. Seal the bottom of bottom end of nock

    Put a small bead of super glue on the open end of the cut nock to seal it. You can then set that bottom onto a paper plate to let it dry (2 hours).

    sealing end of homemade lighted nock

  5. Super glue lighted end of bobber light into the full arrow nock

    Carefully put a bead of super glue aright around the top of the lighted part of the bobber light.

    Be careful not to get glue in between the lighted portion and the battery part of the bobber light. (This would glue the two parts together and prevent the light from coming on when the string impacts the nock). 

    When finished, let that part dry 2 hours.

    super gluing bobber light to insert into arrow nock

  6. Be sure a regular nock will twist easily inside arrow shaft

    BEFORE inserting the finished lighted nocks into the shaft, take one of your nocks that does not have a bobber light in it yet and be sure that when you insert it into your arrow, that you can still twist/move it back and forth fairly easily.

    If it’s too stiff to move/twist, then take your sandpaper and lightly sand around the long part that goes into the arrow shaft (NOT the cut end) until it moves well enough for you to be able twist it fairly easily with your fingers.

    sanding the bottom of lighted nock

  7. Align nock with arrow fletchings

    If you use a rest that requires your fletchings to be pointed a certain direction, be sure you insert the nock in such a way that you will achieve the proper alignment of your arrow with your rest.

    aligning diy lighted nock with arrow shaft

  8. Insert finished nock into arrow shaft

    Once both ends of the lighted nock have dried, and you’ve also sanded the light nocks well enough for the string end of your nocks to move/twist easily, insert the lighted nock into your arrow shaft.

    inserting homemade lighted nock into arrow shaft

  9. Test and shoot

    Once you have inserted the nock into the shaft, test it by pressing on it to turn the light on, and then untwist the nock until it turns off. Then you’re ready to shoot!

    (NOTE: you may need to do some fine tuning of your site, as the added weight at the end of the arrow may slightly impact your current bow site settings.

    pressing end of homemade lighted nock


Nockturnal Fit Universal Size Strobing Red & Green Lighted Arrow Archery Nocks, 3 Pack, Red & Green Strobing
$27.99
Buy Now
We earn a commission if you make a purchase, at no additional cost to you.
09/12/2024 04:44 pm GMT


DIY lighted arrow nocks: Conclusion

We hope that you have fun (and saving some money) making your own lighted arrow nocks. They will help you have a better visual on your arrow and/or wild game on your next bowhunting adventure.

If you’d like to watch a video of this DIY lighted nock process, check this out.

If you are hunting whitetail deer, mule deer, elk or any other game animal, be sure to keep honing your bowhunting skills and we hope you put a hole N1!

(P.S., if you liked this DIY project, check out my DIY deer mineral recipe how to article as well as my DIY euro mount instructions!)

diy lighted nocks shining while in target

The lighted nocks worked great and they fly great too! You can check out the below video for more help on making your own lighted nocks!